Tag: maintenance

  • Savage A40 PAPR Parts: Parts Lookup and Buying Checks

    Savage A40 PAPR Parts: Parts Lookup and Buying Checks

    Savage A40 PAPR Parts

    The ESAB Savage A40 PAPR setup uses multiple wear items and service parts that can age out before the helmet body does. For buyers and maintenance teams, the main task is not just finding a part number. It is verifying which component is needed, whether it matches the specific Savage A40 PAPR configuration, and whether the order is complete enough to keep the helmet in service.

    This guide focuses on lookup and buying checks for Savage A40 PAPR parts. Use it when you are replacing consumables, checking damaged items, or trying to avoid ordering the wrong lens, seal, hose, or headgear-related part.

    Key Takeaways

    • Start with the WSP lookup page for the Savage A40 PAPR system: Savage A40 PAPR Parts.
    • Do not assume every Savage A40 accessory fits every helmet variant. Verify the exact model and revision before ordering.
    • Wear items should be checked for cracks, loss of seal, scratches, distortion, or airflow issues before replacement.
    • If a detail is not confirmed on the lookup page, mark it as Unknown (Verify) and confirm it before purchase.
    • Use the lookup page as the starting point for parts identification, not as a substitute for the manufacturer’s service documentation.

    What to Verify Before You Buy

    For helmet and PAPR parts, a wrong order usually comes from skipping basic checks. Before submitting a purchase request, verify the following:

    • Exact product name: Savage A40 PAPR, not a different Savage A40 variant.
    • Helmet configuration: confirm whether you need helmet-only parts, PAPR-related parts, or both.
    • Part condition: inspect the existing part for damage and compare it to the replacement requirement.
    • Connection points: verify hose ends, seals, covers, and mounting points visually before ordering.
    • Revision or package details: if not clearly stated, use Unknown (Verify) and confirm with the seller or documentation.

    Practical Check, Inspect, Verify Steps

    1) Check the helmet body and outer surfaces

    • Check the shell for impact damage, heat distortion, or cracks.
    • Inspect the front and side areas for warped edges that could affect seals or covers.
    • Verify that any mounting points or retention areas are intact.

    2) Inspect the viewing and protection layers

    • Inspect outer lenses, inner protection layers, and covers for pitting, spatter damage, or clouding.
    • Verify that the replacement layer matches the existing format and attachment method.
    • If lens dimensions are not confirmed on the lookup page, record them as Unknown (Verify).

    3) Check headgear and comfort interfaces

    • Inspect the headgear straps, pivots, and adjustment points for wear or loss of tension.
    • Verify that the helmet still holds position during use.
    • Replace worn pads, straps, or retention components before they cause fit problems.

    4) Inspect PAPR-related airflow parts

    • Check hoses, inlet points, and seals for cuts, collapse, or loose fit.
    • Verify that airflow is unobstructed and that no part of the hose is pinched.
    • If the blower, filter, or battery status is not confirmed by the source page, mark those details as Unknown (Verify).

    How to Use the WSP Lookup Page

    The WSP lookup page is the correct first stop when identifying Savage A40 PAPR parts. Use it to confirm the part family and to narrow the replacement search. Open the page here: Savage A40 PAPR Parts.

    Use the lookup page to support these buying checks:

    • Confirm you are in the right system family.
    • Check whether the item is a replacement wear part or a larger service component.
    • Compare the page listing to the damaged part in hand before ordering.
    • Capture any unknown details for verification with the buyer, user, or supplier.

    If a replacement detail is not fully described, do not infer compatibility. Treat it as Unknown (Verify) until confirmed.

    Common Buying Mistakes

    • Ordering by helmet name alone without verifying the PAPR variant.
    • Replacing only the visible worn item while ignoring the seal, retention, or interface part that caused the failure.
    • Assuming a part from another helmet line will fit because it looks similar.
    • Skipping visual inspection and finding the wrong part only after the machine is down.
    • Using an unconfirmed spec or measurement as if it were confirmed data.

    Support Planning for Maintenance Buyers

    For shops that keep helmets in rotation, it helps to track the highest-wear items first. Build a short internal list of the parts that fail most often in your environment. For example, keep notes on lens wear, seals, hose damage, and headgear adjustment issues. If a part description is incomplete, enter the missing detail as Unknown (Verify) instead of guessing.

    Also document the unit ID, user name, and failure mode. That makes repeat orders cleaner and reduces returns. When a helmet is down, that record is often more useful than a generic “need parts” request.

    Safety Notes

    • Do not use damaged helmet, lens, or airflow components in a welding environment.
    • Verify protection items before returning the unit to service.
    • If airflow performance is questionable, remove the unit from service until inspected.
    • Replacement parts should match the intended system. Do not force-fit unknown components.

    FAQ

    How do I confirm I have the right Savage A40 PAPR part?

    Start with the WSP lookup page and compare the listed item to the part in hand. Verify the helmet variant, the mounting style, and the function of the part before ordering.

    What if the part description is incomplete?

    Treat the missing detail as Unknown (Verify). Do not assume compatibility or dimensions without confirmation from the seller, the manufacturer documentation, or a verified sample part.

    Can I use the lookup page as a procedure approval source?

    No. The lookup page is a parts identification starting point. It does not replace welding procedure approval, respiratory program requirements, or site-specific safety rules.

    What should I inspect first on a worn helmet setup?

    Check the lens stack, seals, headgear, and hose or airflow interfaces first. Those are common wear points and often explain fit, visibility, or airflow complaints.

    Sources Checked

    Details not confirmed on the provided source should be treated as Unknown (Verify).

    Disclosure: As an Amazon Associate, Weld Support Parts may earn from qualifying purchases.
    Related Weld Support Guides

  • ESAB PT-39 Torch Parts Breakdown: Parts Lookup and Buying Checks

    ESAB PT-39 Torch Parts Breakdown: Parts Lookup and Buying Checks

    ESAB PT-39 Torch Parts Breakdown

    The ESAB PT-39 Torch Parts Breakdown is a practical reference for maintenance buyers, welders, and support teams who need to identify replacement consumables before ordering. Plasma torches fail for simple reasons: worn electrodes, damaged nozzles, loose retaining parts, air leaks, or a torch assembly that does not match the machine setup. The right buying step is to verify the torch family and item number first, then inspect the worn parts against the parts breakdown before you place an order.

    This guide is not a substitute for the machine manual or the torch documentation. Use it as a buying and inspection aid. If a detail is not confirmed, treat it as Unknown (Verify).

    Key Takeaways

    • Confirm the exact torch model before ordering any PT-39 replacement part.
    • Match the item number on the parts breakdown to the worn component, not just the visual shape.
    • Inspect electrodes, nozzles, shields, and retaining hardware as a set.
    • Check lead condition, torch body damage, and air delivery before replacing consumables again.
    • Use the WSP lookup page as the primary source for part identification.

    How to Use the PT-39 Parts Breakdown

    Start with the parts lookup page and identify the component by item number, not by assumption. On plasma torches, two parts can look similar but differ in thread style, length, seat profile, or torch-family match. If you only compare pictures, the risk of ordering the wrong part is high.

    Check: the torch label, machine documentation, and worn part geometry.
    Inspect: the nozzle orifice, electrode pit depth, shield face, and retaining cap threads.
    Verify: the replacement item number against the WSP lookup page before purchase.

    Troubleshooting and Support Checks

    When a PT-39 torch starts cutting poorly, do not assume the consumables are the only issue. Plasma cut quality problems often come from a combination of wear and setup errors.

    1) No start or weak start

    • Check the torch lead connection and power source setup.
    • Inspect the electrode and nozzle for heavy wear, burn marks, or contamination.
    • Verify the consumables are seated correctly and tightened to the proper hand-tight condition per the equipment manual.

    If the torch parts are new and the problem remains, the issue may be in air supply, trigger circuit, or internal torch damage. Unknown (Verify) if the source is torch-related until the upstream system is checked.

    2) Arc dropout during cutting

    • Check for loose retaining parts or poor contact between consumables.
    • Inspect the nozzle opening for distortion and the electrode tip for uneven erosion.
    • Verify that the air supply is stable and clean.

    Arc dropout is often caused by consumable wear, but supply instability can produce the same symptom. Replace only the parts that are actually worn or damaged.

    3) Poor cut edge or excessive dross

    • Check cut speed, torch standoff, and work lead condition.
    • Inspect nozzle wear and shield damage.
    • Verify that the torch setup matches the intended cut mode and amperage range. Unknown (Verify).

    Do not buy consumables only by amperage label or general appearance. Match the parts breakdown first, then compare the physical wear pattern.

    Buying Checks Before Ordering Parts

    For buyers and storeroom teams, the important step is reducing return risk. Use these checks before placing an order:

    • Check the torch family: Confirm it is PT-39 and not another ESAB torch model.
    • Check item numbers: Use the parts breakdown item number for the replacement part.
    • Check wear history: If the torch repeatedly burns the same part, the upstream issue may be air quality or handling.
    • Check the machine record: Match the torch to the cutter or power source documentation.
    • Check packaging notes: If the listing does not clearly match the item number, do not guess.

    If a part description is unclear, keep it as Unknown (Verify) until the item number and torch family are confirmed.

    WSP Lookup Section

    Use the official Weld Support Parts page for the ESAB PT-39 torch to review the parts breakdown and item-number lookup:

    ESAB PT-39 Torch Parts Breakdown on Weld Support Parts

    This page is the starting point for identifying replacement consumables and related torch parts. Use it to compare the worn component to the listed item number before you buy.

    Practical Inspection Steps at the Torch

    Before replacing consumables, do a short field inspection:

    1. Lock out the system and make sure the torch cannot fire.
    2. Remove the consumables and lay them out in order.
    3. Inspect the electrode for crater wear, pitting, and heat damage.
    4. Inspect the nozzle for ovality, enlarged orifice, or spatter damage.
    5. Inspect the shield/retaining parts for cracks, thread wear, and burn marks.
    6. Inspect the torch body for heat damage, cracks, and contamination.
    7. Verify that the part numbers on the replacement order match the lookup page.

    This sequence helps prevent unnecessary parts swaps. If the consumables fail early, verify the air supply quality and torch handling before assuming the replacement parts are wrong.

    Safety Notes

    • De-energize the cutter before removing torch consumables or opening covers.
    • Let hot parts cool before inspection. Plasma tips and electrodes can retain heat.
    • Use eye protection and gloves when handling used consumables with sharp or hot edges.
    • Do not fire a torch with missing or loose parts.
    • If a torch shows burn-through, cracked insulation, or exposed conductors, remove it from service until repaired by qualified personnel.

    FAQ

    How do I confirm the correct PT-39 replacement part?

    Use the WSP PT-39 parts breakdown, then match the item number to the worn component. Do not order by appearance alone.

    What if the torch looks like another ESAB model?

    Treat it as Unknown (Verify) until the torch label, machine manual, and parts breakdown all match. Similar torch parts are not interchangeable by default.

    Should I replace only the electrode?

    Only if inspection shows the electrode is the only worn part. If the nozzle or retaining hardware is damaged, replace the matching consumables as needed after verification.

    Why do new consumables sometimes fail early?

    Early failure can come from air contamination, improper torch setup, loose parts, or handling damage. Inspect the whole torch system before ordering the same parts again.

    Sources Checked

    • Weld Support Parts: ESAB PT-39 Torch Parts Breakdown — https://www.weldsupportparts.com/esab-pt-39-torch.html
    • Internal link: Plasma Consumable Compatibility: How to Verify Torch Parts Before Ordering
    • Internal link: Plasma Cutter Pilot Arc Failure Troubleshooting: No Start, Weak Spark, Arc Dropout, and Torch Consumable Checks
    • Internal link: Plasma Drag Shield Compatibility Guide: Torch Family, Amperage, Nozzle, Retaining Cap, and Cut Mode Checks

    Disclosure: As an Amazon Associate, Weld Support Parts may earn from qualifying purchases.

    Related Weld Support Guides

  • Lincoln Electric KP2742-1-62R, Magnum PRO Recessed (1/8″) Gas Nozzle, Pack of (1): Replacement Part Breakdown

    The Lincoln Electric KP2742-1-62R Magnum PRO recessed gas nozzle is a consumable support part used on compatible MIG gun assemblies. For maintenance teams, the main issue is not just ordering the nozzle; it is confirming the gun style, thread/interface, recess requirement, and wear pattern before replacement. A wrong nozzle can create shielding gas problems, contact tip interference, spatter buildup, or a poor fit that keeps the gun down longer than the part itself should.

    This guide stays focused on practical replacement-part checks. It does not assume compatibility beyond the product listing. If your gun setup, liner package, or drive configuration is not confirmed, treat those details as Unknown (Verify).

    Key Takeaways

    • The KP2742-1-62R is a replacement gas nozzle, not a complete gun.
    • Recessed nozzle geometry affects access, spatter exposure, and how far the contact tip sits back from the work.
    • Fitment should be verified against the gun body, diffuser, tip holder, and thread style before installation.
    • If the old nozzle shows heavy spatter, heat distortion, or loose fit, inspect the rest of the front-end consumables before reassembling.
    • Use Unknown (Verify) for any gun compatibility detail not confirmed by the manufacturer documentation or your internal part records.

    What to Check Before Ordering

    For support buyers and shop leads, the first step is to confirm exactly what is worn out. Do not replace a nozzle by appearance alone.

    • Inspect the current nozzle: Look for arc strikes, ovalized bore, packed spatter, or heat discoloration.
    • Verify the gun model: Match the gun family and front-end system. If the gun is Lincoln Magnum PRO and the part number is KP2742-1-62R, verify the complete assembly stack, not just the brand name.
    • Check the recess requirement: Recessed nozzles change stickout and access. Confirm whether recessed geometry is required for the weld joint, joint access, or spatter control.
    • Verify the diffuser and tip style: A nozzle that fits the outer housing may still conflict with the diffuser or tip holder. Unknown (Verify) if the exact mating parts are not in your records.

    Install and Support Checks

    Use these checks during replacement and startup.

    1. Check the threads or retention method: Start the nozzle by hand. It should seat smoothly. Do not force cross-threaded parts.
    2. Inspect the gas path: Make sure the nozzle interior is clear of spatter, grease, and damaged seals.
    3. Verify tip position: Confirm the contact tip is centered and not contacting the nozzle wall. Any rub mark after a short test run indicates a fit issue.
    4. Check gas coverage at the first weld: Run a short bead on scrap and inspect for porosity, soot, or unstable arc starts. If the weld surface changes after nozzle replacement, verify shielding gas flow, leaks, and front-end alignment.
    5. Inspect after cooling: Recheck tightness once the gun has cycled through heat. Some loose conditions show up only after the first warm-up period.

    Troubleshooting Signs That Point to the Nozzle

    Not every arc problem is a nozzle problem, but the nozzle is often part of the failure chain.

    • Heavy spatter buildup: Often indicates excessive heat, poor gas coverage, or a damaged nozzle interior.
    • Poor gas shielding: Check for blocked flow, cracked nozzle, loose fit, or incorrect recess setup.
    • Burnback near the front end: Inspect the contact tip, stickout, and nozzle position. Do not assume the nozzle is the only cause.
    • Intermittent arc instability: Verify liner condition, drive roll tension, and wire feed consistency. For a related front-end maintenance reference, see the Lincoln Magnum PRO Gun Liner Replacement Guide.

    Replacement-Part Breakdown

    The Amazon registry item for this article is the Lincoln Electric KP2742-1-62R, Magnum PRO Recessed (1/8″) Gas Nozzle, Pack of (1), ASIN B008BJMKE6, with shortcode

    Lincoln Electric Magnum PRO Recessed (1/8") Gas Nozzle | 5/8" ID with 350 Amp Rating | Compatible with Magnum PRO Welding Guns | KP2742-1-62R
    • RECESSED NOZZLE - Recommended for medium to high amperage, spray and pulse applications
    • 5/8 INNER DIAMETER - Best for welds that require larger gas coverage.
    • KP2742-1-62R
    • Country of origin: China

    Last update on 2026-07-14 / Affiliate links / Images from Amazon Product Advertising API

    . No additional product specifications should be assumed unless they are confirmed from the manufacturer or internal part records.

    Use this item as a front-end consumable replacement when your existing nozzle is worn, damaged, or no longer maintaining consistent shielding gas coverage. If you are supporting a production line, confirm whether the replacement interval is based on appearance, weld count, or a maintenance trigger. Unknown (Verify) if no internal standard exists.

    Support Workflow for Maintenance Buyers

    A practical store-room process reduces mismatch and returns.

    • Check the old part number: Read the stamping or packaging if available.
    • Inspect the mating components: Verify the tip, diffuser, and nozzle seat for wear or spatter damage.
    • Match the gun family: Confirm the front-end stack against shop records.
    • Verify the failure mode: Replacing a nozzle will not solve liner drag, birdnesting, or drive-roll issues. For those checks, use the liner guide above.

    Safety Notes

    • Let the gun cool before handling the nozzle. Hot consumables can cause burns.
    • De-energize the welding system before front-end service.
    • Do not run a damaged nozzle if it restricts shielding gas or contacts the workpiece unexpectedly.
    • After replacement, verify gas flow and perform a short test weld on scrap before returning the gun to production.

    FAQ

    Is the KP2742-1-62R a complete torch or gun?
    No. It is a replacement gas nozzle only. Confirm the rest of the front-end parts separately.

    Will this nozzle fit every Lincoln Magnum PRO gun?
    Unknown (Verify). Fit depends on the exact gun model, front-end components, and retention style. Confirm against your existing assembly and manufacturer documentation.

    What if the nozzle keeps filling with spatter after replacement?
    Inspect gas coverage, tip condition, stickout, and heat input. Also verify the liner and wire feed system. A nozzle replacement alone may not solve the problem.

    Should I use recessed nozzle geometry for all jobs?
    No. Recessed geometry is application-specific. Verify the required access, joint profile, and shielding needs before standardizing it across jobs.

    Sources Checked

    • Provided Amazon registry product reference for ASIN B008BJMKE6
    • Weld Support Parts internal article: Lincoln Magnum PRO Gun Liner Replacement Guide
    • Task-provided product title and slug

    Disclosure: As an Amazon Associate, Weld Support Parts may earn from qualifying purchases.

    Related Weld Support Guides

  • ESAB MT-200 Gun Parts Breakdown: Parts Lookup and Buying Checks

    ESAB MT-200 Gun Parts Breakdown: Parts Lookup and Buying Checks

    ESAB MT-200 Gun Parts Breakdown

    The ESAB MT-200 gun is a serviceable welding and cutting support item, but the part names, item numbers, and wear points need to be matched carefully before ordering. A breakdown article is useful only if it helps you identify what is on the gun, what is worn, and what must be verified before a purchase. This guide focuses on parts lookup discipline, inspection steps, and buying checks using the Weld Support Parts lookup page for the ESAB MT-200 gun assembly.

    Key Takeaways

    • Use the item-number lookup first. Do not guess from appearance alone.
    • Separate assembly-level needs from service-part needs before you order.
    • Inspect wear, thread condition, sealing surfaces, and electrical continuity where applicable.
    • Match the exact MT-200 gun variant and connection style before buying.
    • When a detail is not confirmed, mark it as Unknown (Verify) instead of assuming compatibility.

    What the ESAB MT-200 Gun Parts Breakdown Is For

    A parts breakdown is a reference for identifying subassemblies and replacement items by position or item number. For the MT-200 gun, that usually means separating the gun body, handle components, triggers or switches, leads, liners or internal paths where applicable, tips or end components, and any external hardware used to secure the assembly. The exact structure of the assembly should be verified against the lookup page rather than assumed from other ESAB guns.

    If you are troubleshooting intermittent performance, the common failure is not the whole gun. It is often one worn item, one loose connector, or one damaged consumable. The breakdown helps you identify the minimum part set needed to restore function.

    How to Use the WSP Lookup Page

    Start with the Weld Support Parts reference for this gun: ESAB MT-200 Gun Parts Breakdown. Use it as the item-number source of record. If your maintenance team keeps a log, record the item number exactly as shown on the page before checking stock or placing an order.

    Check:

    • Gun model marking on the assembly.
    • Item number or callout on the breakdown page.
    • Any variation in handle, lead, or connector style.
    • Whether the needed item is a full assembly, a subassembly, or a wear part.

    Inspect:

    • Cracks in the handle or outer shell.
    • Heat damage near the front end or cable entry.
    • Loose fasteners, stripped threads, or missing retainers.
    • Signs of arcing, discoloration, or contamination.

    Verify:

    • That the item number on the WSP page matches the failed part position.
    • That the replacement is not a similar-looking part from a different gun series.
    • That any connection or interface detail is known, or marked Unknown (Verify).

    Troubleshooting by Symptom

    1) Poor output or unstable performance

    If the gun is not performing consistently, start with the simplest checks.

    Check: the front-end wear items, visible damage, and the condition of the cable or lead.

    Inspect: for loose connections, bent hardware, or contamination at contact points.

    Verify: whether the issue follows the gun or stays with the machine. If the issue stays with the gun, the fault is likely in the gun assembly or a wear component.

    2) Mechanical damage

    Handle damage, broken retainers, and damaged front-end components can create intermittent issues and make the gun unsafe to handle.

    Check: for cracks, missing fasteners, and exposed internal parts.

    Inspect: the trigger area, strain relief, and front-end section for impact marks.

    Verify: whether the damaged item is sold as a separate part or only as part of a larger assembly.

    3) Fit-up or replacement mismatch

    Wrong-order purchases happen when the buyer uses only the model name and ignores the item number. The MT-200 name alone is not enough for a safe purchase decision.

    Check: the part callout and the physical mounting or connection points.

    Inspect: the old part for labels, molded numbers, or unique geometry.

    Verify: any uncertain compatibility detail as Unknown (Verify) before issuing the purchase request.

    Buying Checks for Maintenance Teams

    Before you buy, confirm the part role and the scope of replacement. A shop can waste time and budget by replacing a complete assembly when only a small service part is needed. The opposite also causes downtime if a worn lead or front-end component is left in service.

    Use this checklist:

    • Identify the failed item by position on the breakdown.
    • Confirm whether you need an assembly, subassembly, or consumable/service item.
    • Match the item number from the WSP page.
    • Confirm the gun variant and any connection detail.
    • Record Unknown (Verify) for any data you cannot prove from the source.
    • Save the old part until the replacement is installed and tested.

    If your purchasing process requires a second check, have the welder or technician mark the worn item on the physical gun and compare it with the lookup page before release.

    What to Record in the Maintenance Log

    Good records reduce repeat mistakes. Log the model name, item number, failure symptom, date removed, and whether the gun was returned to service or sent for further inspection. If the part description is unclear, add Unknown (Verify) rather than guessing. That helps the next buyer avoid a mismatch.

    Safety Notes

    • De-energize and isolate equipment before inspection or disassembly.
    • Do not test a damaged gun with exposed conductors or broken insulation.
    • Replace damaged parts before returning the gun to service.
    • If there is heat damage, arcing evidence, or melted insulation, stop and inspect the full assembly.

    FAQ

    How do I know which MT-200 part to order?

    Use the item-number lookup on the Weld Support Parts page, then match the failed component to the callout position. Do not order by appearance alone.

    Can I replace only the worn section instead of the whole gun?

    Often yes, but only if the breakdown shows that part as a separate service item. If that detail is not confirmed on the lookup page, mark it Unknown (Verify).

    What if the old part has no readable label?

    Use the physical location on the gun, the shape, and the breakdown item position. If you still cannot confirm it, hold the order until the item is verified.

    Why does the same MT-200 name still require verification?

    Because variant details, connection interfaces, and subassembly layouts can differ. The model name is not enough to confirm compatibility.

    Sources Checked

    For procurement, the rule is simple: inspect the failed gun, verify the item number, and only then buy the replacement. If any detail cannot be confirmed from the source, treat it as Unknown (Verify) until it is checked.

    Disclosure: As an Amazon Associate, Weld Support Parts may earn from qualifying purchases.

  • Thermal Dynamics 7-5200 Torch and Leads, SL60 1Torch, 75 Deg Head, 20 ft Leads, O2B Connection: Product Breakdown

    Thermal Dynamics 7-5200 Torch and Leads, SL60 1Torch, 75 Deg Head, 20 ft Leads, O2B Connection: Product Breakdown

    Product not found.
    “>Thermal Dynamics 7-5200 Torch and Leads, SL60 1Torch, 75 Deg Head, 20 ft Leads, O2B Connection

    The Thermal Dynamics 7-5200 Torch and Leads, SL60 1Torch, 75 Deg Head, 20 ft Leads, O2B Connection is a plasma torch-and-leads assembly listed for support and replacement use. For buyers and maintenance teams, the main job is not just identifying the nameplate description. It is confirming fit, connection type, torch head orientation, lead length, and wear-part support before the torch goes into service.

    Key Takeaways

    • This is a torch-and-leads assembly, not a complete plasma system.
    • The listed configuration includes an SL60 1Torch, 75 degree head, 20 ft leads, and O2B connection.
    • Compatibility with a specific power supply is Unknown (Verify) unless confirmed from the equipment manual or a qualified distributor source.
    • Before installation, verify connection style, lead condition, torch body orientation, and consumable availability.
    • Use the exact product listing and part identifiers when ordering support items.

    What this product is used for

    This assembly is intended for plasma cutting support applications where a replacement torch and lead set is needed. The short product description states that the 1Torch RPT torch is designed to work with a wide range of plasma power supplies, including high frequency start, CD start, touch start, and moving parts or blow-back start systems. That statement comes from the product source, but exact machine compatibility for this specific setup remains Unknown (Verify) until the power source model is checked.

    For maintenance buyers, the practical question is whether the torch matches the machine-side connection and the operational setup on the shop floor. If the connection or start method does not match, the torch may not function correctly or may require adapters or alternate parts that are not identified here.

    Product and parts breakdown

    • Product title: Thermal Dynamics 7-5200 Torch and Leads, SL60 1Torch, 75 Deg Head, 20 ft Leads, O2B Connection
    • Product type: Torch and leads assembly
    • Torch family: SL60 1Torch
    • Head angle: 75 degree head
    • Lead length: 20 ft
    • Connection: O2B connection

    Any deeper compatibility detail, duty rating, amperage range, or consumable set mapping is Unknown (Verify) from the provided source. Do not assume torch ratings from the name alone.

    Check, inspect, verify before use

    Check

    • Check the torch body for cracked insulation, heat damage, or bent components.
    • Check the 20 ft leads for cuts, flattened sections, burn marks, or loose outer jacket areas.
    • Check the machine-side and torch-side connection points for contamination, damaged threads, or worn seals.

    Inspect

    • Inspect consumable seating and torch head alignment before energizing the system.
    • Inspect the 75 degree head for fit-up clearance against the workpiece and fixture layout.
    • Inspect the cable path for pinch points, hot surfaces, and sharp edges that could shorten service life.

    Verify

    • Verify the power supply connection matches O2B before installation.
    • Verify the machine manual and torch documentation for approved start method and torch interface.
    • Verify consumable type and part numbers using the actual torch identification and source documentation.
    • Verify whether any adapter, lead extension, or mounting hardware is required. If not stated, treat this as Unknown (Verify).

    Troubleshooting and support notes

    If the torch does not operate as expected, isolate the problem in stages.

    • No arc start: Check machine settings, connection integrity, and consumable condition. If the start method is unsupported, that is a system mismatch, not a torch defect.
    • Intermittent operation: Inspect lead continuity, connector tightness, and any heat damage near the torch head or cable ends.
    • Poor cut quality: Verify consumables, torch angle, work clamp quality, and travel speed. Poor cut quality is often caused by setup or wear, not the torch label alone.
    • Excessive flex or handling issues: Evaluate the 75 degree head and 20 ft lead routing against the actual work area. If access is still poor, the issue may be fixture layout or torch style selection.

    Support teams should document what was checked, what was replaced, and what remains Unknown (Verify) so the next service interval starts with clear traceability.

    When to replace the torch and leads

    Replace the assembly when the torch body is damaged, lead insulation is compromised, or the connection no longer holds securely. In many shops, recurring torch faults are caused by cable abuse, heat exposure, or connector wear. If the torch has repeated startup issues, first verify the system-side compatibility and torch condition before ordering a second replacement.

    For stocking decisions, use the exact product title and internal part reference from the ArcWeld listing. Do not substitute based on appearance alone. If a related consumable family is needed, confirm it directly from the torch documentation or manufacturer source.

    Safety notes

    • De-energize the plasma power supply before inspection, removal, or installation.
    • Allow the torch and consumables to cool before handling.
    • Do not use damaged leads or compromised connectors.
    • Keep cables clear of cut paths, molten material, and sharp workpiece edges.
    • If the connection type or start method is uncertain, stop and verify before use.

    FAQ

    Is this a complete plasma cutter?

    No. This is a torch and leads assembly for plasma cutting support. The power supply is not included in the provided product description.

    Will this torch work on my plasma machine?

    That is Unknown (Verify) from the provided source alone. Check the machine manual, torch interface, and connection type before ordering or installation.

    What does O2B connection mean here?

    The product title identifies an O2B connection, but the detailed interface specification is Unknown (Verify) from the available source. Match it to the machine-side connector before use.

    Are consumables included?

    The provided source does not confirm consumables included with the assembly. Treat inclusion as Unknown (Verify) until confirmed by the product listing or documentation.

    Sources Checked

    • ArcWeld product listing:
      Thermal Dynamics 7-5200 Torch and Leads, SL60 1Torch, 75 Deg Head, 20 ft Leads, O2B Connection

      Thermal Dynamics 7-5200 Torch and Leads, SL60 1Torch, 75 Deg Head, 20 ft Leads, O2B Connection

      The 1Torch RPT torch is the first Plasma cutting torch that performs with virtually all Plasma cutting power supplies. The 1Torch works with high frequency start systems, CD start systems, touch start systems and moving parts (blow back) start systems. Install the 1Torch on your current Plasma power supply and you immediately benefit from the latest in high performance torch technology available today. Look for th...

      View at Arc Weld Store
    • Provided product source description for Thermal Dynamics 7-5200 Torch and Leads, SL60 1Torch, 75 Deg Head, 20 ft Leads, O2B Connection

    For any unanswered fit or application question, confirm against the machine manual and the product listing before release to production.

  • CK9 TIG Torch Support: Parts Lookup and Buying Checks

    CK9 TIG Torch Support: Parts Lookup and Buying Checks

    CK9 TIG Torch Support

    The CK9 TIG Torch Support is a parts lookup and buying reference for maintenance teams, welders, and fabricators who need to confirm what belongs in the support assembly before ordering replacements. The provided Weld Support Parts listing identifies this page as a CK9 TIG torch support with Series 2 breakdown routing. That means the best use of this page is verification: confirm what you have, inspect the wear points, and match the replacement path to the torch support breakdown before buying.

    Key Takeaways

    • Use the CK9 TIG Torch Support page as a lookup reference, not as a substitute for a hands-on inspection.
    • The source description calls out Series 2 breakdown routing; confirm that your assembly matches before ordering.
    • Do not assume compatibility from the CK9 name alone. Verify the full torch support path, not just the torch family.
    • Use Unknown (Verify) for any detail not confirmed on the source page or by inspection.

    What the WSP Lookup Page Tells You

    The Weld Support Parts page for CK9 TIG Torch Support is the primary source provided here. Its short description is direct: “CK9 TIG torch support with Series 2 breakdown routing.” That description is useful because it narrows the buying decision to a specific routing structure instead of a generic torch support label.

    What it does not confirm is just as important. The source page does not provide a full parts list in the brief reference supplied here, and no detailed compatibility statement was provided. If you are comparing replacements, treat any unverified fitment detail as Unknown (Verify).

    Practical Check Before You Order

    Follow these checks before sourcing parts:

    1. Identify the exact support path. Confirm the assembly is a CK9 TIG torch support and not another torch family with similar routing.
    2. Confirm Series 2 breakdown routing. Compare the existing setup to the source description. If the routing style is different, stop and verify.
    3. Inspect the wear points. Look for abrasion, loose retention, crushed insulation, cracked outer covering, or damaged ends where the support flexes.
    4. Verify the torch side and machine side connection points. Do not order by appearance alone. Check the full connection path and thread or coupling style if visible.
    5. Document markings and lengths. If markings are present, record them. If length is not confirmed, mark it Unknown (Verify) until measured.

    Troubleshooting and Support Checks

    If the torch support is failing in service, work through the issue in a simple order.

    Problem: Torch support routing does not match the existing assembly

    • Check: Compare the current part layout against the CK9 support description.
    • Inspect: Look for signs that a prior repair changed the routing path.
    • Verify: Confirm whether the setup is Series 2 breakdown routing or Unknown (Verify).

    Problem: Support wears early or rubs at the same point

    • Check: Look at bend radius, drag path, and contact points on the torch lead.
    • Inspect: Search for sharp edges, pinch points, and heat damage along the support path.
    • Verify: Confirm that the torch support is routed to avoid moving parts and abrasive surfaces.

    Problem: Replacement selection is uncertain

    • Check: Match the current part to the lookup page description line by line.
    • Inspect: Pull the old part and compare connectors, breaks, and support sections.
    • Verify: Use the source page and your physical sample together before purchase.

    Buying Checks for Maintenance Teams

    For procurement, the main risk is buying by partial description. A CK9 torch support can sound specific, but the routing and breakdown details still matter. Before creating the order, verify the following:

    • Exact part family: CK9 TIG torch support
    • Routing detail: Series 2 breakdown routing
    • Existing condition: damaged, missing, or simply worn
    • Need date: planned maintenance or repair shutdown
    • Any unconfirmed detail: Unknown (Verify)

    If your internal records use local naming, make sure the catalog description aligns with the WSP lookup page rather than a shop nickname. This avoids mix-ups when multiple torch support styles are in service.

    Safety Notes

    • De-energize welding equipment before inspecting or replacing torch support parts.
    • Allow hot components to cool before handling.
    • Do not force a support into position if the routing does not match. Misrouting can create strain or damage.
    • Replace any part that shows burned insulation, cracked outer covering, or mechanical damage.
    • If a detail is not confirmed by inspection or source material, mark it Unknown (Verify).

    FAQ

    Is the CK9 TIG Torch Support the same as a full torch assembly?

    No confirmation was provided that it is a full torch assembly. Based on the source description, it is a support reference with Series 2 breakdown routing. Treat the exact assembly scope as Unknown (Verify) unless your inspection confirms it.

    Can I buy by the CK9 name alone?

    No. The CK9 name is only the starting point. Verify the routing style, connection points, and the existing part layout before ordering.

    What should I check first if the support keeps failing?

    Check the routing path, inspect for abrasion or pinch points, and verify that the support is not being forced around sharp edges or moving components.

    Does the source page confirm full compatibility details?

    No. The provided source description is brief and does not confirm full compatibility information. Any missing detail should remain Unknown (Verify) until confirmed.

    Sources Checked

    Use the CK9 TIG Torch Support page as a controlled lookup step. Inspect the current assembly, confirm the routing, and verify before purchasing. That sequence reduces misorders and keeps the repair on schedule.

    Disclosure: As an Amazon Associate, Weld Support Parts may earn from qualifying purchases.

  • Hypertherm 120979 Deflector: Replacement Part Breakdown

    Hypertherm 120979 Deflector

    The Hypertherm 120979 deflector is a replacement part used in plasma cutting support workflows. If you are sourcing this part for maintenance, repair, or inventory control, the main task is to confirm that the part matches the torch, shield, and consumable set in use before install. Do not assume fitment from the name alone. Verify the torch system, cut process, and related consumable stack against the machine documentation and the part marking on the removed component.

    Key Takeaways

    • Confirm the deflector part number before ordering or installing.
    • Inspect the torch consumable stack for wear, heat damage, and misalignment.
    • Replace damaged support parts as a set when wear patterns indicate system issues.
    • Use the WSP lookup page to confirm internal part reference data before purchase.
    • Keep safety practices in place during removal, inspection, and test cutting.

    What the Deflector Does

    A deflector in a plasma cutting setup helps manage the interaction between the torch nozzle area and the work environment. In practical terms, it is part of the consumable or support stack that can affect arc behavior, cut consistency, and the condition of nearby components. If the deflector is worn, heat affected, cracked, or physically deformed, the system may show poor cut quality or accelerated wear in other consumables. The exact function and placement depend on the torch family and cutting setup. Unknown (Verify).

    Before You Replace It: Check, Inspect, Verify

    Check the part number on the removed deflector and compare it to the replacement part listing. For this product, the ASIN-linked product reference is Hypertherm 120979 Deflector B008BJFT3K.

    Inspect the mating components in the consumable stack. Look for burn marks, slag buildup, melted edges, thread damage, or out-of-round features. If a companion part is damaged, replacing only the deflector may not correct the root issue.

    Verify that the torch is de-energized, air or gas pressure is isolated as required by your shop procedure, and the work area is clean before removal. Confirm that the replacement part matches the torch model and assembly configuration. Compatibility not otherwise documented is Unknown (Verify).

    Troubleshooting When a Deflector Is Failing Early

    If the deflector shows short service life, do not stop at part replacement. Look for process issues that can drive premature wear.

    • Check torch height control: Verify the torch is not running too low and striking spatter or the plate surface.
    • Inspect air quality: Moisture, oil, and contamination can shorten consumable life. Confirm your air prep system is operating correctly.
    • Verify cut settings: Excess current, improper pierce timing, or incorrect cut speed can overheat the support parts.
    • Check for physical damage: A bent torch retaining area or damaged head can misalign the consumable stack.
    • Inspect installation torque or seating: A loose or poorly seated part may arc unpredictably. Torque values are Unknown (Verify).

    If repeated failure happens after replacement, document the failure pattern, machine settings, and consumable condition. That record helps separate part defects from operating problems.

    Support Parts and Replacement Logic

    For maintenance buyers and welding support teams, the correct purchasing approach is to evaluate the full wear stack, not the individual part in isolation. When a deflector is replaced, also review the nozzle, shield, swirl ring, electrode, retaining hardware, and any torch-specific components in the same area. The exact set depends on the torch family. Unknown (Verify).

    If the shop uses a planned replacement schedule, track install date, cutting hours, material type, and observed wear. That data helps determine whether the replacement interval is normal or whether the system needs troubleshooting. A deflector that keeps failing early is often a symptom, not the root cause.

    Product Reference

    The referenced product for this draft is the Hypertherm 120979 Deflector, associated with ASIN B008BJFT3K. Use the provided product shortcode below for the Amazon affiliate listing in the WordPress editor:

    Last update on 2026-07-14 / Affiliate links / Images from Amazon Product Advertising API

    Do not infer fitment from the product name alone. Confirm the intended torch platform and consumable family against your service records or the machine manual. If your internal part lookup or service notes are incomplete, mark compatibility as Unknown (Verify) until confirmed.

    Installation and Return-to-Service Checks

    After installing the deflector, run these checks before returning the torch to production:

    1. Visual check: Confirm the part is seated correctly and that no foreign material is trapped in the assembly.
    2. Alignment check: Verify the consumable stack is centered and installed in the proper order.
    3. Leak or air-path check: Confirm the torch gas path is unobstructed and connections are secure.
    4. Dry function check: If your procedure allows, cycle the system without cutting to confirm normal operation.
    5. Test cut: Make a short cut on known material and inspect edge quality, dross, and arc stability.

    If the test cut is unstable, stop and inspect the entire consumable stack before continuing. Replacing the deflector alone may not resolve the fault.

    Safety Notes

    • Lock out and isolate the plasma system before service.
    • Allow hot components to cool before handling.
    • Wear gloves and eye protection when removing spent consumables.
    • Do not touch torch components with bare hands if contamination control matters to your process.
    • Follow the equipment manual and site procedure for maintenance and return-to-service steps.

    FAQ

    Q: Is the Hypertherm 120979 deflector a universal part?
    A: No. Do not treat it as universal. Confirm the torch model and consumable family before ordering. Compatibility not otherwise documented is Unknown (Verify).

    Q: What are the signs that the deflector needs replacement?
    A: Common signs include heat distortion, cracking, burn-through, slag buildup, or fit issues during assembly. Also inspect for abnormal wear in nearby consumables.

    Q: Can I replace only the deflector if cutting performance drops?
    A: Sometimes, but not always. If the nozzle, electrode, or shield is also worn, the root cause may remain after replacement. Inspect the full consumable stack.

    Q: What should I verify before putting the torch back in service?
    A: Verify correct seating, clean assembly surfaces, secure connections, and a stable test cut. If the cut is poor, stop and recheck the setup.

    Sources Checked

    • Provided Amazon affiliate product reference: ASIN B008BJFT3K
    • Provided product name: Hypertherm 120979 Deflector
    • Internal prompt constraints for the Weld Support Parts draft

    Technical details not explicitly provided above are marked Unknown (Verify) to avoid unsupported assumptions.

    Disclosure: As an Amazon Associate, Weld Support Parts may earn from qualifying purchases.

  • Thermal Dynamics 8-4025, Plasma Lubricant, Pack of (1): Replacement Part Breakdown

    No products found.

    Thermal Dynamics 8-4025, Plasma Lubricant, Pack of (1) is a support item used in plasma cutting maintenance workflows. For buyers and maintenance teams, the main question is not just what the item is, but where it fits in the service routine, what it can and cannot solve, and what should be checked before it is put into service. For this product, the verified Amazon identifier is B0044FK0XY. Any deeper technical detail beyond the product listing should be treated as Unknown (Verify) unless confirmed by the equipment manual or supplier documentation.

    Key Takeaways

    • This is a plasma cutting support item, not a cutting torch, consumable kit, or machine assembly.
    • Use it as part of a maintenance plan, not as a fix for worn internal parts, damaged leads, or airflow faults.
    • Compatibility with any specific plasma system is Unknown (Verify) unless confirmed by the manufacturer or the machine manual.
    • Before use, check the equipment manual, service procedure, and worksite handling requirements.
    • For sourcing, the verified product reference is Thermal Dynamics 8-4025, Plasma Lubricant, Pack of (1) B0044FK0XY.

    What This Part Is Used For

    Lubricants in plasma support applications are generally used to reduce friction, support maintenance activities, or assist with service-related handling. The exact application for this item is Unknown (Verify) from the product reference alone. Do not assume it is intended for torch internals, O-rings, seals, cutting tips, or automated system components unless the equipment documentation says so.

    If you support production equipment, treat this as a controlled maintenance item. Verify where it belongs in the process, how it is applied, and whether any residue is acceptable on the specific machine or work area.

    Replacement Part Breakdown

    This listing is for a pack of one. Beyond that, the product page identifier does not confirm formulation, container size, application method, or temperature rating. Those details are Unknown (Verify).

    • Product name: Thermal Dynamics 8-4025, Plasma Lubricant, Pack of (1)
    • Amazon ASIN: B0044FK0XY
    • Package count: 1
    • Exact chemistry: Unknown (Verify)
    • Exact equipment compatibility: Unknown (Verify)
    • Certifications: Unknown (Verify)

    For maintenance buyers, that means the purchase decision should be driven by confirmed machine need, not assumption. Cross-check the part number against the service manual, service bulletin, or approved supplier list.

    Check, Inspect, Verify Before Ordering

    • Check: The machine model, torch family, and service procedure that calls for this lubricant.
    • Inspect: The current maintenance issue. If the problem is arc instability, torch damage, or airflow restriction, a lubricant alone will not correct it.
    • Verify: The exact part number 8-4025 in the manual or parts list.
    • Verify: Whether the application point is external service hardware, torch-related service points, or another assembly.
    • Check: Whether the work area requires any contamination control before applying a lubricant.
    • Inspect: Any warning notes about seals, plastics, elastomers, or post-application cleanup.

    Troubleshooting and Support

    If you are using a lubricant in a plasma cutting support role, start with the failure mode. Do not default to part replacement before the underlying issue is checked.

    • If motion feels stiff: Check for dirt, heat damage, worn bearings, or misalignment before applying lubricant.
    • If torch performance is poor: Inspect consumables, gas flow, power settings, and ground path. Do not assume lubricant is relevant.
    • If residue is present where it should not be: Verify whether the lubricant is approved for that location. Remove contamination per the machine procedure.
    • If the part number does not match: Stop and verify the revision or alternate part number in the equipment documentation.
    • If the application instruction is unclear: Use the manufacturer manual or support channel. Unknown (Verify) is the correct status until you confirm it.

    For recurring support issues, create a simple job record: machine ID, torch type, date of service, part number used, and the observed result after application. This helps distinguish a true maintenance improvement from a temporary symptom change.

    Product and Parts Notes

    This product should be treated as a maintenance consumable or support item, not a high-value replacement assembly. Because the public listing does not confirm material data or compatibility scope, buyers should not rely on general assumptions from other lubricants in the plasma category. Use the exact part number only where the equipment documentation supports it.

    If you are building a spare-parts shelf, label it clearly: manufacturer name, part number, intended equipment family, and storage controls if any are required. If those controls are not stated in the documentation, they remain Unknown (Verify).

    Safety Notes

    • Follow the equipment manual before applying any lubricant to plasma cutting equipment.
    • Keep lubricant away from cutting paths, electrical contact points, and surfaces where contamination could affect performance.
    • Use normal shop controls for chemical handling, including gloves, ventilation, and cleanup procedures where required by the product label.
    • Do not assume the product is suitable for every seal, hose, plastic, or coated surface.
    • If the labeling or SDS is unavailable, stop and verify before use.

    Buyer Guidance

    For maintenance buyers, the key question is whether this exact part number is listed in your approved spares plan. If it is, buy to the documented need. If it is not, verify the substitution path before ordering. A plasma support lubricant can be useful, but only when it matches the service requirement. Do not purchase based on brand recognition alone.

    If you need to compare the exact listing, the verified Amazon product reference is available through the product shortcode:

    No products found.

    .

    FAQ

    Is Thermal Dynamics 8-4025 a consumable for cutting performance?
    Not directly. It is a plasma support lubricant listing. Any performance benefit depends on the intended maintenance application, which is Unknown (Verify) without the manual.

    Can I use this on any plasma cutter?
    No assumption should be made. Compatibility is Unknown (Verify) unless the manufacturer documentation lists the exact part number for your machine or torch family.

    What should I check before installing or using it?
    Check the equipment model, inspect the service point, and verify the part number against the official parts list. Also confirm any contamination or cleanup requirements.

    Does the product listing confirm specifications or certifications?
    No. Specifications, certification status, and detailed formulation are Unknown (Verify) from the provided product reference alone.

    Sources Checked

    • Provided Amazon ASIN registry entry: B0044FK0XY
    • Provided product name: Thermal Dynamics 8-4025, Plasma Lubricant, Pack of (1)
    • Provided task metadata and buyer-guide instructions

    Where technical details were not confirmed by the provided sources, they are marked Unknown (Verify).

    Disclosure: As an Amazon Associate, Weld Support Parts may earn from qualifying purchases.
  • CK20 TIG Torch Support: Parts Lookup and Buying Checks

    CK20 TIG Torch Support: Parts Lookup and Buying Checks

    CK20 TIG Torch Support

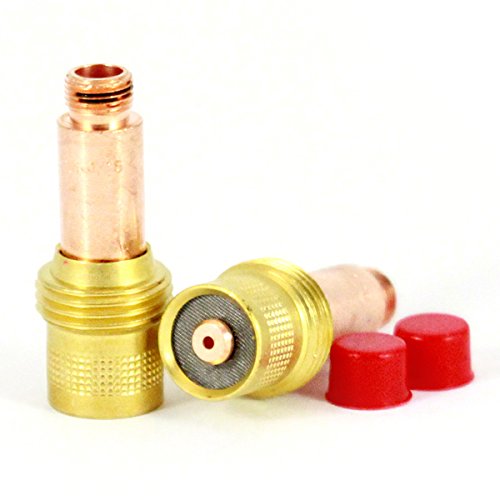
    CK20 TIG torch support starts with identification, then moves to parts verification. If the torch body, back cap, collet body, cup, or gas lens do not match the CK20 pattern, the wrong consumable set can create fit-up problems, gas coverage issues, or early wear. This guide is for buyers, welders, and maintenance teams who need a practical way to check what fits before ordering.

    Key Takeaways

    • Confirm the torch model and series before ordering any consumables.
    • Check the torch breakdown against the support page, not memory or shop habit.
    • Verify cup, collet, gas lens, and back cap style as a matched set where needed.
    • Use Unknown (Verify) for any fitment detail that is not confirmed by the source page or your own machine records.
    • Inspect wear parts for heat damage, thread wear, and loose fit before reuse.

    What the WSP CK20 support page is for

    The Weld Support Parts CK20 TIG Torch Support page is the starting point for machine and consumable lookup. The page is intended to help you find CK20 compatible machines, CK Series 2 consumables, gas lenses, cups, collets, and breakdown support. Use it as a reference point when you need to confirm what the torch uses or when you are matching replacement parts after a service call.

    Open the lookup page here: CK20 TIG Torch Support.

    Before you buy anything, compare the torch numberplate, handle markings, lead style, and consumable stack. If the torch is not clearly identified, treat compatibility as Unknown (Verify).

    Check, inspect, verify: buying process

    1. Check the torch ID. Read the torch body, handle, and lead connection. If the marking is worn off, confirm from machine records or the service ticket.
    2. Inspect the current consumables. Remove the cup, collet, and back cap. Look for thread damage, cracked ceramic, burned O-rings, and discoloration from overheating.
    3. Verify the stack order. Gas lens, collet body, collet, and cup must match the torch setup. If any part is missing or substituted, record it before reordering.
    4. Match by function, not appearance. Two parts can look similar and still differ in thread form, length, or internal bore. If the source page does not confirm it, mark it Unknown (Verify).
    5. Cross-check replacement quantity. Buy enough for the active torch and a small service reserve. Do not assume all CK parts in stock are interchangeable without verification.

    Troubleshooting support checks

    If the torch is running poorly, use a basic check sequence before replacing parts.

    Gas coverage problems

    • Check: Is the cup cracked, blocked, or loose?
    • Inspect: Look for soot, spatter, or heat damage on the gas lens and collet body.
    • Verify: Confirm the cup size and gas lens style against the CK20 support reference. If not confirmed, Unknown (Verify).

    Arc instability or wandering arc

    • Check: Is the tungsten properly centered and secured?
    • Inspect: Look for worn collet jaws, damaged collet body threads, or a bent tungsten stickout path.
    • Verify: Confirm the torch is assembled with the correct CK Series 2 consumables if that is what the lookup page identifies for your setup.

    Overheating at the front end

    • Check: Is the duty cycle being exceeded for the application?
    • Inspect: Look for darkened cups, soft back cap seals, and burned components near the nozzle end.
    • Verify: Confirm the torch is actually the CK20 variant and not a similar torch with different duty limits or consumable geometry. Unknown (Verify) if not documented.

    Parts and breakdown support workflow

    Use the support page when a torch is already apart or when a replacement order is needed after failure. Start with the torch breakdown, then identify the wear parts in this order:

    • Back cap
    • Collet
    • Collet body or gas lens body
    • Cup or nozzle
    • Insulators or seals, if used in that assembly

    If a part is damaged beyond a visual ID, remove one confirmed sample from the line and match it directly. Do not order by description alone if the stack has been modified in the field. If a helper note, machine log, or purchase record does not confirm the part number, treat the replacement as Unknown (Verify).

    What to inspect on used CK20 consumables

    • Threads: Check for galling, cross-threading, and incomplete engagement.
    • Ceramic cups: Inspect for chips, cracks, and heat checking.
    • Collets: Look for jaw spread, oxidation, and poor tungsten grip.
    • Gas lens screens: Check for clogging, distortion, or impact damage.
    • Back caps: Verify seal condition and straightness.

    If any item fails inspection, replace it as a set when needed. Mixing worn and new components can make the problem harder to diagnose.

    Safety notes

    • Shut down power and gas before disassembly.
    • Allow the torch to cool before handling cups, collets, and gas lenses.
    • Do not reuse parts with cracked ceramic, stripped threads, or heat-damaged seals.
    • Use the correct PPE for hot work and sharp ceramic fragments.
    • If machine compatibility is not confirmed, do not force-fit consumables. Mark it Unknown (Verify) and recheck the torch ID.

    FAQ

    How do I know if my torch is CK20 compatible?

    Start with the torch marking, machine records, and the consumable stack already installed. Then compare it to the CK20 TIG Torch Support page. If the ID is unclear, treat compatibility as Unknown (Verify).

    Can I mix CK consumables from different setups?

    Not without verification. Some consumables may appear similar but differ in length, thread form, or internal geometry. Verify the exact stack before mixing parts.

    What should I replace first if the torch has poor gas coverage?

    Inspect the cup, gas lens, and collet body first. Check for cracks, clogging, and poor fit. Replace the damaged part and confirm the assembly order.

    Where should I start when I need breakdown support?

    Use the CK20 support page, then break the torch down into its consumable stack and compare each piece against a confirmed sample or documented machine record.

    Sources Checked

    Any compatibility or fitment detail not directly confirmed from the source page or your shop records should be treated as Unknown (Verify).

    Disclosure: As an Amazon Associate, Weld Support Parts may earn from qualifying purchases.
  • Exothermic Cutting Safety Checks Before Use

    Arcair 94-463-032, Slice 3/8" Conversion Kit
    “>Arcair 94-463-032, Slice 3/8" Conversion Kit

    Exothermic cutting is a high-heat cutting process that depends on correct setup, clean connections, and controlled work practices. Before you strike the torch, complete a pre-use safety check. This helps reduce burn risk, flashback risk, and equipment failure during the cut.

    Key Takeaways

    • Inspect the torch, hose, cables, and consumables before each use.
    • Confirm the work area is clear of combustible material and ignition hazards.
    • Verify gas, oxygen, and power supply conditions if your setup uses them. Unknown (Verify).
    • Wear PPE rated for cutting heat, sparks, and spatter.
    • Do not start cutting if any leak, damage, or control issue is found.

    Pre-Use Safety Checks

    1) Confirm the job setup

    • Verify the cut location, material, and access path.
    • Check that the work permit, hot-work approval, and site rules are in place if required. Unknown (Verify).
    • Identify nearby fuel, solvent, paint, dust, or vapor sources.
    • Set a fire watch if required by site procedure.

    2) Inspect the work area

    • Remove combustible material from the cut zone.
    • Protect floors, walls, hoses, and adjacent equipment from sparks and slag.
    • Check for confined space hazards, poor ventilation, or restricted egress.
    • Keep extinguishers accessible and confirm the correct type for the hazard. Unknown (Verify).

    3) Check PPE

    • Wear flame-resistant clothing with full arm and leg coverage.
    • Use cutting goggles, face shield, or other eye and face protection required by the process.
    • Wear heat-resistant gloves and safety footwear.
    • Keep sleeves, cuffs, and pockets closed to limit spark entry.
    • Do not use contaminated PPE with oil, grease, or solvent residue.

    4) Inspect the torch and cutting kit

    • Check the torch body for cracks, damage, or loose fittings.
    • Inspect hoses, leads, and connectors for wear, cuts, burns, or leaks.
    • Verify the nozzle, electrode, and consumable condition before use.
    • Confirm parts are assembled per the manufacturer instructions.
    • If a conversion or adapter kit is used, confirm it is correct for the torch system. Unknown (Verify).

    5) Check supply conditions

    • Confirm gas cylinders, regulators, and valves are secured and in good condition if used in the setup. Unknown (Verify).
    • Verify oxygen supply, fuel supply, or electrical supply settings match the procedure. Unknown (Verify).
    • Check for leaks before ignition using the approved site method.
    • Confirm grounding, if required by the process, is secure and correctly placed. Unknown (Verify).

    6) Verify the ignition and shutdown controls

    • Check trigger, valve, switch, and start controls for smooth operation.
    • Confirm the torch can be shut down quickly without obstruction.
    • Review the shutdown sequence before starting the cut.
    • Keep the operator’s path clear for emergency movement.

    Troubleshooting and Support Checks

    If the system does not pass inspection, stop and correct the issue before use.

    • Damaged hose or lead: Remove from service and replace per site procedure.
    • Loose fitting or leak: Do not ignite. Depressurize and repair.
    • Worn consumable: Replace before cutting to reduce instability and backfire risk.
    • Poor visibility or ventilation: Improve the work area before starting.
    • Unclear compatibility: Verify the torch, conversion kit, and consumables against the equipment manual.

    Product / Parts Check

    For setup work that needs replacement or conversion parts, verify the exact fit before installation. The allowed product for this draft is the Arcair 94-463-032, Slice 3/8" Conversion Kit. Use it only where the manufacturer documentation confirms compatibility. Unknown (Verify).

    Product reference:

    Safety Notes

    • Exothermic cutting produces intense heat, sparks, and molten material.
    • Keep body parts out of the direct line of the cut and away from hot slag.
    • Do not cut on sealed, pressurized, or contaminated vessels without proper isolation and cleaning.
    • Do not bypass guards, interlocks, or shutoff devices.
    • If you smell gas, see damage, or lose control of the cut, stop immediately.

    FAQ

    What is the main pre-use check for exothermic cutting safety?

    The main check is a full inspection of the torch, supplies, PPE, and work area before ignition.

    Should I use a conversion kit without checking compatibility?

    No. Confirm compatibility in the manufacturer documentation. If it is not confirmed, mark it Unknown (Verify) and do not install it until checked.

    What if the hose or torch shows damage?

    Stop work, remove the equipment from service, and repair or replace it before use.

    Do I need a fire watch?

    Site rules or hot-work procedures may require one. Verify the requirement before starting.

    Sources Checked

    Related Arc Weld Part

    Arcair 94-463-032, Slice 3/8" Conversion Kit

    Arcair 94-463-032, Slice 3/8" Conversion Kit

    Introducing the Arcair 94-463-032, Slice 3/8" Conversion Kit, an essential addition to your cutting tool arsenal. This conversion kit is designed to enhance the performance of your existing cutting equipment, ensuring precision and efficiency in your cutting tasks. The Arcair 94-463-032 is specifically engineered to fit seamlessly with compatible models, providing a reliable solution for your cutting needs. Whethe…

    View at Arc Weld Store

    Related Weld Support Guides

  • Stream with Amazon Music