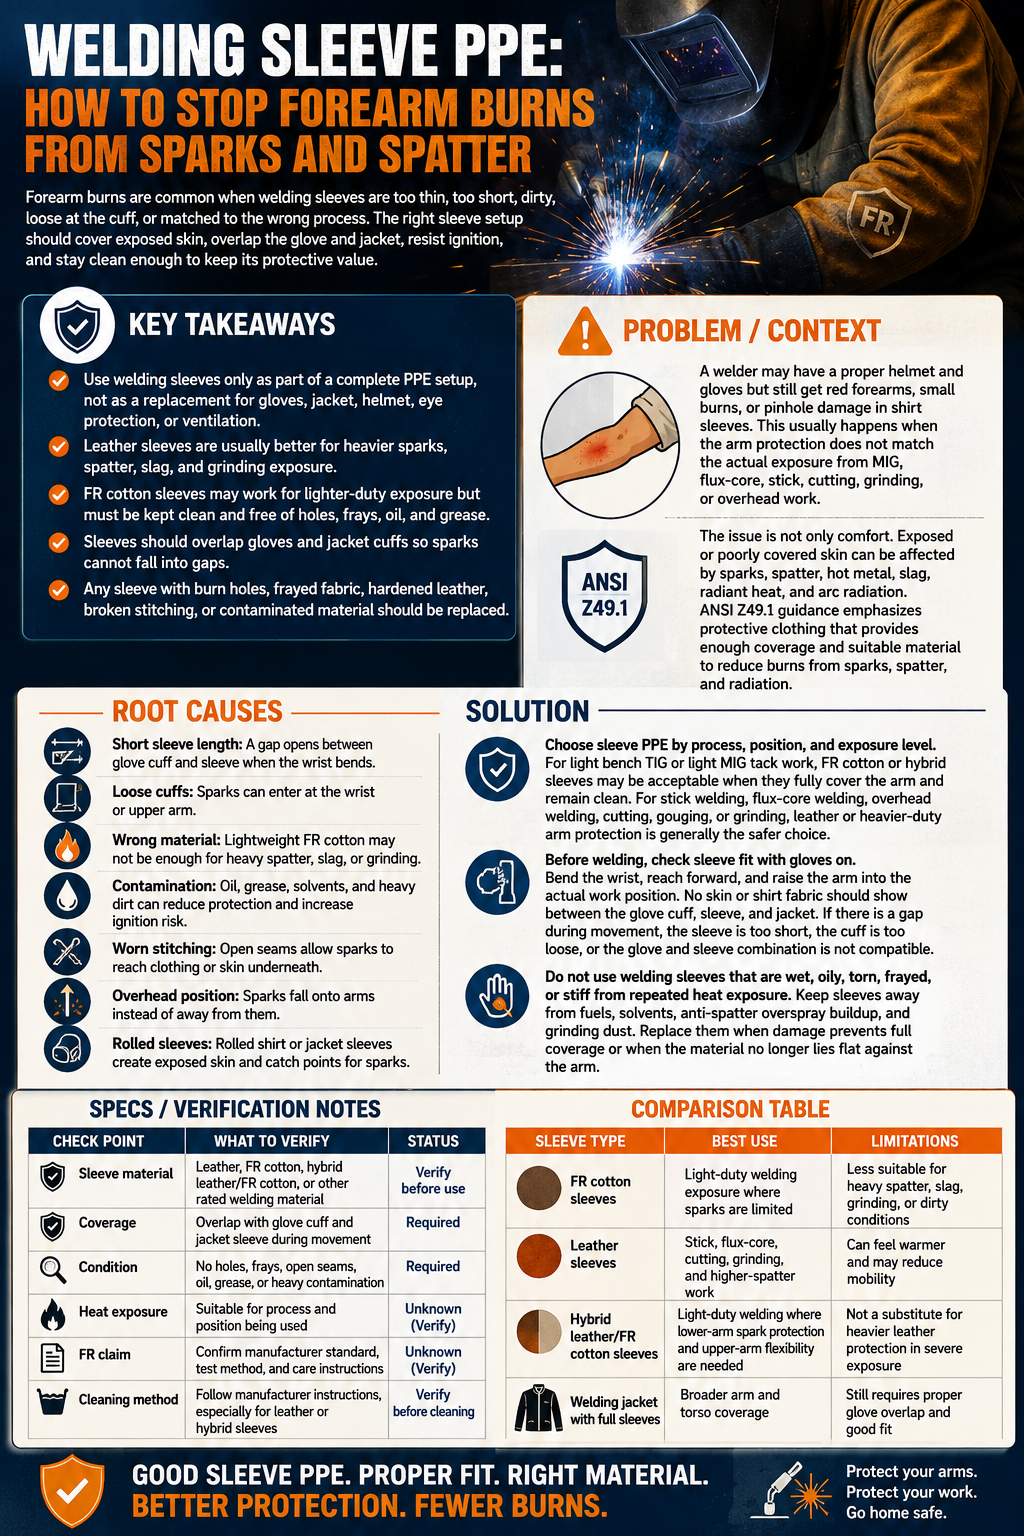
Tag: welding safety

  • How to Fix an Unstable TIG Arc from Poor Tungsten Prep

    A wandering TIG arc is often blamed on gas flow, amperage, or the machine. Those issues can matter, but the tungsten electrode is one of the first places to check. A contaminated, poorly ground, or incorrectly shaped tungsten can make the arc drift, split, sputter, or pull away from the joint.

    This guide covers how to identify tungsten-prep problems, what usually causes them, and what to verify before replacing torch parts or changing machine settings.

    Key Takeaways

    • A TIG arc that wanders, flickers, or splits can often be traced to tungsten contamination or poor grind direction.
    • Grinding marks should run lengthwise with the tungsten, not around it.
    • A dipped tungsten should be cut back or re-ground before welding continues.
    • Use a dedicated tungsten grinder or wheel to reduce cross-contamination from steel, aluminum, or abrasive debris.
    • Verify torch setup, gas coverage, and electrode size before assuming the welder is the problem.

    Problem / Context

    An unstable TIG arc can show up as arc wander, inconsistent starting, dirty weld edges, excessive tungsten balling, black peppering near the weld, or a weld puddle that does not stay centered under the electrode.

    These symptoms are common after the tungsten touches the weld puddle, filler rod, work clamp area, or a contaminated bench grinder. The issue may also appear after switching from aluminum to stainless or carbon steel without cleaning the electrode properly.

    Root Causes

    • Contaminated tip: The tungsten touched the puddle, filler wire, base metal, or dirty work surface.
    • Wrong grind direction: Circular grinding marks can encourage the arc to wander around the tip.
    • Shared grinding wheel: A wheel used for steel or aluminum can embed unwanted material into the electrode.
    • Overheated tungsten: Excessive amperage, poor torch cooling, or too small an electrode can damage the tip.
    • Incorrect stickout: Long stickout without enough gas coverage can oxidize the tungsten and destabilize the arc.
    • Loose torch parts: A loose collet, damaged collet body, or poor gas lens seating can create inconsistent current transfer or shielding.

    Solution

    Start by removing any contaminated portion of the tungsten. Do not simply grind over a dipped tip if filler metal or base metal has fused into it. Cut back the contaminated section, then re-grind the electrode.

    • Use a dedicated tungsten grinder or a wheel reserved only for tungsten.
    • Grind lengthwise so the grind lines run from the body of the tungsten toward the point.
    • Keep the electrode centered while grinding to avoid an off-center point.
    • Use a consistent included angle for the job instead of changing tip shape randomly between welds.
    • For DC TIG on steel or stainless, use a pointed or slightly truncated point as required by the procedure.
    • For AC aluminum, follow the machine and tungsten manufacturer guidance for electrode type and tip preparation.

    Specs / Verification Notes

    Item to VerifyWhat to CheckNotes
    Tungsten typeConfirm electrode material and color codeUnknown (Verify)
    Tungsten diameterMatch electrode size to amperage rangeUnknown (Verify)
    Grind directionLengthwise grind marksAvoid circular grind marks
    Grinding wheelDedicated tungsten wheel or sharpenerDo not share with general metal grinding
    Torch partsCollet, collet body, cup, gas lens, back capReplace damaged consumables
    Shielding gasCorrect gas, flow rate, hose condition, leaksUnknown (Verify)

    Product Section

    A tungsten sharpener can help keep grind angle and grind direction more consistent than freehand grinding on a shared bench wheel. Verify compatibility with the rotary tool, tungsten diameters, and wheel size before purchasing.

    3mirrors Tungsten Electrode Sharpener Grinder Head TIG Welding Tool w/Cut-Off Slot Multi-Angle & Offsets, Horizontal Hole, 4 Copper Screw Holes & 2X CNC Mandrel & 5X 25mm Diamond Wheels, ALUMINUM
    • Our Tungsten Electrode Sharpener fits most all Rotary Tools with a 3/4-12 thread, compatible for Black and Decker, Milwaukee, Bosch Dremel and More! (Package No Rotary Tools Included). Product designed by professional 3D CAD, made of T-6061 aluminum alloy, CNC finishing, Durable and Easy to use.
    • ALUMINUM Grinder Head comes with 4 Brass Tungsten Guide Screws: 040″, 1/16″, 3/32″ and 1/8″ (1mm, 1.6mm, 2.4mm, 3.2mm). The guides ensure concentricity and multi-offset. Increase the utilization of the grinding wheel.
    • A tungsten sharpening tool has four angled holes on it for use. 22.5ยฐ, 20ยฐ, 15ยฐ and 10ยฐ (45ยฐ, 40ยฐ, 30ยฐ, 20ยฐ Tips Angle respectively). Precise control makes Upgraded grinding tools will grind a More perfect tungsten tip angle. All holes are designed to use the same height as the diamond wheel. Needn’t set the height repeatedly, it is very easy to align the diamond wheel and the 2mm slit.
    • This Upgrade version tool adds a Horizontal Hole so that cleaning up tungsten electrodes that have picked up metal during welding easily. The tungsten sharpening tool also has tungsten cut-off port processing. After the tungsten you are using is worn or contaminated, you can use the cut-off port for cutting so that you can use it again. Upgraded Brass Guides & Mandrels are CNC forging, Will have higher accuracy.
    • 3mirrors Tungsten Electrode Sharpener tool is essential for real professionals. Will save you a lot of time and give you precise tips. The open design makes the grinding wheel installation more convenient. Wearing a mask and other protective gear is recommended unless you are grinding in full-sealed space.

    Last update on 2026-06-04 / Affiliate links / Images from Amazon Product Advertising API

    Comparison Table

    MethodBest UseRisk
    Dedicated tungsten sharpenerRepeatable tungsten prepMust verify tool compatibility
    Dedicated bench wheelShop setup with controlled workflowEasy to contaminate if others use it
    Shared grinderEmergency field use onlyHigh contamination risk
    Hand fileMinor cleanup onlySlow and inconsistent for full prep

    Safety Notes

    • Use eye and face protection suitable for grinding and welding. OSHA notes that welding and cutting can expose workers to radiant energy that can injure the eyes.
    • Use the correct welding lens shade for the TIG amperage and work conditions.
    • Control grinding dust, especially when preparing thoriated tungsten. Follow shop safety procedures and applicable SDS guidance.
    • Do not grind tungsten near open containers, flammables, or clean assembly areas where dust contamination is a concern.
    • Follow ANSI Z49.1 safety guidance for welding, cutting, and allied processes where applicable.

    FAQ

    Can a dirty tungsten really make the arc wander?

    Yes. Contamination on the electrode tip can change how the arc starts and where it anchors. A dipped tungsten should be corrected before continuing the weld.

    Should tungsten be ground in a circle or lengthwise?

    Lengthwise grinding is preferred for TIG electrode preparation. The grind marks should run along the tungsten, not around it.

    Can one grinder wheel be used for tungsten and steel?

    It is not recommended. A shared grinding wheel can transfer contaminants into the tungsten and create arc stability problems.

    Why does the tungsten keep balling up on DC TIG?

    Possible causes include wrong polarity, excessive amperage for the electrode size, poor tip prep, contaminated tungsten, or incorrect tungsten type. Verify machine polarity and electrode size first.

    Does a gas lens fix tungsten contamination?

    No. A gas lens can improve shielding coverage in the right setup, but it will not fix a contaminated or poorly ground tungsten.

    Next Step

    If the TIG arc is unstable, remove and inspect the tungsten before changing machine settings. Cut back contamination, re-grind lengthwise on a dedicated wheel or sharpener, then verify torch parts and gas coverage before restarting the weld.

    Sources Checked

    • Amazon product page for 3mirrors Aluminum Tungsten Electrode Sharpener Grinder Head, ASIN B09F9J7GSV
    • OSHA Eye Protection against Radiant Energy during Welding and Cutting fact sheet
    • OSHA Welding, Cutting, and Brazing standards overview
    • AWS welding lens shade safety guidance
    • Diamond Ground Products tungsten electrode guidebook
  • Why MIG Wire Burns Back Into the Contact Tip

    MIG burnback happens when the welding wire melts into the contact tip instead of feeding cleanly into the weld puddle. It is a common shop problem because the symptom looks simple, but the cause can come from wire speed, stickout, liner drag, contact tip wear, drive roll setup, or grounding.

    This guide focuses on practical troubleshooting for short-circuit MIG welding where the wire repeatedly fuses to the contact tip, stalls at the gun, or creates inconsistent starts.

    Key Takeaways

    • Burnback usually points to the wire melting faster than it is being delivered.
    • Low wire-feed speed, excessive liner drag, worn contact tips, or poor cable setup can all create the same symptom.
    • Do not solve repeated burnback by only increasing drive roll tension. That can deform the wire and create more feeding problems.
    • Contact tips should match the wire diameter and gun system. Unknown compatibility should be verified before ordering.
    • Any troubleshooting should include ventilation, eye protection, gloves, and control of hot work hazards.

    Problem / Context

    The typical sign is a wire end fused inside or at the face of the contact tip. The operator may hear the arc start, snap, and stop. In some cases, the wire birds-nests at the feeder after the wire path blocks at the tip.

    Burnback is not always caused by a bad contact tip. The contact tip is often where the problem becomes visible, but the restriction may be farther back in the gun liner, drive rolls, spool brake, cable bend, or work lead connection.

    Root Causes

    • Wire-feed speed too low: If the arc consumes wire faster than the feeder supplies it, the arc can climb back to the contact tip.
    • Stickout too short: Holding the gun too close reduces the distance between the contact tip and the weld puddle, increasing the chance of burnback.
    • Worn or dirty contact tip: An enlarged, oval, spatter-filled, or wrong-size tip can interrupt smooth wire delivery.
    • Dirty or kinked liner: Debris, metal shavings, or tight bends in the liner increase drag and cause inconsistent feeding.
    • Incorrect drive roll setup: Wrong groove type, wrong groove size, or excessive tension can slip, shave, or deform wire.
    • Gun cable bends: Tight loops or sharp bends make the feeder work harder and can cause wire speed variation at the arc.
    • Poor work connection: A loose or dirty work clamp can destabilize the arc and make starts less predictable.
    • Burnback control setting: Some machines have adjustable burnback timing. Incorrect adjustment can leave the wire too short after trigger release.

    Solution

    Start with the simplest checks before replacing multiple parts. Clip the wire clean, install a known-good contact tip that matches the wire diameter, and confirm the wire feeds through the gun without unusual resistance.

    1. Confirm the contact tip size matches the wire being used.
    2. Check the machine settings against the wire size, material thickness, shielding gas, and transfer mode.
    3. Increase wire-feed speed slightly if the wire is burning back immediately at arc start.
    4. Hold a consistent contact-tip-to-work distance instead of pushing the nozzle too close to the puddle.
    5. Remove the contact tip and feed wire through the gun. If feeding improves, replace the tip.
    6. If resistance remains with the tip removed, inspect the liner, gun cable bends, and feeder path.
    7. Check drive roll size, groove type, pressure, and wire spool brake tension.
    8. Clean the work clamp area and confirm the work lead connection is tight.
    9. Review burnback timer settings only after the mechanical feeding path is confirmed.

    Specs / Verification Notes

    Item to VerifyWhy It MattersStatus
    Wire diameterContact tip and drive roll groove must match the wire size.Unknown (Verify)
    Contact tip thread/systemTips are not universal across all MIG guns.Unknown (Verify)
    Liner sizeA liner that is too small, worn, kinked, or contaminated can create drag.Unknown (Verify)
    Drive roll grooveSolid wire commonly uses V-groove rolls; cored wire often uses knurled rolls.Unknown (Verify)
    Burnback timerSome MIG machines include adjustable burnback timing.Unknown (Verify)

    Product Section

    The product below was checked as an Amazon listing with a visible ASIN. Confirm wire diameter, thread style, gun compatibility, and seller details before purchase.

    Comparison Table

    SymptomLikely AreaCheck First
    Wire fuses to tip immediatelyWire-feed speed or stickoutIncrease wire feed slightly and maintain proper gun distance.
    Wire feeds unevenly before burnbackLiner, drive rolls, spool brakeInspect the full wire path for drag or slipping.
    Tip hole looks oval or spatteredContact tip wearReplace with the correct size tip.
    Bird-nesting at feederBlocked path near gun or tipRemove the tip and test wire feed through the gun.
    Arc starts harsh or unstableWork connection or settingsClean the work clamp area and verify voltage and wire-feed settings.

    Safety Notes

    Follow ANSI Z49.1 guidance for welding, cutting, and allied processes. Use appropriate eye, face, hand, and body protection, and keep the work area controlled for sparks, heat, and fire hazards.

    AWS safety guidance also emphasizes adequate ventilation for welding and cutting. Keep the breathing zone out of the fume plume and use local exhaust or other controls where required.

    Disconnect power according to the equipment manual before servicing feeder components, gun liners, or internal machine parts. Hot contact tips and nozzles can cause burns even after welding stops.

    FAQ

    Does burnback always mean the contact tip is bad?

    No. A worn or dirty contact tip can cause burnback, but liner drag, low wire-feed speed, tight cable bends, incorrect drive rolls, or a poor work connection can also cause the same symptom.

    Should drive roll tension be increased when burnback happens?

    Only after checking the rest of the wire path. Too much drive roll tension can deform the wire, create metal shavings, and make liner contamination worse.

    Can stickout cause burnback?

    Yes. If the contact tip is held too close to the weld puddle, the arc has less wire length between the tip and the work. That can increase burnback risk, especially during starts and stops.

    How often should MIG contact tips be replaced?

    There is no single replacement interval for every shop. Replace the tip when the bore is worn, oval, spatter-blocked, feeding becomes inconsistent, or arc starts become unreliable.

    Can burnback timing fix the problem?

    Sometimes, but only after confirming the mechanical feed path is correct. Burnback timing should not be used to hide a worn tip, dirty liner, or incorrect drive roll setup.

    Next Step

    For repeated MIG burnback, replace the contact tip with the correct size, straighten the gun cable, test wire feed with the tip removed, and inspect the liner if resistance remains. Verify consumable compatibility before ordering replacement tips.

    Sources Checked

    • Amazon product listing checked for ASIN B0GG66ZVBD.
    • American Torch Tip: causes of contact tip burnback.
    • Hobart Brothers: common wire feeding issues and contact tip wear.
    • General Air: wire feeding problems, liners, contact tips, drive rolls, and welding circuit checks.
    • AWS ANSI Z49.1 safety guidance for welding, cutting, and allied processes.
    • AWS Safety and Health Fact Sheet: ventilation for welding and cutting.
  • Welding Sleeve PPE: How to Stop Forearm Burns from Sparks and Spatter

    Welding Sleeve PPE: How to Stop Forearm Burns from Sparks and Spatter

    Forearm burns are common when welding sleeves are too thin, too short, dirty, loose at the cuff, or matched to the wrong process. The right sleeve setup should cover exposed skin, overlap the glove and jacket, resist ignition, and stay clean enough to keep its protective value.

    Key Takeaways

    • Use welding sleeves only as part of a complete PPE setup, not as a replacement for gloves, jacket, helmet, eye protection, or ventilation.
    • Leather sleeves are usually better for heavier sparks, spatter, slag, and grinding exposure.
    • FR cotton sleeves may work for lighter-duty exposure but must be kept clean and free of holes, frays, oil, and grease.
    • Sleeves should overlap gloves and jacket cuffs so sparks cannot fall into gaps.
    • Any sleeve with burn holes, frayed fabric, hardened leather, broken stitching, or contaminated material should be replaced.

    Problem / Context

    A welder may have a proper helmet and gloves but still get red forearms, small burns, or pinhole damage in shirt sleeves. This usually happens when the arm protection does not match the actual exposure from MIG, flux-core, stick, cutting, grinding, or overhead work.

    The issue is not only comfort. Exposed or poorly covered skin can be affected by sparks, spatter, hot metal, slag, radiant heat, and arc radiation. ANSI Z49.1 guidance emphasizes protective clothing that provides enough coverage and suitable material to reduce burns from sparks, spatter, and radiation.

    Root Causes

    • Short sleeve length: A gap opens between glove cuff and sleeve when the wrist bends.
    • Loose cuffs: Sparks can enter at the wrist or upper arm.
    • Wrong material: Lightweight FR cotton may not be enough for heavy spatter, slag, or grinding.
    • Contamination: Oil, grease, solvents, and heavy dirt can reduce protection and increase ignition risk.
    • Worn stitching: Open seams allow sparks to reach clothing or skin underneath.
    • Overhead position: Sparks fall onto arms instead of away from them.
    • Rolled sleeves: Rolled shirt or jacket sleeves create exposed skin and catch points for sparks.

    Solution

    Choose sleeve PPE by process, position, and exposure level. For light bench TIG or light MIG tack work, FR cotton or hybrid sleeves may be acceptable when they fully cover the arm and remain clean. For stick welding, flux-core welding, overhead welding, cutting, gouging, or grinding, leather or heavier-duty arm protection is generally the safer choice.

    Before welding, check sleeve fit with gloves on. Bend the wrist, reach forward, and raise the arm into the actual work position. No skin or shirt fabric should show between the glove cuff, sleeve, and jacket. If there is a gap during movement, the sleeve is too short, the cuff is too loose, or the glove and sleeve combination is not compatible.

    Do not use welding sleeves that are wet, oily, torn, frayed, or stiff from repeated heat exposure. Keep sleeves away from fuels, solvents, anti-spatter overspray buildup, and grinding dust. Replace them when damage prevents full coverage or when the material no longer lies flat against the arm.

    Specs / Verification Notes

    Check PointWhat to VerifyStatus
    Sleeve materialLeather, FR cotton, hybrid leather/FR cotton, or other rated welding materialVerify before use
    CoverageOverlap with glove cuff and jacket sleeve during movementRequired
    ConditionNo holes, frays, open seams, oil, grease, or heavy contaminationRequired
    Heat exposureSuitable for process and position being usedUnknown (Verify)
    FR claimConfirm manufacturer standard, test method, and care instructionsUnknown (Verify)
    Cleaning methodFollow manufacturer instructions, especially for leather or hybrid sleevesVerify before cleaning

    Comparison Table

    Sleeve TypeBest UseLimitations
    FR cotton sleevesLight-duty welding exposure where sparks are limitedLess suitable for heavy spatter, slag, grinding, or dirty conditions
    Leather sleevesStick, flux-core, cutting, grinding, and higher-spatter workCan feel warmer and may reduce mobility
    Hybrid leather/FR cotton sleevesLight-duty welding where lower-arm spark protection and upper-arm flexibility are neededNot a substitute for heavier leather protection in severe exposure
    Welding jacket with full sleevesBroader arm and torso coverageStill requires cuff overlap and regular inspection

    Safety Notes

    ANSI Z49.1 and AWS welding safety guidance emphasize suitable protective clothing, gloves, eye protection, face protection, and full coverage against burns, sparks, spatter, radiation, and related hazards. Sleeve PPE should be selected as part of a full hazard assessment, not by comfort alone.

    • Wear dry, hole-free welding gloves in good condition.
    • Keep sleeves down and avoid exposed skin at the wrist, forearm, or upper arm.
    • Do not weld in synthetic street clothing that can melt or ignite.
    • Use leather spats or boot protection when sparks can enter boot tops or pant legs.
    • Use proper ventilation and respiratory protection where fumes, coatings, or confined spaces create additional hazards.
    • Follow employer safety rules, equipment manuals, SDS information, and applicable OSHA, ANSI, and AWS guidance.

    FAQ

    Are FR cotton sleeves enough for MIG welding?

    Sometimes. FR cotton sleeves may be suitable for light-duty MIG work with limited sparks and spatter. For heavier MIG, flux-core, overhead work, cutting, or grinding, leather or heavier-duty arm protection is usually the better choice.

    Should welding sleeves go over or under gloves?

    The setup should prevent sparks from entering the cuff area. In many cases, the glove cuff overlaps the sleeve at the wrist. The correct setup depends on glove style, sleeve cuff design, and work position. Check for exposed gaps while moving before welding.

    Can dirty welding sleeves still be used?

    Dirty sleeves should be treated carefully. Oil, grease, solvents, and heavy buildup can reduce protection and increase fire risk. Follow the manufacturer cleaning instructions. Replace contaminated sleeves when they cannot be safely cleaned.

    Do welding sleeves protect against arc flash?

    They help cover skin against radiation exposure, but they do not replace a welding helmet, proper filter shade, safety glasses, curtains, or full protective clothing. Arc radiation protection requires complete coverage of exposed skin and proper eye and face protection.

    When should welding sleeves be replaced?

    Replace sleeves when they have holes, burns, frayed edges, open seams, hardened leather, loose elastic, contamination, or any condition that prevents full coverage and proper fit.

    Next Step

    Inspect current welding sleeves before the next job. Confirm material, coverage, cuff overlap, cleanliness, and process suitability. If the sleeves are damaged, too short, or too light for the work, replace them before welding continues.

    Sources Checked

    • ANSI Z49.1 welding and cutting safety guidance summary from ANSI
    • AWS Fact Sheet No. 33, Personal Protective Equipment for Welding and Cutting
    • AWS Welding Digest PPE selection guidance
    • John Tillman 9215 manufacturer product page for sleeve material and use limitations
    • Airgas Tillman 9215 product listing for third-party spec comparison
  • Why TIG Tungsten Turns Black Even When the Weld Looks Clean

    TIG tungsten turning black is usually a shielding problem, not a mystery tungsten problem. The weld may still look acceptable at first, but a darkened electrode, unstable arc, dull bead edge, or repeated regrinding points to air, turbulence, contamination, or heat overload reaching the tungsten zone.

    This guide focuses on the narrow failure path where the tungsten darkens even when the bead does not immediately look destroyed. For broader tungsten failure issues, compare this checklist with TIG tungsten contamination causes and prevention, black specks from tungsten contamination, and sooty TIG weld troubleshooting.

    Key Takeaways

    • Black tungsten usually means the hot electrode is being exposed to oxygen or contamination.
    • Too much gas flow can be as bad as too little flow because turbulence can pull air into the shield.
    • A cracked cup, loose back cap, damaged O-ring, bad gas lens screen, or leaking hose can contaminate the tungsten without looking obvious.
    • Post-flow matters. Stopping shielding gas while the tungsten is still hot can discolor the electrode after the weld ends.
    • If the tungsten turns black repeatedly, inspect the torch front end before blaming the electrode type.

    Problem / Context

    A clean TIG weld needs the molten puddle, filler wire end, and tungsten electrode protected by inert shielding gas. When the tungsten turns black, the shield is not protecting the electrode consistently. The bead may still look passable on mild steel, but the same condition can cause oxidation, porosity, arc wander, gray stainless color, or inclusions on more sensitive work.

    This problem often appears after changing cups, adding a gas lens, moving to a drafty bench, shortening post-flow, switching tungsten size, or using a torch that has been dropped or overheated. It can also appear when the torch looks assembled correctly but has a small leak at the back cap, collet body, hose fitting, or gas solenoid connection.

    Root Causes

    1. Shielding Gas Flow Is Too Low

    Low argon flow may not fully cover the tungsten and weld pool. This can happen from an incorrect flowmeter setting, a partially closed cylinder valve, a kinked hose, a blocked torch screen, or a flowmeter that is being read incorrectly. Do not assume gas is reaching the torch just because the flowmeter ball moves.

    2. Shielding Gas Flow Is Too High

    More gas is not automatically better. Excessive flow can create turbulence at the cup. Turbulence can pull surrounding air into the argon stream, which can oxidize the hot tungsten and contaminate the weld zone. This is common when a small cup is run at an aggressive flow rate or when the torch is held too far from the work.

    3. Post-Flow Is Too Short

    The tungsten stays hot after the arc stops. If post-flow ends while the electrode is still hot enough to oxidize, the tip can turn dark after the weld is already finished. This can make the problem look random because the bead may look cleaner than the tungsten.

    4. Torch Parts Are Leaking or Damaged

    A loose back cap, worn O-ring, cracked cup, split torch hose, damaged collet body, or poor gas lens screen can disturb shielding. A torch can leak enough to discolor tungsten without making an obvious hissing sound. For front-end fit problems, review TIG collet and gas lens troubleshooting.

    5. Tungsten Stickout Is Too Long for the Cup Setup

    Long stickout exposes the tungsten to air unless the cup and gas lens can maintain coverage. A gas lens can help, but it does not override poor torch angle, excessive flow, drafts, or a damaged screen. If arc wander appears with the discoloration, compare the setup against TIG tungsten sharpening and arc stability checks.

    6. Contamination Is Being Carried Into the Arc

    Oil, marker residue, mill scale, filler wire oxidation, grinding dust, and dirty gloves can all contaminate the arc zone. The tungsten may darken because the weld area is giving off contaminants into the shielding envelope. This is especially common on stainless, aluminum, thin tubing, and repair work with unknown surface history.

    Solution

    • Confirm the cylinder contains the correct shielding gas for TIG welding. Pure argon is the common baseline for many TIG applications. Unknown gas mix: Unknown (Verify).
    • Set flow to a reasonable starting range for the cup size and joint access, then adjust by weld appearance and torch behavior. Exact CFH target: Unknown (Verify) for the specific torch, cup, gas lens, and procedure.
    • Check for drafts from fans, open doors, compressed air, HVAC vents, and nearby grinding stations.
    • Inspect the cup for cracks, spatter, chips, and poor seating.
    • Remove and inspect the gas lens or collet body. Look for clogged screens, damaged threads, or signs of overheating.
    • Inspect the back cap O-ring and torch body seals. Replace damaged seals before troubleshooting amperage or tungsten type.
    • Shorten tungsten stickout and test again with the same amperage and filler technique.
    • Increase post-flow long enough to keep shielding over the tungsten until it stops glowing.
    • Clean base metal and filler wire before welding. Use dedicated stainless brushes where required.
    • Regrind contaminated tungsten lengthwise using a clean wheel or dedicated tungsten grinder.

    Specs / Verification Notes

    Item to CheckWhat to VerifyWhy It Matters
    Shielding gasCorrect gas type and clean deliveryWrong or contaminated gas can oxidize the tungsten and weld pool
    Flow settingNot too low and not excessiveLow flow leaves gaps; high flow can create turbulence
    Post-flowLong enough to shield hot tungsten after arc stopHot tungsten can oxidize after the weld ends
    Cup and gas lensNo cracks, clogged screens, loose fit, or heat damageDamaged front-end parts disturb laminar gas coverage
    Back cap and O-ringSealed, tight, and not cut or flattenedSmall leaks can pull air into the torch gas path
    Tungsten prepClean, lengthwise grind, correct diameter for amperagePoor prep contributes to arc wander and tip overheating

    Comparison Table

    SymptomLikely CauseFirst Check
    Tungsten turns black after the arc stopsPost-flow too shortWatch whether gas stops while tungsten is still hot
    Tungsten turns black during the weldPoor shielding or contaminationCheck gas flow, torch angle, cup, and drafts
    Arc wanders and tungsten darkensBad tip prep, contaminated tungsten, or gas instabilityRegrind tungsten and inspect gas lens
    Weld is black or sooty tooMajor gas coverage failure or dirty materialInspect gas delivery and clean the joint
    Only one torch causes the issueTorch leak or damaged front-end partSwap cup, collet body, back cap, and hose if available

    Related Failure Paths

    Safety Notes

    TIG welding produces intense arc radiation even when the process looks clean. Use a welding helmet with the correct shade for the work, safety glasses under the hood, flame-resistant clothing, gloves, and adequate ventilation. Grinding tungsten also creates dust and eye impact hazards, so use eye protection and avoid breathing grinding dust.

    OSHA welding, cutting, and brazing rules address eye protection, fire prevention, ventilation, and protective clothing. ANSI Z49.1 is a key welding safety reference for safe welding, cutting, and allied processes. For shop procedures, verify requirements against the current employer safety program, SDS documents, and applicable local rules.

    FAQ

    Does black tungsten always mean the weld is bad?

    No. A bead may look acceptable while the tungsten still shows oxidation. However, black tungsten is a warning that shielding, post-flow, torch condition, or cleanliness should be checked before continuing on critical work.

    Can too much argon turn tungsten black?

    Yes. Excessive gas flow can create turbulence at the cup and pull air into the shielding zone. The result can look like low gas flow even though the flowmeter setting is high.

    Should the tungsten stay shiny after welding?

    It should remain clean enough to hold a stable arc. Light heat tint may appear depending on the application, but repeated blackening, soot, or arc wander means the setup needs correction.

    Is a gas lens always the fix?

    No. A gas lens can improve shielding stability, but it will not fix a leaking torch, bad post-flow, contaminated gas, dirty base metal, or poor torch angle.

    When should tungsten be re-ground?

    Regrind when the tip is contaminated, balled unexpectedly, split, dull, or causing arc wander. Grind lengthwise and keep the grinding surface clean from other metals.

    Next Step

    If the tungsten turns black again after checking flow and post-flow, isolate the torch. Swap the cup, gas lens or collet body, back cap, and tungsten one part at a time. If the issue follows the torch, inspect the hose, O-rings, and fittings for leaks before changing welding parameters.

    For the next troubleshooting step, compare the symptoms with black and sooty TIG weld causes if the bead is also dark, or use the tungsten contamination prevention guide if the bead shows inclusions or black specks.

    Sources Checked

    • AWS Recommended Practices for Gas Tungsten Arc Welding, AWS C5.5/C5.5M
    • OSHA 29 CFR 1910.252 General Requirements for Welding, Cutting, and Brazing
    • OSHA Welding, Cutting, and Brazing Standards overview
    • AWS/ANSI Z49.1 Safety in Welding, Cutting, and Allied Processes
    • Miller: How to Solve Common TIG Welding Problems
    • Miller: Proper Shielding Gas Coverage Is Key to Success in GTAW
    • WSP internal TIG contamination and TIG gas coverage articles listed above
  • Welding Fume Extractor Not Pulling Smoke: Causes and Fixes

    A welding fume extractor that fails to pull smoke effectively exposes operators to hazardous fumes and reduces overall shop safety. Poor suction is typically caused by airflow restriction, filter saturation, or incorrect positioning. Diagnosing the airflow path is critical to restoring proper extraction performance.

    Key Takeaways

    • Clogged filters are the most common cause of weak suction
    • Improper hood positioning reduces capture efficiency
    • Airflow restrictions limit extraction performance
    • Undersized systems struggle with high-fume processes
    • Routine maintenance prevents most extraction failures

    Problem / Context

    Fume extraction systems are designed to capture and remove airborne contaminants at the source. When suction drops, fumes remain in the breathing zone, increasing exposure risk. This issue is often gradual and may go unnoticed until visible smoke buildup occurs.

    Root Causes

    • Clogged filters: saturated media reducing airflow
    • Blocked ducting: debris or buildup restricting flow
    • Poor hood placement: positioned too far from the arc
    • Leaks in system: air loss reducing suction at the source
    • Undersized extractor: insufficient CFM for application
    • Fan or motor wear: reduced airflow performance

    Solution / Explanation

    • Replace or clean filters according to manufacturer guidelines
    • Inspect ducting for obstructions and remove debris
    • Position extraction hood as close to the weld arc as possible
    • Check system for air leaks and seal connections
    • Verify extractor capacity matches welding process requirements
    • Inspect fan and motor performance for wear or failure

    Specs / Verification Notes

    • Airflow Capacity (CFM): Unknown (Verify per unit)
    • Filter Type: HEPA or multi-stage (application dependent)
    • Duct Diameter: System dependent
    • Capture Velocity: Unknown (Verify)
    • Process Type: MIG, TIG, Stick, Flux-Cored (fume levels vary)

    Product Option

    ArcOne S240-10 Horizontal Single Auto-Darkening Filter for Welding, 2 x 4, Shade 10
    • Two independent sensors, High Definition clear view technology
    • 5.25 square inches of active viewing area
    • Switching speed of 0.5 milliseconds
    • Water and dust resistant
    • Dark to light state delay of 0.2 seconds

    Last update on 2026-06-04 / Affiliate links / Images from Amazon Product Advertising API

    Comparison Table

    IssueSymptomImpactFix
    Clogged FilterWeak suctionPoor air qualityReplace filter
    Blocked DuctReduced airflowFume buildupClear obstruction
    Poor Hood PlacementSmoke not capturedOperator exposureReposition hood
    Undersized UnitConstant smokeIneffective extractionUpgrade system

    Safety Notes

    Follow ANSI Z49.1 and OSHA ventilation standards for welding environments. Always verify proper airflow before welding. Use respiratory protection if extraction is insufficient.

    FAQ

    Why is my fume extractor not pulling smoke?

    This is usually caused by clogged filters, airflow restrictions, or improper hood placement.

    How often should filters be replaced?

    Filter replacement depends on usage, but should be done when airflow noticeably decreases.

    Does hood position affect performance?

    Yes. The hood must be positioned close to the arc to effectively capture fumes.

    Next Step

    Inspect filters and airflow path before the next weld. Adjust hood position and confirm suction strength using a visible smoke test.

    Sources Checked

    • ANSI Z49.1 Safety in Welding and Cutting
    • OSHA ventilation guidelines
    • Fume extraction system manufacturer documentation
  • Plasma Cutter Not Cutting Through: Causes and Fixes

    A plasma cutter that fails to cut through material typically indicates issues with air supply, consumables, or machine setup. This problem reduces cut quality, increases dross, and can damage the torch if ignored. Diagnosing the root cause quickly restores performance and prevents unnecessary wear.

    Key Takeaways

    • Insufficient air pressure is a leading cause of poor cutting performance
    • Worn consumables reduce arc energy and cut penetration
    • Incorrect amperage settings limit cutting capability
    • Slow or inconsistent travel speed affects cut-through
    • Moisture in air supply degrades plasma arc quality

    Problem / Context

    Plasma cutting relies on a high-temperature ionized gas stream to melt and eject metal. When any part of the systemโ€”air supply, power, or consumablesโ€”is compromised, the arc loses effectiveness. This results in incomplete cuts, excessive slag, or arc instability.

    Root Causes

    • Low air pressure: insufficient airflow reduces arc force
    • Moisture contamination: water in air disrupts plasma stability
    • Worn consumables: degraded electrodes and nozzles reduce performance
    • Incorrect amperage: not matched to material thickness
    • Slow travel speed: excessive heat buildup without full penetration
    • Poor ground connection: unstable arc behavior

    Solution / Explanation

    • Verify air pressure meets machine specifications
    • Install air dryers or filters to remove moisture
    • Replace consumables regularly based on wear
    • Adjust amperage according to material thickness
    • Maintain consistent travel speed during cutting
    • Ensure clean and secure ground clamp connection

    Specs / Verification Notes

    • Air Pressure: Unknown (Verify per machine manual)
    • Amperage Range: Machine dependent
    • Consumable Life: Usage dependent
    • Cut Thickness Capacity: Unknown (Verify)
    • Air Quality Requirement: Dry, oil-free air

    Comparison Table

    CauseSymptomImpactFix
    Low Air PressureWeak arcNo full cut-throughIncrease pressure
    Worn ConsumablesWide arcPoor cut qualityReplace parts
    Moisture in AirArc sputteringInconsistent cutsDry air supply
    Low AmperageSlow cuttingIncomplete penetrationIncrease output

    Safety Notes

    Follow ANSI Z49.1 safety standards for plasma cutting. Ensure proper grounding and use appropriate PPE including eye protection and gloves. Never operate a plasma cutter with damaged consumables or unstable air supply.

    FAQ

    Why is my plasma cutter not cutting all the way through?

    This is usually caused by low air pressure, worn consumables, or incorrect amperage settings.

    Can bad air quality affect plasma cutting?

    Yes. Moisture or oil in the air supply disrupts the plasma arc and reduces cutting efficiency.

    How often should consumables be replaced?

    Replacement depends on usage and material, but worn consumables should be changed as soon as cut quality declines.

    Next Step

    Check air supply quality and consumable condition before the next cut. Adjust settings based on material thickness and confirm stable operation on scrap material.

    Sources Checked

    • ANSI Z49.1 Safety in Welding and Cutting
    • Plasma cutter manufacturer’s operation manuals
    • AWS cutting process references (general guidance)
  • Auto-Darkening Welding Helmet Not Working: Causes and Fixes

    An auto-darkening welding helmet that fails to activate properly creates serious visibility and safety issues. Common failures include delayed darkening, flickering lenses, or complete non-response. These problems are typically related to sensors, power supply, or lens degradation.

    Key Takeaways

    • Dead or weak batteries are a leading cause of failure
    • Blocked or dirty sensors prevent proper arc detection
    • Lens cartridges degrade over time and may require replacement
    • Incorrect sensitivity or delay settings can mimic failure
    • Low amperage welding may not trigger some helmets reliably

    Problem / Context

    Auto-darkening helmets rely on arc sensors and electronic filters to instantly adjust shade levels. When the system fails, the user may experience flash exposure or inconsistent visibility. These issues can occur suddenly or develop gradually due to wear or environmental conditions.

    Root Causes

    • Low or dead battery: insufficient power for lens activation
    • Obstructed sensors: dirt, spatter, or positioning blocking detection
    • Damaged lens cartridge: internal failure or aging electronics
    • Incorrect sensitivity setting: arc not detected at lower amperage
    • Cracked or worn cover lens: reduces sensor accuracy
    • Cold temperatures: slows LCD response time

    Solution / Explanation

    • Replace batteries or confirm solar-assisted units are receiving light
    • Clean sensor areas and remove any obstructions
    • Adjust sensitivity and delay settings for the welding process
    • Inspect outer and inner cover lenses for damage
    • Test helmet under normal arc conditions to confirm response
    • Replace lens cartridge if failure persists after basic checks

    Specs / Verification Notes

    • Shade Range: Unknown (Verify)
    • Switching Speed: Unknown (Verify)
    • Power Source: Battery / Solar (model dependent)
    • Sensor Count: Unknown (Verify)
    • Operating Temperature Range: Unknown (Verify)

    Comparison Table

    IssueSymptomCorrection
    Dead BatteryNo darkeningReplace battery
    Dirty SensorsIntermittent responseClean sensors
    Low SensitivityNo activation at low ampsIncrease sensitivity
    Damaged LensFlicker or delayReplace cartridge
    Cold ConditionsSlow responseWarm helmet before use

    Safety Notes

    Follow ANSI Z87.1 and ANSI Z49.1 standards for eye and face protection. Never weld with a malfunctioning helmet. Verify proper operation before each use to prevent arc flash exposure.

    FAQ

    Why is my welding helmet not darkening?

    This is usually caused by low battery power, blocked sensors, or incorrect sensitivity settings.

    Can auto-darkening helmets stop working over time?

    Yes. Lens cartridges degrade and may eventually fail, requiring replacement.

    Do low amperage welds affect helmet performance?

    Some helmets may not detect low-amperage arcs unless the sensitivity is properly adjusted.

    Next Step

    Test the helmet with a known-working welding setup after the adjustments. If the issue persists, replace the lens cartridge or upgrade the helmet to ensure reliable protection.

    Sources Checked

    • ANSI Z87.1 Eye and Face Protection
    • ANSI Z49.1 Safety in Welding and Cutting
    • Welding helmet manufacturer manuals (general reference)
  • Oxy-Acetylene Torch Backfire vs Flashback: Causes and Fixes

    Backfire and flashback events in oxy-acetylene torches indicate improper gas flow, tip condition issues, or unsafe operating practices. While a backfire is typically a momentary pop, a flashback is more serious and can travel into the torch or hoses, creating a significant safety hazard.

    Key Takeaways

    • Backfire is a short pop; flashback is a sustained flame reversal
    • Dirty or damaged tips are a common cause
    • Incorrect gas pressures disrupt flame stability
    • Blocked hoses or regulators increase flashback risk
    • Flashback arrestors are critical safety components

    Problem / Context

    Oxy-fuel systems rely on controlled gas flow and proper mixing at the torch tip. When this balance is disrupted, combustion can occur inside the tip or travel backward into the system. Understanding the difference between backfire and flashback is essential for safe troubleshooting and prevention.

    Root Causes

    • Clogged or dirty tip: restricts gas flow and causes unstable combustion
    • Incorrect gas pressure: improper oxygen-to-fuel ratio
    • Loose tip or connections: creates internal leaks
    • Overheating tip: increases risk of ignition inside the tip
    • Blocked hoses or regulators: restricts flow and pressure stability
    • Missing flashback arrestors: no protection against reverse flame travel

    Solution / Explanation

    • Clean torch tips using proper tip cleaners sized for the orifice
    • Verify gas pressures match manufacturer recommendations
    • Tighten all connections securely before operation
    • Allow the torch to cool if overheating occurs
    • Inspect hoses and regulators for restrictions or damage
    • Install and maintain flashback arrestors on both oxygen and fuel lines

    Specs / Verification Notes

    • Operating Pressure (Oxygen): Unknown (Verify)
    • Operating Pressure (Acetylene): Unknown (Verify)
    • Tip Size: Application dependent
    • Flashback Arrestor Rating: Unknown (Verify)
    • Hose Type: Grade R or T (application dependent)

    Comparison Table

    ConditionSymptomSeverityCorrection
    BackfireLoud pop, flame extinguishesLowClean tip, adjust pressure
    FlashbackHissing or whistling, flame inside torchHighClean or replace the tip
    Clogged TipUnstable flameMediumHissing or whistling, flame inside the torch
    Low Gas PressureWeak or sputtering flameMediumAdjust regulator settings

    Safety Notes

    Follow ANSI Z49.1 and CGA safety guidelines for oxy-fuel systems. Always use flashback arrestors and check valves. Shut off the gas supply immediately if a flashback is suspected. Never operate damaged equipment.

    FAQ

    What is the difference between backfire and flashback?

    Backfire is a brief pop with flame extinguishing, while flashback involves flame traveling back into the torch or hoses.

    What should be done during a flashback?

    Immediately shut off oxygen first, then fuel gas, and inspect the system before reuse.

    Can dirty tips cause flashback?

    Yes. Restricted gas flow from clogged tips is a common trigger for both backfire and flashback.

    Next Step

    Inspect the torch system, clean the tip, and verify gas pressures before next use. Install flashback arrestors if not already present to reduce risk.

    Sources Checked

    • ANSI Z49.1 Safety in Welding and Cutting
    • CGA (Compressed Gas Association) safety guidelines
    • Oxy-fuel torch manufacturer manuals (general reference)
  • 7018 Rod Sticking: Causes & Solutions

    Introduction

    Welding with 7018 rods can be challenging, especially when they start sticking during operation. This issue not only affects the quality of the weld but also disrupts workflow. Understanding the underlying causes and solutions can help welders achieve more efficient results.

    Key Takeaways

    – 7018 rods are prone to sticking due to improper technique or settings.
    – Correct amperage and angle can reduce sticking.
    – Proper rod storage is crucial for optimal performance.
    – Using the right equipment can significantly improve weld quality.

    Problem / Context

    Sticking occurs when the electrode fuses to the workpiece, interrupting the arc and making it difficult to complete the weld. This is a common issue with 7018 rods, which require precise conditions to function correctly.

    Causes

    Low Amperage

    – Inadequate amperage fails to sustain the arc, causing the rod to stick.

    Incorrect Angle

    – Holding the rod at an incorrect angle reduces arc stability.

    Poor Rod Condition

    – Moisture absorption in 7018 rods can lead to sticking.

    Fixes

    Step 1: Adjust Amperage

    Increase Amperage: Slowly increase amperage until the arc is stable and the rod flows smoothly without sticking.

    Step 2: Correct Angle

    Maintain a 10-15 Degree Angle: Keep the rod at a consistent angle to ensure smooth arc movement.

    Step 3: Ensure Dry Storage

    Proper Storage: Store rods in a dry, sealed container or rod oven to prevent moisture absorption.

    Step 4: Consistent Movement

    Steady Motion: Employ a steady, consistent movement along the weld joint to reduce sticking.

    Product Section

    Washington Alloy 7018 Stick Electrode 5LB Package (7018 1/8″)
    • All-position, Flux coated
    • 70,000 lbs Tensile Strength
    • 5 Lb Package

    Last update on 2026-06-04 / Affiliate links / Images from Amazon Product Advertising API

    Safety Notes

    Eye Protection: Follow ANSI Z87.1 standards for eye protection.
    Welding Codes: Adhere to AWS D1.1 and D1.3 for safe and effective welding practices.

    FAQ

    What amperage should be used for 7018 rods?

    Amperage settings typically range from 90 to 160 amps, depending on the rod diameter. Adjust based on welding parameters and practice.

    How should 7018 rods be stored?

    Store in a temperature-controlled rod oven at 250ยฐF (121ยฐC) to keep them dry and prevent moisture absorption.

    Can rod sticking damage my welding machine?

    Prolonged sticking can overheat and damage your welding machine, so it’s vital to address issues promptly.

    Conclusion / Next Step

    Addressing 7018 rod sticking involves proper technique and equipment adjustments. By implementing these solutions, welders can enhance their welding performance and minimize disruptions. For more tips on stick welding, explore additional resources and comparisons of welding rods like 7018 vs 6011.

  • Best P100 Respirators for Welding Fumes (Seal Leak Fix)

    Your respirator is leaking fumes because your mask is worn out or the wrong size.

    Here are the best P100 respirators that seal properly and protect against welding fumes.

    WHERE TO BUY

    CKE 20 Pairs Cable Railing Kit – 3/16″ Swage Toggle Turnbuckle Hardware Kit – T316 Stainless Steel for Wood Post Cable Railing System – Angle 180ยฐ Adjustable Angle Stairs Deck
    • ๐Ÿ”ฆใ€Multi Angled & Wide Adjustmentใ€‘This cable railing kit works for 3/16″ wire rope in multi angled stairways or horizontal sections cable railing systems. The multi adjustable angle feature enables the turnbuckle to rotate from 0 to180 degrees, closed-body of the turnbuckle adjust freely length from the min 7.2″ to max 10.1 inch”. This cable railing hardware kit package can make 20 cable runs.
    • ๐Ÿ”ฆใ€T316 Marine Grade Stainless Steelใ€‘This 3/16″ Cable Railing Hardware Kit made from T316 marine grade stainless steel, which means it’s excellent resistance to rust, corrosion with long-lasting protection. It can handle extreme weather conditions, even in coastal areas where there’s a lot of humidity and salty air. CKE Swage Toggle Turnbuckle for Wood Post is ideal for indoor and outdoor black deck stair cable railing kit system.
    • ๐Ÿ”ฆใ€Sizeใ€‘Fit for 3/16 inch stainless steel cable, apply for both wood posts. Turnbuckle: 7.2″ Deck Toggle End: 3″. We suggest the post spacing about 3-4 ft between wood post ends, and the cable spacing about 3″ to 4″ for each post.
    • ๐Ÿ”ฆใ€Applicationsใ€‘This 3/16″ Swage Toggle Turnbuckle Cable Railing Hardware Kit with wide adjustable range with cleanly looks solve the problem for tighten and adjust the tension of attached cable in multi angled stairways and ramps also for horizontal section cable railing systems for straight, stair or angled sections when using timber posts. This cable railing kit is installed simply by tightening the screws, please refer the picture of 3 to install.
    • ๐Ÿ”ฆใ€Package List & 100% Satisfaction Guaranteeใ€‘20 Set 180 Degree Adjustable Angle Cable Railing Kit (Kti Includes: 20 Pcs Swage Toggle Turnbuckles, 20 Pcs Deck Toggle Terminal, 80 Pcs screws, 1 Pcs CKE Patent Design Spanner Multi Tool). This package can make 20 cable runs. โญBuy with confidence: If you’re not satisfied with this item at anytime within two years after purchased, we’ll provide a refund or replacement.

    Last update on 2026-06-04 / Affiliate links / Images from Amazon Product Advertising API

    Key Takeaways

    • P100 filters block 99.97% of welding fumes (manganese, chromium, nickel, particulates)
    • Silicone facepieces seal better than rubber and last longer
    • Half-face respirators are lighter and more comfortable than full-face for all-day wear
    • Size mattersโ€”small, medium, large; wrong size = seal failure
    • Replace filters every 40 hours of use or when hard to breathe through

    Comparison Table

    ModelTypeSize RangeFilter TypeBest ForPrice Range
    3M 6502QLHalf-face, reusableSmall/Medium/LargeBayonet P100Daily welding, MIG/TIG$35โ€“$50
    Honeywell 5500Half-face, reusableSmall/Medium/LargeBayonet P100General welding, grinding$30โ€“$45
    3M 6391Half-face, reusableLarge onlyBayonet P100Larger faces, high-volume use$40โ€“$55
    3M 2097 FiltersReplacement filtersUniversal fitP100 + organic vapor reliefFilter replacement$8โ€“$12 per pair

    Product Sections

    3M 6502QL Rugged Comfort Quick Latch Respirator

    The 3M 6502QL is the gold standard for welding shops. Quick Latch design means you can snap cartridges on and off without twisting, saving time between jobs. Silicone facepiece seals tight and won’t degrade like rubber. Cool Flow exhalation valve reduces fogging and heat buildup.

    Key Specs:

    • Facepiece: Silicone, soft and durable
    • Filter connection: Bayonet (quick-click)
    • Sizes: Small, Medium, Large
    • Exhalation valve: Yes (reduces heat/moisture)
    • Reusable: Yes (lasts 5+ years with care)
    • NIOSH certified: Yes (ANSI Z87.1)

    Best for: Daily MIG/TIG welding, confined spaces, high-fume environments.

    Amazon:

    CKE 20 Pairs Cable Railing Kit – 3/16″ Swage Toggle Turnbuckle Hardware Kit – T316 Stainless Steel for Wood Post Cable Railing System – Angle 180ยฐ Adjustable Angle Stairs Deck
    • ๐Ÿ”ฆใ€Multi Angled & Wide Adjustmentใ€‘This cable railing kit works for 3/16″ wire rope in multi angled stairways or horizontal sections cable railing systems. The multi adjustable angle feature enables the turnbuckle to rotate from 0 to180 degrees, closed-body of the turnbuckle adjust freely length from the min 7.2″ to max 10.1 inch”. This cable railing hardware kit package can make 20 cable runs.
    • ๐Ÿ”ฆใ€T316 Marine Grade Stainless Steelใ€‘This 3/16″ Cable Railing Hardware Kit made from T316 marine grade stainless steel, which means it’s excellent resistance to rust, corrosion with long-lasting protection. It can handle extreme weather conditions, even in coastal areas where there’s a lot of humidity and salty air. CKE Swage Toggle Turnbuckle for Wood Post is ideal for indoor and outdoor black deck stair cable railing kit system.
    • ๐Ÿ”ฆใ€Sizeใ€‘Fit for 3/16 inch stainless steel cable, apply for both wood posts. Turnbuckle: 7.2″ Deck Toggle End: 3″. We suggest the post spacing about 3-4 ft between wood post ends, and the cable spacing about 3″ to 4″ for each post.
    • ๐Ÿ”ฆใ€Applicationsใ€‘This 3/16″ Swage Toggle Turnbuckle Cable Railing Hardware Kit with wide adjustable range with cleanly looks solve the problem for tighten and adjust the tension of attached cable in multi angled stairways and ramps also for horizontal section cable railing systems for straight, stair or angled sections when using timber posts. This cable railing kit is installed simply by tightening the screws, please refer the picture of 3 to install.
    • ๐Ÿ”ฆใ€Package List & 100% Satisfaction Guaranteeใ€‘20 Set 180 Degree Adjustable Angle Cable Railing Kit (Kti Includes: 20 Pcs Swage Toggle Turnbuckles, 20 Pcs Deck Toggle Terminal, 80 Pcs screws, 1 Pcs CKE Patent Design Spanner Multi Tool). This package can make 20 cable runs. โญBuy with confidence: If you’re not satisfied with this item at anytime within two years after purchased, we’ll provide a refund or replacement.

    Last update on 2026-06-04 / Affiliate links / Images from Amazon Product Advertising API


    Honeywell North 5500 Series P100 Half Mask

    The Honeywell 5500 is the budget-friendly alternative that doesn’t sacrifice protection. Direct cartridge-to-face seal (no valve) makes it simple and reliable. Soft elastomer facepiece is comfortable for 8-hour shifts. Compatible with a wide range of filter types.

    Key Specs:

    • Facepiece: Elastomer (soft, durable)
    • Filter connection: Direct bayonet
    • Sizes: Small, Medium, Large
    • Exhalation valve: No (simpler design)
    • Reusable: Yes (lasts 3โ€“5 years)
    • NIOSH certified: Yes

    Best for: Budget-conscious shops, occasional welding, grinding and sanding.

    Amazon:

    No products found.


    3M 6391 Half Facepiece Respirator (Large)

    The 3M 6391 is the large-size version of the 6502, designed for welders with bigger faces or those who need maximum comfort. Same silicone quality and Cool Flow valve as the 6502. Wider straps distribute pressure evenly.

    Key Specs:

    • Facepiece: Silicone, large fit
    • Filter connection: Bayonet
    • Sizes: Large only
    • Exhalation valve: Yes (Cool Flow)
    • Reusable: Yes (lasts 5+ years)
    • NIOSH certified: Yes

    Best for: Large-face welders, all-day high-volume welding, TIG work.

    Amazon:

    No products found.


    3M 2097 P100 Particulate Filters (Replacement)

    Fresh filters are critical. The 3M 2097 includes organic vapor relief, which helps with the smell of welding fumes. Magenta color makes it easy to spot when they’re saturated (turn dark brown). Compatible with 3M 6500 series respirators and most half-face masks.

    Key Specs:

    • Filter type: P100 (99.97% efficiency)
    • Organic vapor relief: Yes
    • Fit: Bayonet (3M 6500 series, 6000 series, 7000 series)
    • Lifespan: 40 hours of use or until hard to breathe through
    • Quantity: 2 pairs (4 filters) per box
    • NIOSH certified: Yes

    Best for: Replacing worn-out filters, maintaining seal integrity, reducing fume odor.

    Amazon:

    Last update on 2026-06-04 / Affiliate links / Images from Amazon Product Advertising API


    Still Deciding? Compare These Options Below

    No products found.

    How to Choose the Right Respirator

    1. Get the Right Size Try on small, medium, and large. The mask should feel snug but not painful. You should feel gentle suction when you inhale. If it shifts or gaps appear, try the next size.

    2. Check Your Filter Type Most modern half-face respirators use bayonet cartridges (click-on). Older models use threaded cartridges (screw-on). Know which one you have before buying filters.

    3. Consider Comfort Silicone facepieces (3M 6502, 6391) are more comfortable for all-day wear. Elastomer (Honeywell 5500) is cheaper but less comfortable. Cool Flow valves reduce heat buildup.

    4. Plan for Filter Replacement P100 filters last 40 hours of use. If you weld 8 hours a day, 5 days a week, you’ll need new filters every 1โ€“2 weeks. Budget accordingly.

    5. Check Compatibility Not all filters fit all masks. 3M 6500 series uses bayonet cartridges. Honeywell 5500 uses direct bayonet. Verify before buying.

    FAQ

    Q: Can I use an N95 for welding? A: No. N95 masks are for dust and pollen, not welding fumes. Welding fumes contain toxic metals (manganese, chromium, nickel). You need a P100 respirator.

    Q: How long do P100 filters last? A: 40 hours of use or until they become hard to breathe through. If your filters are dark brown, replace them. Don’t guessโ€”replace them.

    Q: Can I reuse a P100 filter? A: No. Once saturated, they lose efficiency. Throw them away and install fresh filters.

    Q: What if I have a beard? A: Shave the area where the mask contacts your face. Even 1/8 inch of beard hair breaks the seal. A leaking mask doesn’t protect you.

    Q: Do I need a fit test? A: OSHA recommends annual fit testing in high-risk environments. For shop use, do a quick seal check: cover the cartridges, inhale hard, and feel for leaks around the edges.

    Safety Notes

    Welding fumes contain manganese, chromium, nickel, and other toxic metals. Chronic exposure causes neurological damage, respiratory disease, and kidney problems. ANSI Z87.1 requires proper respiratory protection in confined spaces or high-fume environments. A proper seal is criticalโ€”a leaking mask gives false confidence and exposes you to harmful particulates.

    Always wear a properly sealed P100 respirator when welding in enclosed or poorly ventilated spaces.


Watch with Prime Video