Victor 0781-3628 EDGE 2.0 Regulator Review & Guide
Note for Readers: This post may contain affiliate links. If you purchase through them, we may earn a small commission at no cost to you. Thank you for supporting our site.
Introduction
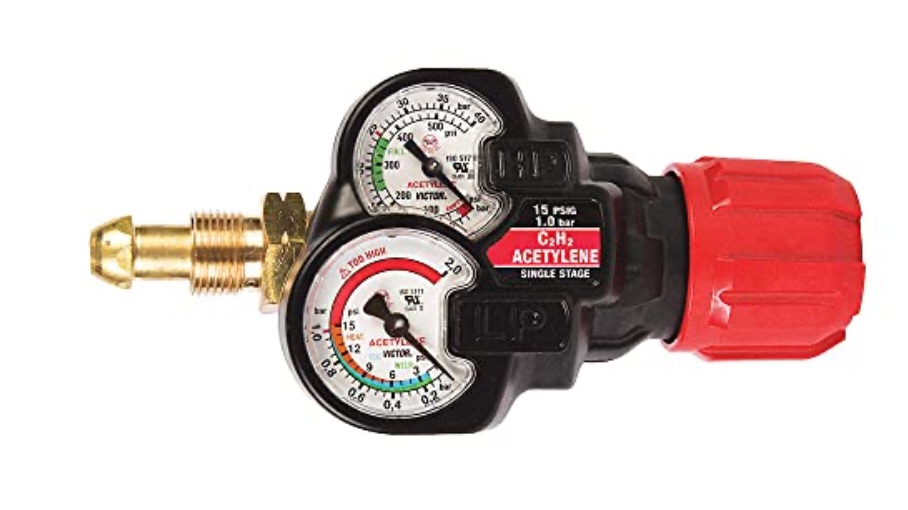
The Victor 0781-3628 ESS32-15-510 EDGE 2.0 Regulator is a high-performance single-stage Acetylene regulator engineered for reliability, precision, and safety in welding and cutting operations. Designed as part of the EDGE 2.0 series, this regulator is trusted by professional welders, metal fabricators, technicians, and industrial maintenance crews for its excellent pressure control and rugged build.
Welding gases, especially Acetylene, must be regulated precisely for safety and performance. The Victor EDGE 2.0 regulator ensures accurate gas delivery, making it essential for processes like oxy-fuel cutting and gas welding, where stable flow rates are critical for flame control and consistent results.
Whether you’re a student learning oxy-fuel welding techniques, a fabrication shop owner, or a pipefitter on-site, the Victor 0781-3628 delivers dependable regulation and advanced safety features in high-demand conditions.
—
Types / Variants / Models
The Victor EDGE 2.0 line includes several regulators designed for different gases and connection types. The 0781-3628 (ESS32-15-510) model focuses specifically on acetylene use and features a CGA-510 inlet connection.
Here are common variants in the EDGE 2.0 ESS32 series:
– Victor 0781-3628 ESS32-15-510
– Gas: Acetylene
– Inlet Connection: CGA-510
– Max Delivery Pressure: 15 PSI
– Best for: General-purpose welding, cutting, heating in fabrication environments.
– Victor 0781-3627 ESS32-510
– Gas: Acetylene
– Inlet Connection: CGA-510
– Used alongside the 0781-3626 for oxy-acetylene setups.
– Victor EDGE 2.0 Argon/CO2 Regulators
– Tailored for shielding gases in GMAW (MIG) and GTAW (TIG) welding applications.
The 0781-3628 is optimized for use with Acetylene cylinders and pairs with oxygen regulators for balanced and safe operation in oxy-fuel torches.
—
Key Features or Specifications
The Victor 0781-3628 EDGE 2.0 regulator is engineered for performance, precision, and durability. Here’s what sets it apart:
– Gas Type: Acetylene
– Designed for high-flow acetylene applications in cutting and welding.
– Inlet Connection: CGA-510
– Commonly found on standard industrial acetylene cylinders in the U.S.
– Delivery Pressure Range: 1-15 PSI
– Ideal for acetylene fuel cutting, light to heavy-duty brazing, and machine torch setups.
– Gauge Type: Dual 2-inch gauges with high-contrast color-coded dials
– Provides clear visibility of cylinder pressure and delivery pressure, even in low-light environments.
– Housing: Forged brass body with zinc-aluminum cap
– Delivers strength and corrosion resistance suitable for heavy industrial use.
– Diaphragm: Fabric-reinforced neoprene
– Offers stable pressure control and responsiveness, especially in variable temperature conditions.
– Safety: Built-in SLAM™ (Shock Limitation and Minimization) technology
– Protects gauges and regulator internals from impact for extended longevity and reliability.
– Weight: Approx. 3 lbs
– Heavy-duty yet portable, suitable for mobile welding units and shop setups.
– Certifications: Meets industry standards like ANSI Z49.1, with stringent manufacturing quality controls. Victor products are also known to be CE compliant and AWS (American Welding Society) recommended.
—
Usage & Compatibility
The Victor EDGE 2.0 0781-3628 is primarily used in oxy-fuel cutting, welding, and brazing processes. It is compatible with:
– Processes:
– SMAW (Shielded Metal Arc Welding): For preheating or post-weld heat treating using torch heating.
– GMAW / FCAW: When combined with fuel gases for flame-cutting prep.
– GTAW (TIG): Occasionally used for heating applications alongside TIG for thick metal prep.
– Oxy-Acetylene Welding and Cutting: The most common use-case scenario, pairing the 0781-3628 with an oxygen regulator.
– Torch Compatibility:
– Compatible with Victor journeyman torch sets, Harris-type tips, and general oxy-fuel torch outfits.
– Cylinders:
– Works with standard industrial-sized acetylene tanks with a CGA-510 fitting.
Pros:
– Excellent gauge readability and safety design.
– Stable, accurate delivery pressure control.
– Extremely durable for harsh job site conditions.
Cons:
– Heavier than some budget regulators (due to durable casing).
– Slightly more expensive, but justifiable by performance and lifespan.
—
Common Applications
The Victor 0781-3628 is relied upon in a variety of professional and industrial settings, particularly where precision and safety are paramount:
– Metal Fabrication Shops
– Acetylene delivery for cutting thick plate steel, structural beams, and prepping weld joints.
– Field Welding & Pipelines
– Durable enough for on-site welding and cutting in demanding environments.
– Trade Schools & Welding Education
– Provides students with tools that mirror professional-grade standards, preparing them for industry work.
– Industrial Maintenance & Repair
– Used for steel structure repairs, flange bolt removal via acetylene heating, and dismantling operations.
Its robust design, precision control, and wide delivery pressure range make it ideal for both stationary setups and mobile welding units.
—
Tips & Best Practices
To get the most out of your Victor 0781-3628 EDGE 2.0 regulator, follow these tips:
Setup:
– Always attach to an upright cylinder and use a wrench appropriate for CGA-510 fittings.
– Crack the cylinder valve briefly before connecting to blow out debris.
– Gradually open the acetylene valve; do not force open fully in one turn.
Usage:
– Use in well-ventilated areas and ensure hoses and flashback arrestors are in good condition.
– Monitor gauge readings frequently, especially in high-heat environments.
– Use a compatible acetylene regulator and appropriate torch tip for balanced flame characteristics.
Maintenance:
– Store regulators in protective cases or upright when not in use.
– Periodically inspect for gas leaks using soapy water (never a flame).
– Avoid dropping or hitting the regulator to protect internal calibration and integrity.
Troubleshooting:
– Erratic Pressure: May indicate diaphragm wear—time for service or replacement.
– Leak at CGA-510 Inlet: Check for damaged threads or missing sealing washer.
– (Incomplete: max_output_tokens)