Tag: welding helmet

  • Lincoln Viking 1740 Auto-Darkening Welding Helmet – K3282-3: Product Breakdown

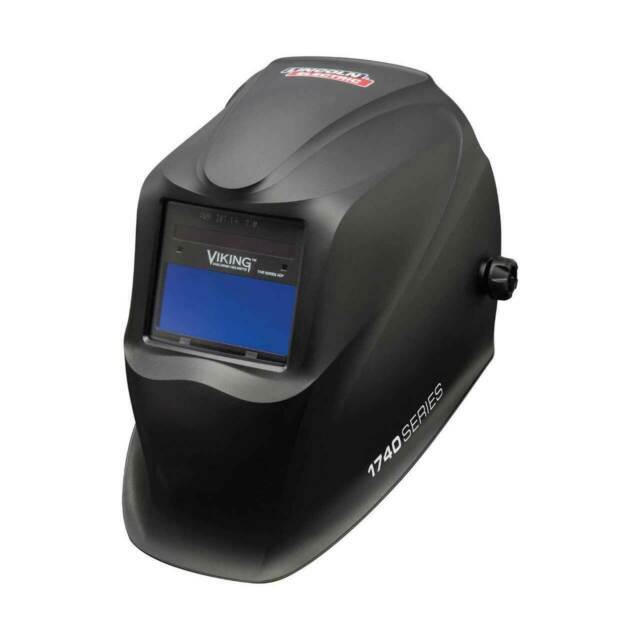
    Lincoln Viking 1740 Auto-Darkening Welding Helmet – K3282-3: Product Breakdown

    Product not found.
    “>Lincoln Viking 1740 Auto-Darkening Welding Helmet - K3282-3

    The Lincoln Viking 1740 Auto-Darkening Welding Helmet – K3282-3 is a welding PPE item intended for day-to-day fabrication and repair work where a stable view of the weld zone matters. For buyers and support teams, the main question is not whether the helmet is โ€œadvanced,โ€ but whether it fits the job, the user, and the maintenance routine. On a shop floor, consistent lens response, proper fit, and basic inspection discipline matter more than marketing terms.

    Key Takeaways

    • Auto-darkening helmets are support items for visibility and eye protection, not a substitute for correct process setup.
    • Inspect the shell, lens area, headgear, and sensors before each shift.
    • Verify that the user can see the joint clearly in the bright state and that the helmet stays positioned during work.
    • Replace damaged components early. Small issues in lens cover condition or headgear fit can become reliability problems.
    • If a detail is not confirmed in the source material, treat it as Unknown (Verify).

    What this helmet is for

    Based on the product description provided, this helmet is aimed at general fabrication and repair, shop work, field welding, and common arc processes such as MIG, TIG, and stick. The practical value of an auto-darkening helmet is simple: it lets the welder see the work area clearly before the arc starts, then darkens when the arc is struck. That reduces the need to repeatedly nod the hood up and down and can help reduce eye strain during repetitive work.

    For maintenance buyers, the priority is not just the helmet model name. It is whether the unit supports the weldersโ€™ actual tasks, how often consumable parts are checked, and whether the team has a repeatable inspection routine. If the application includes grinding, overhead welds, tight access work, or frequent start-stop cycles, the helmet must stay comfortable and reliable enough to avoid operator workarounds.

    Product / parts notes

    This article is limited to the product listing provided. Specific technical specs, lens sizes, shade ranges, sensor counts, and certification details were not supplied here, so they are Unknown (Verify). Do not assume compatibility with aftermarket headgear, cover lenses, or cartridge-style replacements unless the manufacturer documentation confirms it.

    For shop support, verify the following before issue or deployment:

    • Shell condition: inspect for heat damage, cracks, warping, and spatter buildup.
    • Lens area: check the outer and inner cover surfaces for pitting, clouding, scratches, and contamination.
    • Auto-darkening function: confirm the lens transitions properly during arc exposure in a controlled test.
    • Headgear: verify adjustment range, locking action, and that the helmet stays in position during head movement.
    • Seal and fit: confirm proper coverage around the face and neck area when used with other PPE.

    Troubleshooting and support checks

    1) Lens does not darken consistently

    • Check: confirm the helmet has power, if applicable. Power source details are Unknown (Verify) from the provided source.
    • Inspect: the sensors, cover lenses, and front face for dirt, spatter, or obstruction.
    • Verify: the arc is within normal working position and the helmet is aimed correctly at the weld zone.
    • Action: clean the lens surfaces and retest. If response remains inconsistent, remove the helmet from service until the fault is confirmed.

    2) Helmet feels loose or shifts during work

    • Check: the headgear adjustment points and tension settings.
    • Inspect: worn straps, cracked pivots, or damaged lock points.
    • Verify: the operator can tilt, lower, and raise the hood without it drifting out of position.
    • Action: replace worn support parts before the next shift. A loose helmet is a job-quality and safety problem.

    3) Visibility is poor even when the hood is up

    • Check: outer and inner covers for haze, slag impact, smoke film, or grinding dust.
    • Inspect: whether the lens is damaged or blocked by residue.
    • Verify: the user is not using the helmet in a way that exceeds its intended visibility setup.
    • Action: replace scratched cover lenses and clean the shell regularly. If the internal lens is degraded, escalate for replacement or service review.

    How to inspect before use

    1. Visual check: look over the shell for cracks, heat damage, and spatter.
    2. Lens check: inspect both cover surfaces for scratches, haze, or debris.
    3. Fit check: put the helmet on and verify secure headgear contact without pressure points that force the user to loosen the hood.
    4. Function check: perform a controlled arc-response test if shop procedure allows it.
    5. Record check: note any recurring issue, especially if the same helmet is being reassigned between shifts.

    Related support references

    If you are comparing this model to adjacent Lincoln helmet support content, these internal pages may help with broader helmet selection and setup context:

    Safety notes

    • Do not use a damaged helmet in production.
    • Do not rely on a visual appearance alone to confirm auto-darkening performance.
    • Inspect the helmet before every shift and after any impact, drop, or spatter event.
    • Confirm the helmet is used with the correct companion PPE for the task, including gloves, jacket, and respiratory protection when required.
    • If lens response, fit, or shell condition is uncertain, remove the unit from service until verified.

    FAQ

    Is the Lincoln Viking 1740 K3282-3 suitable for MIG, TIG, and stick welding?

    The provided product description says it is intended for daily MIG, TIG, and stick work. Specific duty limits, settings, and procedure approvals are Unknown (Verify).

    Can I use this helmet as a direct replacement for other Lincoln Viking models?

    Not without verification. Compatibility with other models, covers, headgear parts, or accessories is Unknown (Verify) unless the manufacturer documentation confirms it.

    What should I inspect first if the helmet starts acting up?

    Start with the basics: lens cleanliness, cover condition, sensor obstruction, headgear fit, and shell damage. In many cases, the issue is a contaminated cover lens or a loosened adjustment point.

    How often should the helmet be checked?

    At minimum, check it before each use. For shared helmets or high-volume shops, add shift-start and post-incident checks after drops, spatter strikes, or heavy grinding exposure.

    Sources Checked

    • ArcWeld product listing: Lincoln Viking 1740 Auto-Darkening Welding Helmet – K3282-3
    • Internal Weld Support Parts articles linked above

    For procurement or support decisions, keep the focus on fit, function, and inspection discipline. If a technical detail is not documented in the available source material, treat it as Unknown (Verify) before buying or issuing the helmet to the floor.

    Related Arc Weld Part

    Lincoln Viking 1740 Auto-Darkening Welding Helmet - K3282-3

    Lincoln Viking 1740 Auto-Darkening Welding Helmet – K3282-3

    Lincoln Viking 1740 Auto-Darkening Welding Helmet (K3282-3) is a professional-grade auto-darkening hood built for daily MIG, TIG, and stick work where clear visibility and consistent shade response matter. Itโ€™s designed to reduce eye strain by giving you a bright, high-clarity view of the puddle and joint before and during the arc. What itโ€™s for General fabrication and repair Shop and field welding Processes with…

    View at Arc Weld Store

    Related Weld Support Guides

  • Choosing Replacement Cover Lenses

    Miller 231411 Pro-Hobby Series Front Cover Lens - Pack of 5 Replacement Lenses for Welding Helmets
    “>Miller 231411 Pro-Hobby Series Front Cover Lens - Pack of 5 Replacement Lenses for Welding Helmets

    Choosing the wrong cover lens creates fitment problems fast. The lens may not seat correctly, may leave the viewing area exposed, or may interfere with the helmet shell or ADF assembly. For welding helmet cover lens replacement, verify the helmet model, lens size, thickness, edge profile, and whether you need an outside/front cover lens or an inside cover lens.

    Key Takeaways

    • Match the cover lens to the exact helmet model whenever possible.
    • Confirm lens dimensions before ordering. Unknown (Verify) if the model number is not on hand.
    • Do not assume a lens fits because it looks similar.
    • Check whether you need a front cover lens, inner cover lens, or both.
    • Inspect the lens seal, retaining frame, and helmet lens pocket for wear or damage.

    What to Verify Before Ordering

    Start with the helmet manufacturer and series. Then check the part number in the helmet manual, on the old lens, or on the replacement packaging. If that information is missing, measure the lens opening and compare it to the replacement part listing. Unknown (Verify) if the lens is a standard size or a model-specific part.

    • Helmet model: exact series and revision
    • Lens type: front cover lens or inside cover lens
    • Length and width: measure the visible and seating area
    • Thickness: some frames require a specific thickness
    • Edge shape: flat, curved, or keyed profile
    • Retention method: snap-in, slide-in, or frame-held

    Common Fitment Problems

    Lens is too large or too small

    If the lens does not drop into the pocket cleanly, stop. Forcing it can crack the lens or distort the retaining frame. Recheck the part number and dimensions.

    Lens fits but does not stay seated

    This usually points to a worn frame, damaged tabs, or the wrong thickness. Inspect the helmet lens holder before installing another part.

    Visibility is still poor after replacement

    A cover lens will not fix all visibility issues. Check for spatter buildup, scratches, soot, inside fogging, or a damaged auto-darkening filter. See Best Welding Helmet Replacement Lenses for Clear Visibility.

    Lens clouding or rapid wear

    High spatter, grinding debris, and improper storage can shorten lens life. Replace the cover lens sooner if surface damage reduces visibility. A cover lens protects the ADF window, but it is a wear item.

    Support Checks for Helmet Owners and Buyers

    If you are supporting a shop fleet, record the helmet model, lens part number, and replacement interval. That reduces downtime and prevents mixed parts across similar helmets. For model-specific ordering checks, use the helmet manual and the current lens part number before submitting a purchase request.

    For related fitment guidance, see 3M Speedglas G5-02 Welding Helmet Support Guide: Fitment, Lens Protection, and Ordering Checks.

    Product / Parts

    Miller 231411 Pro-Hobby Series Front Cover Lens – Pack of 5 Replacement Lenses for Welding Helmets

    This replacement pack is listed for the Miller Pro Hobby and Miller Classic series welding helmets. Use it only if your helmet model matches the listed compatibility. Unknown (Verify) for any other helmet series.

    Miller 231411 Pro-Hobby Series Front Cover Lens - Pack of 5 Replacement Lenses for Welding Helmets

    Miller 231411 Pro-Hobby Series Front Cover Lens – Pack of 5 Replacement Lenses for Welding Helmets

    Enhance your welding experience with the Miller 231411 Pro-Hobby Series Front Cover Lens, specifically designed for the Miller Pro Hobby and Miller Classic series welding helmets. This pack of five high-quality replacement lenses ensures that you have the clear visibility you need to perform your tasks effectively and safely. Durable and built to last, these lenses are essential for any serious welder. The Miller…

    View at Arc Weld Store

    Safety Notes

    • Do not weld with a damaged, loose, or missing cover lens.
    • Replace scratched or spattered lenses before visibility drops.
    • Verify that the lens protects the ADF and does not interfere with helmet closure.
    • Use only parts intended for the helmet model in service.
    • If fitment is uncertain, remove the helmet from service until verified.

    FAQ

    How do I know which replacement cover lens I need?

    Check the helmet model, lens part number, and lens dimensions. If any of those are missing, measure the lens opening and verify against the manufacturer listing. Unknown (Verify) if the helmet uses a standard or model-specific size.

    Can I use a similar-looking lens from another helmet?

    Not safely. Similar appearance does not confirm fitment. Use the exact part number or verified dimensions.

    Should I replace both the front and inside cover lenses at the same time?

    Replace both if both are worn, scratched, or contaminated. If only one side is damaged, replace that side after confirming the correct part number.

    Will a cover lens fix a dim view?

    Sometimes, but not always. If the ADF, battery, or sensor system is the real problem, a new cover lens will not solve it. Inspect the full helmet assembly.

    Sources Checked

    Related Weld Support Guides

  • PAPR Helmet Airflow Feels Weak

    ESAB Savage A40 PAPR Pre-Filter Replacement, NIOSH Approved, Pack of 5 Filters
    “>ESAB Savage A40 PAPR Pre-Filter Replacement, NIOSH Approved, Pack of 5 Filters

    If your PAPR helmet airflow feels weak, start with the basic flow path: intake, pre-filter, main filter, blower, hose, battery, and helmet seals. Low airflow is usually caused by restriction, a failing power source, or a leak in the air delivery path.

    Key Takeaways

    Troubleshooting Steps

    1) Check the filter condition

    A loaded pre-filter can restrict airflow before the blower can compensate. Remove the pre-filter and inspect it for dust buildup, discoloration, or collapse. If it is loaded, replace it.

    Also inspect the main filter element. If the system still feels weak after a fresh pre-filter, the main filter may be restricted. Use the manufacturerโ€™s replacement schedule and alarm guidance.

    2) Confirm the battery is charged and healthy

    Low battery output can reduce blower speed. Charge the battery fully, then retest the system. If the airflow improves after charging, the battery may be nearing end of service life. Battery health details are Unknown (Verify) without the system manual.

    3) Inspect the hose

    Run your hand along the hose and check for:

    A hose leak or restriction can make the helmet feel underfed even if the blower is running normally.

    4) Listen to the blower

    Power the unit on and listen for the blower. A healthy blower should run consistently. If it sounds weak, surges, rattles, or changes pitch under load, there may be a motor, bearing, or electrical issue. Exact service limits are Unknown (Verify) without the OEM documentation.

    5) Check the helmet air path

    Make sure the helmet inlet, internal air channel, and face seal area are clean and properly installed. A mis-seated component can block or divert airflow. Remove dust or spatter buildup that could interfere with delivery.

    6) Check for alarm conditions

    If the low-flow alarm is active, do not ignore it. The alarm can be triggered by filter loading, airflow restriction, battery issues, or blower faults. If the alarm continues after basic checks, take the unit out of service until the fault is found.

    When to Replace Parts

    If the pre-filter is visibly loaded, replace it before moving on to deeper troubleshooting. For the ESAB Savage A40 PAPR system, use the replacement pre-filter below.

    ESAB Savage A40 PAPR Pre-Filter Replacement, NIOSH Approved, Pack of 5 Filters

    ESAB Savage A40 PAPR Pre-Filter Replacement, NIOSH Approved, Pack of 5 Filters

    Enhance your protection while welding with the ESAB 0700002404 Savage A40 PAPR Pre-Filter. This essential pre-filter acts as a replacement part for the esteemed ESAB Savage A40 Powered Air Purifying Respirator (PAPR) system, ensuring that you maintain optimal air quality while you work in hazardous environments. Designed for professionals, this pack of 5 PAPR pre-filter replacements provides a reliable solution fo…

    View at Arc Weld Store

    Product note: ESAB Savage A40 PAPR Pre-Filter Replacement, NIOSH Approved, Pack of 5 Filters. Compatibility is limited to the listed ESAB Savage A40 PAPR pre-filter replacement application. Verify fitment against your system manual before purchase or installation.

    Safety Notes

    FAQ

    Why does my PAPR helmet feel weak even when the blower is on?

    Most often, the cause is filter loading, a battery that cannot maintain output, or a hose restriction or leak.

    Can a dirty pre-filter cause low airflow?

    Yes. A loaded pre-filter is one of the most common causes of weak airflow and low-flow alarms.

    Should I replace the battery or the filter first?

    Replace or inspect the filter first if it is visibly loaded. If the filter is clean, check the battery and blower performance next.

    What if the airflow is still weak after changing the filter?

    Inspect the hose, battery, blower, and helmet air path. If the issue remains, the fault may be in the blower assembly or another component. Unknown (Verify) without OEM diagnostics.

    Sources Checked

    Category: PAPR Helmet Support

    Related Weld Support Guides

  • Welding Helmet Sensor Troubleshooting: Auto-Darkening Lens Flicker, Flashing, and No-Darken Checks

    If an auto-darkening welding helmet flashes, flickers, darkens late, stays light, or drops out while welding, stop welding and inspect the helmet before continuing. The most common sensor-related causes are blocked arc sensors, dirty cover lenses, low batteries, grind mode left on, sensitivity set too low, delay set wrong, low-amperage TIG not being detected, or the workpiece/torch blocking the sensor view of the arc.

    Do not keep welding through repeated flicker. Even if the filter cartridge still provides passive UV/IR protection when functioning as designed, a helmet that does not darken reliably can expose the operator to bright arc flash, eye strain, missed starts, and unsafe reaction movements. Verify helmet mode, sensor visibility, battery condition, shade range, sensitivity, delay, and cover lens condition before returning it to service.

    Common Symptoms

    • Helmet does not darken: Grind mode, dead battery, blocked sensors, failed ADF cartridge, or sensor not seeing the arc.
    • Helmet darkens late: Low battery, low sensitivity, dirty sensor windows, or weak arc detection.
    • Helmet flickers while welding: Sensors are being blocked, sensitivity is too low, or the arc signal is inconsistent.
    • Helmet flashes during TIG: Low-amperage TIG, torch hand blockage, cup position, or poor sensor angle.
    • Helmet stays dark after welding: Delay set too long, sensor seeing bright light, or control issue.
    • Helmet works on MIG but not TIG: TIG arc may be too low or partially blocked for the sensor setup.
    • Helmet darkens in sunlight or under shop lights: Sensitivity too high or sensor responding to external light sources.

    What the Sensors Do

    Auto-darkening helmets use arc sensors to detect welding light and trigger the auto-darkening filter. Most problems are not caused by the viewing lens itself at first. They begin when the sensors cannot clearly see the arc or the electronics do not have enough power to switch consistently. A scratched outside cover lens, spatter over a sensor window, a gloved hand blocking one side of the helmet, or a joint corner hiding the arc can all cause intermittent darkening.

    Fast Checks Before Replacing the Helmet

    1. Confirm the helmet is in weld mode, not grind mode or cut mode.
    2. Clean or replace the outside cover lens.
    3. Clean the sensor windows with the method allowed by the helmet manual.
    4. Replace batteries if the helmet uses replaceable batteries.
    5. Set sensitivity higher for low-amperage TIG or obstructed joints.
    6. Set delay appropriate for the process and amperage.
    7. Check that the selected shade range matches MIG, TIG, Stick, or plasma work.
    8. Test the helmet before welding again. If it still fails, remove it from service.

    Sensor Troubleshooting Table

    ProblemLikely CauseFirst Check
    Lens stays lightGrind mode, dead battery, blocked sensors, failed ADFMode, batteries, sensor windows
    Lens flickers during weldSensor view blocked or sensitivity too lowIncrease sensitivity and reposition helmet
    Works on MIG but not TIGLow TIG amperage or arc hidden by torch handHigher sensitivity, better sensor angle
    Darkens lateLow battery, dirty sensors, wrong settingReplace batteries and clean cover lens
    Stays dark too longDelay too long or bright light hitting sensorsAdjust delay and remove bright light source
    Random darkeningSensitivity too high or sunlight/shop light triggerLower sensitivity and test indoors

    Blocked Sensor Checks

    Look at the front of the helmet and locate the arc sensor windows. They are usually small dark windows around or near the auto-darkening filter. Spatter, dust, stickers, tape, scratched cover lenses, smoke film, and damaged front lens retainers can block the sensor view. A helmet may work on a flat bench test but fail in a tight joint because the torch hand, cup, fixture, or workpiece blocks one or more sensors.

    Battery and Solar-Assist Checks

    Many helmets use replaceable batteries, solar-assist cells, or sealed batteries depending on model. Replace the battery if the helmet has a low-battery indicator, slow switching, dim controls, intermittent darkening, or unexplained flicker. Do not assume a solar-assist panel means the helmet never needs battery service. Battery type and replacement method are model-specific: Unknown (Verify from helmet manual).

    Sensitivity and Delay Setup

    Sensitivity controls how easily the sensors trigger the ADF. Low-amperage TIG, hidden arcs, out-of-position work, and tack welding often need more sensitivity. Bright shop lighting, sunlight, nearby welders, and reflective work can require less sensitivity. Delay controls how long the lens stays dark after the arc stops. Too short a delay can feel like flicker. Too long a delay can make the helmet feel stuck dark between tack welds.

    TIG-Specific Sensor Problems

    TIG can expose weak helmet sensor setups because the arc may be small, low-amperage, partially hidden by the torch cup, or blocked by the welderโ€™s hand. If the helmet works reliably on MIG or Stick but flickers on TIG, test at a higher sensitivity setting, keep the sensors facing the arc, reduce obstruction from the torch hand, and confirm the helmet is rated for the TIG amperage being used.

    Cover Lens and Sensor Window Wear

    A scratched or smoke-coated outside cover lens can reduce arc detection and make the puddle hard to see. Replace cover lenses before condemning the ADF cartridge. If the sensor window itself is cracked, melted, clouded, or contaminated behind the front cover, the helmet may need a replacement ADF cartridge or manufacturer service.

    Common Wrong-Diagnosis Mistakes

    • Welding with grind mode still enabled.
    • Replacing the helmet before cleaning the sensor windows.
    • Testing only under shop lights instead of testing with a safe arc check.
    • Assuming low-amperage TIG will trigger every budget helmet reliably.
    • Leaving scratched cover lenses in service too long.
    • Ignoring blocked sensors when welding pipe, corners, fixtures, or tight fillets.
    • Assuming solar-assist helmets never need battery replacement.

    Field Fix vs Proper Fix

    Field fix: Stop welding, clean the sensor windows, replace the outside cover lens, verify weld mode, increase sensitivity, and replace batteries if applicable.

    Proper fix: Confirm the helmetโ€™s shade range, TIG amperage rating, sensor count, battery condition, cover lens condition, and ADF cartridge function. Replace damaged cover lenses, failed batteries, broken retainers, cracked shells, or a failing ADF cartridge. Remove the helmet from service if it cannot darken reliably.

    Related Failure Paths

    Safety Notes

    • Never weld with a helmet that repeatedly flickers or fails to darken.
    • Verify helmet operation before welding.
    • Use the shade range required for the process and amperage.
    • Replace damaged cover lenses and cracked helmet shells.
    • Follow ANSI Z87.1 and ANSI Z49.1 guidance for welding eye and face protection.
  • 3M Speedglas G5-02 Welding Helmet Support Guide: Fitment, Lens Protection, and Ordering Checks

    The 3M Speedglas G5-02, Auto Darkening Welding Helmet, Pack of (1)

    “>3M Speedglas G5-02 Auto Darkening Welding Helmet is a professional welding helmet built around the Speedglas G5-02 platform. This support article is intended to help buyers confirm the correct helmet, understand the verified specs, and avoid ordering the wrong lens protection or replacement accessory.

    Key Takeaways

    Product Overview

    The 3M Speedglas G5-02 is an auto-darkening welding helmet listed by Arc Weld Store under SKU 08-0100-50IC. The product page identifies the brand as 3M and describes the helmet with Natural Color Technology, adjustable arc detection sensitivity, a delay function, and Bluetooth connectivity through the 3M Connected Equipment App.

    For commercial buyers, the important ordering point is simple: this is a complete G5-02 helmet listing, not a cover plate, not a replacement ADF, and not a generic welding hood. Confirm that your shop needs the helmet assembly before purchasing.

    View this product at Arc Weld Store: 3M Speedglas G5-02, Auto Darkening Welding Helmet, Pack of (1)

    “>3M Speedglas G5-02 Auto Darkening Welding Helmet

    Best For

    Key Specs

    Product3M Speedglas G5-02 Auto Darkening Welding Helmet, Pack of 1
    Brand3M
    Arc Weld SKU08-0100-50IC
    Helmet SeriesSpeedglas G5-02
    Auto-DarkeningYes
    Dark Shade Range8 to 12
    Natural Color TechnologyListed by Arc Weld Store
    Adjustable Arc Detection SensitivityListed by Arc Weld Store
    Delay FunctionListed by Arc Weld Store
    Bluetooth ConnectivityListed by Arc Weld Store
    Included ItemsUnknown (Verify)
    CertificationsUnknown (Verify)
    Viewing AreaUnknown (Verify)
    Battery TypeUnknown (Verify)
    WeightUnknown (Verify)

    Compatibility / Fitment Notes

    The product page identifies this helmet as the 3M Speedglas G5-02. For replacement parts, do not assume that other Speedglas series accessories will fit. G5-01, G5-03, 9100, and 9002NC components may use different filter, cover lens, or shell designs. Confirm the helmet series and part number before ordering replacement plates, ADF components, headgear, or accessories.

    3M lists a G5-02 curved auto-darkening filter under alternative ID 08-0000-50iC, but the Arc Weld product URL supplied for this article is the helmet listing with SKU 08-0100-50IC. If you need only the filter, verify the exact replacement filter part number before purchasing.

    Before You Order

    Accessories / Compatible Products

    Technically relevant accessories should be selected by confirmed helmet series and part number. The most direct Arc Weld accessory found for this product family is the G5-02 outside protection plate.

    Related ItemUse CaseCompatibility Note
    3M Speedglas G5-02 Outside Protection Plate 08-0200-52, Scratch Resistant, 5 ea/Case “>3M Speedglas G5-02 Outside Protection Plate 08-0200-52, Scratch Resistant, 5 ea/CaseReplacement outside protection plates for the G5-02 helmet family.Listed by Arc Weld as designed specifically for the 3M Speedglas G5-02 welding helmet.
    3M Speedglas G5-03 Pro Welding Helmet 10-0100-30TW with G5TW ADF with Grind Mode, TAP, Natural Color, Tack Weld Mode “>3M Speedglas G5-03 Pro Welding Helmet 10-0100-30TWCompare another Speedglas helmet option.Not a replacement part for the G5-02. Compatibility: Unknown (Verify).
    Inside and Outside Cover Lens CollectionFind cover lenses and protection plates.Filter by exact helmet model and part number before ordering.
    Welding Helmet CollectionCompare welding helmet options.Compare by process, shade range, viewing area, and safety requirements.

    Common Applications

    Shipping / Returns Notes

    Arc Weld Store lists this product as typically shipping within 1โ€“2 business days, shipping from Corydon, Indiana, with free ground shipping to the lower 48 on qualifying orders. Returns are listed as accepted on unused items in original packaging. Always check the live product page before ordering because shipping, pricing, and availability can change.

    FAQ

    Is this a complete welding helmet or a replacement lens?

    The Arc Weld listing is for the 3M Speedglas G5-02 Auto Darkening Welding Helmet, Pack of 1. Replacement lens and cover plate requirements should be verified separately by part number.

    What is the Arc Weld SKU?

    The Arc Weld SKU shown on the product page is 08-0100-50IC.

    What shade range is listed?

    The Arc Weld product page lists a variable dark shade range of 8 to 12.

    Which outside protection plate was found for the G5-02?

    Arc Weld lists the 3M Speedglas G5-02 Outside Protection Plate 08-0200-52, Scratch Resistant, 5 ea/Case as designed specifically for the 3M Speedglas G5-02 welding helmet.

    Can G5-03 parts be used on the G5-02?

    Compatibility: Unknown (Verify). Do not substitute G5-03 parts for G5-02 parts unless the manufacturer or Arc Weld confirms the fitment.

    Safety Notes

    Welding helmets and filter lenses must be selected for the welding process, amperage, radiant energy exposure, impact hazards, and workplace safety requirements. OSHA welding guidance references filter lens requirements and appropriate eye and face protection. Confirm jobsite PPE requirements before use, and wear approved safety glasses or goggles under the helmet when required by your safety program.

    Sources Checked

    End CTA: 3M Speedglas G5-02, Auto Darkening Welding Helmet, Pack of (1)

    3M Speedglas G5-02, Auto Darkening Welding Helmet, Pack of (1)

    $1,241.24

    In Stock

    View Product
    “>Check current stock at Arc Weld Store

  • Auto-Darkening Welding Helmet Not Working: Causes and Fixes

    An auto-darkening welding helmet that fails to activate properly creates serious visibility and safety issues. Common failures include delayed darkening, flickering lenses, or complete non-response. These problems are typically related to sensors, power supply, or lens degradation.

    Key Takeaways

    • Dead or weak batteries are a leading cause of failure
    • Blocked or dirty sensors prevent proper arc detection
    • Lens cartridges degrade over time and may require replacement
    • Incorrect sensitivity or delay settings can mimic failure
    • Low amperage welding may not trigger some helmets reliably

    Problem / Context

    Auto-darkening helmets rely on arc sensors and electronic filters to instantly adjust shade levels. When the system fails, the user may experience flash exposure or inconsistent visibility. These issues can occur suddenly or develop gradually due to wear or environmental conditions.

    Root Causes

    • Low or dead battery: insufficient power for lens activation
    • Obstructed sensors: dirt, spatter, or positioning blocking detection
    • Damaged lens cartridge: internal failure or aging electronics
    • Incorrect sensitivity setting: arc not detected at lower amperage
    • Cracked or worn cover lens: reduces sensor accuracy
    • Cold temperatures: slows LCD response time

    Solution / Explanation

    • Replace batteries or confirm solar-assisted units are receiving light
    • Clean sensor areas and remove any obstructions
    • Adjust sensitivity and delay settings for the welding process
    • Inspect outer and inner cover lenses for damage
    • Test helmet under normal arc conditions to confirm response
    • Replace lens cartridge if failure persists after basic checks

    Specs / Verification Notes

    • Shade Range: Unknown (Verify)
    • Switching Speed: Unknown (Verify)
    • Power Source: Battery / Solar (model dependent)
    • Sensor Count: Unknown (Verify)
    • Operating Temperature Range: Unknown (Verify)

    Comparison Table

    IssueSymptomCorrection
    Dead BatteryNo darkeningReplace battery
    Dirty SensorsIntermittent responseClean sensors
    Low SensitivityNo activation at low ampsIncrease sensitivity
    Damaged LensFlicker or delayReplace cartridge
    Cold ConditionsSlow responseWarm helmet before use

    Safety Notes

    Follow ANSI Z87.1 and ANSI Z49.1 standards for eye and face protection. Never weld with a malfunctioning helmet. Verify proper operation before each use to prevent arc flash exposure.

    FAQ

    Why is my welding helmet not darkening?

    This is usually caused by low battery power, blocked sensors, or incorrect sensitivity settings.

    Can auto-darkening helmets stop working over time?

    Yes. Lens cartridges degrade and may eventually fail, requiring replacement.

    Do low amperage welds affect helmet performance?

    Some helmets may not detect low-amperage arcs unless the sensitivity is properly adjusted.

    Next Step

    Test the helmet with a known-working welding setup after the adjustments. If the issue persists, replace the lens cartridge or upgrade the helmet to ensure reliable protection.

    Sources Checked

    • ANSI Z87.1 Eye and Face Protection
    • ANSI Z49.1 Safety in Welding and Cutting
    • Welding helmet manufacturer manuals (general reference)
  • Best Welding Helmet Replacement Lenses for Clear Visibility

    If your weld puddle looks hazy or washed out, your helmet lens is usually the problemโ€”not your settings. Replacing the outer cover lens is the fastest, cheapest fix (and it’s a consumable in any busy shop).

    Not sure this is your issue? See the full troubleshooting guide:Why You Can’t See Your Weld Pool (And How to Fix It)

    Lincoln Electric KP2898-1 Viking 3350/2450 Series Outside Clear Cover Lens, 5-Pack
    • Universal Compatibility - Fits all major welding helmet brands including Lincoln Electric Viking 3350, 2450, 750S, and 850S series
    • Thermal Protection - Effectively blocks 60% of radiation heat to prevent lens distortion and extend the life of your auto-darkening filter
    • Durable Polycarbonate - Constructed from high-quality material to provide reliable protection against scratches, sparks, and weld spatter
    • Precise Dimensions - Each lens measures 4.5 x 5.25 x 0.04 inches, ensuring a perfect fit and full coverage for standard helmet windows
    • Value 5-Pack - Includes five clear replacement lenses to keep your helmet in top condition and maintain excellent optical clarity

    Last update on 2026-07-14 / Affiliate links / Images from Amazon Product Advertising API

    Key Takeaways

    • Start with the outer cover lens (the clear protective lens). It takes the scratches and spatter so your ADF doesn’t have to.
    • If you weld MIG or flux-core, keep a spare pack on hand and swap lenses as soon as visibility drops.
    • Buy OEM lenses when possible (Lincoln/Miller/3M/Jackson). Aftermarket quality varies.
    • Verify your helmet’s lens size/model before ordering.
    • Replace any lens that’s cracked, deeply scratched, or heat-warped.

    Quick Comparison

    ProductWhat It IsFitsBest For
    Lincoln KP2898-1Outer cover lens (5-pack)Viking 3350/850S/750SLincoln owners, high spatter
    Miller 216326Outer cover lens (5-pack)Digital Elite / Elite series (verify model)Miller owners, daily shop use
    3M Speedglas 9100 outer cover lensOuter cover lens (pack size varies)Speedglas 9100 series (verify)Speedglas owners

    Top Picks (Outer Cover Lenses)

    1) Lincoln KP2898-1 (VIKING Outside Cover Lens)

    OEM outside cover lenses for Lincoln Viking helmets. This is the simplest fix when your view is cloudy from scratches, spatter, or grinding dust.

    Key specs: Unknown (Verify)

    Best for: Lincoln Viking 3350/850S/750S users who want a quick visibility reset.

    Buy:

    Lincoln Electric KP2898-1 Viking 3350/2450 Series Outside Clear Cover Lens, 5-Pack
    • Universal Compatibility - Fits all major welding helmet brands including Lincoln Electric Viking 3350, 2450, 750S, and 850S series
    • Thermal Protection - Effectively blocks 60% of radiation heat to prevent lens distortion and extend the life of your auto-darkening filter
    • Durable Polycarbonate - Constructed from high-quality material to provide reliable protection against scratches, sparks, and weld spatter
    • Precise Dimensions - Each lens measures 4.5 x 5.25 x 0.04 inches, ensuring a perfect fit and full coverage for standard helmet windows
    • Value 5-Pack - Includes five clear replacement lenses to keep your helmet in top condition and maintain excellent optical clarity

    Last update on 2026-07-14 / Affiliate links / Images from Amazon Product Advertising API


    2) Miller 216326 (Front Lens Cover)

    OEM front cover lenses for Miller helmets. If you’re running MIG all day, these are a low-cost consumable that keeps your view crisp.

    Key specs: Unknown (Verify)

    Best for: Miller Digital Elite/Elite-series users (confirm fitment before ordering).

    Buy:

    Miller Elite or Digital Elite Cover Lens Pkg (216326, 216327)
    • MAKE SURE TO CHOOSE TONY PARTS AS SELLLER TO MAKE SURE YOU HAVE THE ORIGINAL
    • Genuine Miller Parts
    • 216326 (5)
    • 216327 (5)

    Last update on 2026-07-14 / Affiliate links / Images from Amazon Product Advertising API


    Still deciding? Compare these options below.

    Lincoln Electric KP2898-1 Viking 3350/2450 Series Outside Clear Cover Lens, 5-Pack
    • Universal Compatibility - Fits all major welding helmet brands including Lincoln Electric Viking 3350, 2450, 750S, and 850S series
    • Thermal Protection - Effectively blocks 60% of radiation heat to prevent lens distortion and extend the life of your auto-darkening filter
    • Durable Polycarbonate - Constructed from high-quality material to provide reliable protection against scratches, sparks, and weld spatter
    • Precise Dimensions - Each lens measures 4.5 x 5.25 x 0.04 inches, ensuring a perfect fit and full coverage for standard helmet windows
    • Value 5-Pack - Includes five clear replacement lenses to keep your helmet in top condition and maintain excellent optical clarity

    Last update on 2026-07-14 / Affiliate links / Images from Amazon Product Advertising API


    3) 3M Speedglas 9100 Outer Cover Lens (Verify exact model)

    Speedglas lenses are helmet-specific. If you’re on a 9100 series hood, start by replacing the outer cover lens before assuming your auto-darkening filter is failing.

    Key specs: Unknown (Verify)

    Best for: Speedglas 9100 series owners who want OEM clarity.

    Buy:

    3M Speedglas 9100 Welding Helmet Outside Protection Plate 06-0200-51/37174(AAD), Standard, 10 EA/bag
    • Auto-Darkening Filter Protection
    • Replacement Part
    • Country of origin: Taiwan
    • Package Dimensions: 9.0" L x 5.875" W x 0.662" H

    Last update on 2026-07-14 / Affiliate links / Images from Amazon Product Advertising API


    Top Pick Callout

    Top pick (best overall for most welders):OEM outer cover lenses for your exact helmet model.

    Reason: outer lenses are the part that gets destroyed first, and replacing them restores visibility immediately with minimal cost.

    Buying Guide: How to Choose

    1. Confirm your helmet model (inside label or manual). Don’t guess.
    2. Confirm lens type: outer cover lens vs inner lens vs ADF. This page is for outer cover lenses.
    3. Check the pack quantity, so you’re not re-ordering every month.
    4. Replace on a schedule if you weld daily (or whenever you notice haze).

    FAQ

    Do I need to replace the auto-darkening filter (ADF) if I can’t see?

    Usually no. Replace the outer cover lens first. If the view is still hazy, then inspect the ADF and inner lens.

    How often should I replace the outer cover lens?

    As needed. In high-spatter work, it can be monthly. In cleaner TIG work, it can last much longer.

    Will any 4.5″ x 5.25″ lens fit my helmet?

    Not always. Many helmets share sizes, but fitment varies by brand and series. Verify before ordering.

    Why does my lens look cloudy right after I replace it?

    Check for protective film you forgot to peel, dust inside the helmet, or a scratched inner lens.

    Safety Notes

    • Wear safety glasses under the hood.
    • Replace lenses that are cracked or heavily scratched.
    • Use ANSI Z87.1-rated eye/face protection.
  • Why You Can’t See Your Weld Pool (And How to Fix It)

    Why You Can’t See Your Weld Pool (And How to Fix It)

    Your helmet lens is probably dirty, scratched, or damagedโ€”and it’s costing you quality welds.

    If you’re squinting through your helmet or struggling to see the puddle clearly, the problem isn’t your eyesight. It’s your lens. Dirty, scratched, or worn lenses block light and create a hazy view that makes precision impossible. The good news: this is an easy fix.

    Symptoms of a Bad Helmet Lens

    • Hazy or cloudy view even in good light
    • Scratches or scuffs visible on the lens surface
    • Difficulty seeing the weld pool or joint
    • Lens feels sticky or has residue buildup
    • Darkening is uneven or inconsistent across the lens
    • You’re lifting your helmet more often to see clearly

    Why This Happens

    Welding helmets take a beating. Spatter, grinding dust, and UV exposure degrade the lens over time. The outer clear lens (the protective layer) scratches easily from handling and contact with metal. The inner auto-darkening filter (if you have one) can accumulate dust and residue, especially in high-spatter processes like MIG.

    Even small scratches refract light and reduce contrast, making it harder to follow your bead. Residue from flux, spatter, or shop dust acts like a filter, dimming your view and forcing you to compensate by tilting your head or adjusting your shadeโ€”both bad habits that slow you down.

    AWS D1.1 welding standards don’t specify lens cleanliness, but they do require clear, undamaged optics for safe, quality welds. A damaged lens compromises both.

    The Fix (Step-by-Step)

    Step 1: Clean the lens thoroughlyStart with the outer clear lens. Use a soft, lint-free cloth and warm water with a drop of mild soap. Wipe gentlyโ€”don’t scrub. Dry completely. For the inner auto-darkening filter, use a dry cloth only (water can damage the LCD).

    Step 2: Inspect for damageHold the lens up to light. Look for scratches, cracks, or discoloration. If you see deep scratches or cracks, the lens needs replacement. Small surface scratches won’t affect visibility much, but they’ll get worse.

    Step 3: Replace if necessaryIf cleaning doesn’t help, order replacement lenses. Most helmets use standard sizes: outer clear lenses (usually 4.5″ x 5.25″ or similar) and inner filters (if auto-darkening). Check your helmet model or measure the lens.

    Step 4: Install the new lensMost helmets have a simple snap-in or screw-on design. Remove the old lens, snap or screw in the new one. Takes 30 seconds.

    Step 5: Test before weldingStrike a test arc or wave the helmet at a light source. The lens should darken instantly and evenly. If it doesn’t, check the battery (for auto-darkening) or reinstall the lens.

    Real-World Tip

    Experienced welders replace outer clear lenses every 2โ€“3 months in high-spatter environments (MIG, flux-core). It’s cheap insurance. Keep a spare pack of lenses in your toolbox. When visibility drops, swap them out immediately instead of fighting through a bad lens. You’ll weld faster and straighter.

    Safety Note

    ANSI Z87.1 requires helmets to have impact-resistant lenses and proper UV/IR protection. A cracked or heavily scratched lens fails this standard and puts your eyes at risk. Replace damaged lenses before your next weld.

    Next Steps

    If this keeps happening, your helmet lens is likely worn or damaged. See the best replacement options โ†’  Best Welding Helmet Replacement Lenses for Clear Visibility 

  • Auto-Darkening Welding Helmet (True Color, Large View) โ€“ Specs & Safety Guide

    Auto-Darkening Welding Helmet (True Color, Large View) โ€“ Specs & Safety Guide

    A true color auto-darkening helmet improves puddle visibility, reduces eye strain, and protects against arc flash. Not all budget helmets react quickly or provide clear opticsโ€”hereโ€™s what to check.


    Key Takeaways

    • True color lens improves puddle visibility
    • Large viewing area (~3.94″ x 3.66″)
    • 4 arc sensors for reliable switching
    • Variable shade 4/5-9/9-13
    • Solar powered with battery backup

    Where to Buy

    No products found.

    Disclosure: As an Amazon Associate, Weld Support Parts earns from qualifying purchases.


    Why True Color Matters

    Traditional lenses tint green, masking puddle detail.
    True color improves contrast and clarity, helping you:

    • Track the weld pool
    • Identify defects
    • Reduce fatigue during long sessions

    Performance & Compatibility

    Suitable for:

    • MIG
    • TIG (increase sensitivity for low-amp TIG)
    • Stick
    • Plasma cutting

    Always test before striking an arc.


    Specs

    SpecValue
    Viewing Area~3.94″ x 3.66″
    Shade Range4 / 5-9 / 9-13
    Sensors4 arc
    PowerSolar + battery
    Weight~1โ€“2 lbs (Verify)
    StandardANSI Z87.1 (Verify)

    Who Should Buy

    Best for:

    • Multi-process welders
    • Hobbyists upgrading from fixed shade
    • Shop environments with varied amperage

    Skip if:

    • You require fixed shade only
    • You weld exclusively outdoors in bright sunlight

    Safety Notes

    • Confirm ANSI Z87.1 compliance
    • Inspect shell and headgear regularly
    • Replace outer lenses when scratched
    • Always wear flame-resistant PPE

    FAQ

    Is it good for TIG?
    Yesโ€”ensure proper sensitivity adjustment.

    Does it run only on solar?
    No, typically solar with battery backup.

    Can lenses be replaced?
    Most models allow easy lens swaps.

    Is it rated for overhead welding?
    Verify impact rating with manufacturer.


  • Tensileweld Stick Electrode

    Tensileweld Stick Electrode

    Introduction & Overview

    Tensileweld Electrodes are engineered for high-strength, porosity-free welds that can handle demanding environments. These electrodes are designed to work on both AC and DC current. They deliver weld deposits that are resistant to impact, abrasion, heat, and corrosion. They are particularly useful when welding dissimilar steels. They are also handy if the base metalโ€™s alloy content is unknown. This makes them a versatile choice across a wide range of industries.

    Key Features

    The standout qualities of Tensileweld electrodes make them a go-to option for critical welding jobs:

    • High Strength & Durability: Tensile strength ranging from 95,000 to 122,000 psi and yield strength up to 95,000 psi.
    • Corrosion & Heat Resistance: Formulated to withstand harsh conditions.
    • Versatile Applications: Works effectively on dissimilar steels, carbon steels, stainless steels, tool steels, spring steels, and more.
    • Flexible Power Source: Suitable for both AC and DC reverse polarity.
    • User-Friendly Technique: Short arc welding with stringer beads and peening is recommended for best results.

    Pros & Cons

    Pros:

    • Produces strong, porosity-free welds
    • Resistant to impact, abrasion, heat, and corrosion
    • Compatible with a wide variety of steels and alloys
    • Useful when base metal composition is unknown

    Cons:

    • Requires preheating (400ยบF) for carbon and cast steels
    • Recommended procedures may be less forgiving for beginners

    Who Itโ€™s For

    Tensileweld electrodes are designed for professionals and industries where weld integrity is non-negotiable:

    • Mining and Heavy Industry: Underlayment of hardfacing alloys, rebuilding shafts, agitator blades, and gears.
    • Aerospace & Pressure Vessels: Welding high-performance steels in critical applications.
    • Maintenance & Repair: Field welders tackling mixed or unknown alloys.

    What Makes It Unique

    What sets Tensileweld apart is its ability to handle unknown or dissimilar steels without sacrificing strength or reliability. Many electrodes are designed for specific alloys. However, Tensileweldโ€™s chemistry, which is high in chromium, nickel, and molybdenum, makes it versatile across a wide spectrum. This adaptability reduces the guesswork when the base material isnโ€™t clearly identified.

    Buying Tips

    When selecting Tensileweld electrodes:

    • Choose the correct diameter for the job (3/32โ€, 1/8โ€, 5/32โ€, or 3/16โ€).
    • Use flat position amperage ranges for best control (65โ€“230 amps depending on size).
    • Preheat thicker or carbon steels to avoid cracking.
    • Keep the work area clean and beveled for maximum penetration and weld quality.

    Conclusion

    Tensileweld Electrodes provide welders with a high-performance, all-purpose solution for tackling tough jobs across diverse industries. They deliver strong, durable welds on dissimilar or unknown steels. This makes them an invaluable tool for anyone who prioritizes strength and reliability in welding.

    Note: We may earn a small commission from Amazon affiliate links at no additional cost to you.

    No products found.

    No products found.

    No products found.

  • Listen with Audible