Tag: gas lens

  • Square Wave 205 TIG Torch Overheating Causes: Amperage, Duty Cycle, Consumables, and Cooling Checks

    If the TIG torch on a Lincoln Square Wave 205 gets too hot to hold, discolors the cup, burns collets, loosens tungsten, or overheats the torch head, stop and check amperage, duty cycle, tungsten size, torch rating, gas coverage, and consumable condition. Torch overheating is usually not one single failure. It is the result of running too much current for the installed torch, welding too long without cooldown, using undersized tungsten, running poor gas coverage, or using worn collets, gas lenses, cups, or back-cap seals.

    The Square Wave 205 is an AC/DC TIG and Stick welder with AC frequency, AC balance, pulse, and post-flow controls. Lincoln literature also lists a Caliber 26 Series TIG torch option rated 200A at 60% duty cycle. That rating matters: if the installed torch is a different air-cooled torch, smaller torch, longer cable, flex-head torch, or aftermarket torch, torch heat limits may be lower. Verify the torch series before assuming it can handle the machineโ€™s full output.

    Common Symptoms

    • Torch handle gets hot fast: Amperage, duty cycle, or torch rating is too high for the setup.
    • Cup turns brown, white, or cracks: Excess heat, over-tightening, or poor gas coverage is stressing the ceramic.
    • Tungsten slips in the torch: Collet is worn, overheated, or not matched to tungsten diameter.
    • Arc becomes unstable after a few minutes: Torch front-end parts are overheating or losing grip.
    • Tungsten turns black after welding: Post-flow, gas coverage, or torch sealing is not protecting the hot electrode.
    • Collet body or gas lens is discolored: Heat is concentrating in the front end.
    • Torch cable feels hot near the head: Duty cycle or torch/cable capacity may be exceeded.

    What Torch Overheating Means

    An air-cooled TIG torch removes heat through the torch body, copper parts, cable, shielding gas flow, and rest time between welds. Unlike a water-cooled torch, it has limited heat rejection. When the arc current, weld duration, torch angle, tungsten size, consumable condition, or duty cycle exceeds what the torch can handle, heat builds up in the torch head and handle.

    Square Wave 205 Compatibility Notes

    Do not order torch parts by โ€œSquare Wave 205โ€ alone. Verify the installed TIG torch series first. Torch consumables are series-specific: 9/20-style, 17/18/26-style, Caliber 26-style, and aftermarket torches do not all use the same collets, collet bodies, gas lenses, cups, back caps, or adapters. If the torch series is unknown, fitment is Unknown (Verify).

    For related Square Wave support, see the Lincoln Square Wave 205 overview, why TIG tungsten turns black, unstable TIG arc from poor tungsten prep, TIG torch support, and TIG collet support.

    Overheating Diagnosis Table

    SymptomLikely CauseFirst Check
    Handle overheats quicklyToo much amperage or duty cycleVerify torch rating and reduce weld time
    Tungsten slipsOverheated or worn colletReplace collet and match tungsten size
    Cup cracks or discolorsHeat stress, gas issue, over-tighteningInspect cup, gas lens, and torch head
    Arc wanders after heatingLoose tungsten or front-end heat damageCheck collet, collet body, gas lens
    Tungsten blackensPost-flow too short or gas leakCheck post-flow, cup, back cap O-ring
    Overheats on aluminum ACHigher heat load and AC cleaning actionCheck AC balance, tungsten size, torch rating

    Common Causes

    • Amperage too high: A smaller air-cooled torch may not tolerate high-current welding for long runs.
    • Duty cycle exceeded: Even a correctly rated torch needs cooldown time.
    • Wrong tungsten size: Undersized tungsten runs hot and transfers heat into the front end.
    • Worn collet: Poor grip increases resistance and lets tungsten shift.
    • Damaged gas lens or collet body: Poor gas flow and poor contact increase heat stress.
    • Long tungsten stickout: Too much stickout exposes the tungsten and front end to heat.
    • Short post-flow: Hot tungsten and front-end parts oxidize after the arc stops.
    • AC aluminum settings: Excess cleaning action can heat the tungsten and torch front end.

    What Wears Out First

    The collet and cup usually show heat damage before the whole torch fails. A collet that has lost spring tension will let the tungsten move, arc-start poorly, or slip when hot. A cup that is cracked, chipped, or heat-stained can disturb gas coverage. A gas lens screen can clog or discolor from heat and debris. Replace these before condemning the torch body.

    AC Aluminum Overheating Checks

    AC aluminum work puts more heat into the tungsten and front end than many light DC jobs. If the torch overheats mainly on aluminum, confirm tungsten diameter, cup size, gas flow, AC balance, AC frequency, and travel speed. Too much cleaning action, too long of an arc, or slow travel can all increase torch heat. Adjust settings only after confirming the torch rating and consumables are correct.

    What To Verify Before Ordering Parts

    • Installed torch series and amperage rating.
    • Air-cooled vs water-cooled torch type.
    • Tungsten diameter and tungsten alloy.
    • Standard collet body vs gas lens setup.
    • Cup size and cup condition.
    • Back cap and O-ring condition.
    • Connector and adapter style used on the Square Wave 205.
    • Actual welding amperage and weld duration.

    Common Wrong-Setup Mistakes

    • Assuming every torch on a Square Wave 205 is rated for full-output TIG welding.
    • Running a small air-cooled torch like a water-cooled production torch.
    • Using 1/16 in tungsten at amperage better suited for 3/32 in or larger.
    • Ignoring a slipping tungsten until the collet body overheats.
    • Over-tightening cups and cracking ceramic parts.
    • Using too much tungsten stickout with a small cup.
    • Shortening post-flow until tungsten and front-end parts oxidize.

    Test Procedure

    1. Let the torch cool fully before disassembly.
    2. Remove and inspect the cup, collet, collet body or gas lens, back cap, and O-ring.
    3. Replace any heat-discolored, cracked, loose, or worn consumable.
    4. Install tungsten that matches the amperage range.
    5. Reduce tungsten stickout and confirm stable argon flow.
    6. Run a short test bead at lower amperage and shorter duration.
    7. If heat stays controlled, increase amperage or weld duration gradually.
    8. If overheating returns quickly, verify torch rating and consider a higher-rated torch setup.

    Field Fix vs Proper Fix

    Field fix: Reduce amperage, shorten weld time, allow cooldown, replace the collet, reduce stickout, and increase post-flow enough to protect the hot tungsten and cup area.

    Proper fix: Match the TIG torch to the amperage and duty cycle of the job, replace heat-damaged torch consumables, confirm argon coverage, document Square Wave 205 AC settings, and upgrade to a higher-rated torch if the work repeatedly overheats the current torch.

    Safety Notes

    • Let the torch cool before touching front-end parts.
    • Disconnect power before torch service.
    • Do not weld with cracked cups, exposed conductors, or damaged torch cables.
    • Use gloves rated for TIG heat and keep hands away from hot ceramic parts.
    • Use ventilation and keep your head out of fumes.
  • TIG Tungsten Contamination Troubleshooting: Black Specks, Arc Wander, Dirty Starts, and Re-Grind Checks

    TIG tungsten contamination usually comes from one of five places: the tungsten touched the puddle, the filler rod hit the electrode, shielding gas was interrupted, the tungsten was ground on a dirty wheel, or the torch consumables are leaking or loose. The fix is not to keep welding through it. Stop, cut back or re-grind the contaminated tungsten, verify gas coverage, inspect the collet/gas lens/cup, and test on clean scrap before returning to the part.

    Contaminated tungsten can show up as black specks in the bead, gray or black weld edges, arc wandering, hard starts, sputtering, excessive balling, or a weld puddle that will not stay centered. On critical work, assume the contaminated section of weld may need to be removed and re-welded. Do not treat tungsten inclusions as cosmetic.

    Common Symptoms

    SymptomLikely CauseFirst Check
    Black specks in beadTungsten dipped or flaked into puddleInspect tip under good light
    Arc wanders or splitsDirty grind, off-center point, contaminated tipRe-grind lengthwise on clean wheel
    Gray/black weld surfacePoor shielding, long stickout, post-flow too shortCheck argon flow, leaks, cup, gas lens
    Tungsten balls excessivelyToo much amperage for diameter, wrong polarity/process setupVerify tungsten size, type, current, polarity
    Tungsten slipsWorn collet or collet bodyPull-test electrode after tightening

    Fast Diagnosis Procedure

    1. Stop welding immediately. Do not keep running a bead after dipping the tungsten.
    2. Remove the tungsten. Look for melted filler, dark oxidation, a balled end, cracks, or an off-center point.
    3. Cut back if dipped. If base metal or filler is fused into the tip, cut off the bad section before grinding.
    4. Re-grind lengthwise. Grind marks should run with the electrode, not around it.
    5. Check gas coverage. Verify cylinder valve, regulator, hose leaks, torch O-rings, cup condition, and post-flow.
    6. Inspect torch consumables. Replace cracked cups, loose collets, damaged gas lenses, and worn collet bodies.
    7. Run a scrap test. Use clean scrap, same filler, same amperage, and same torch angle before returning to the job.

    What Wears Out First

    The tungsten tip gets blamed first, but the support parts often cause repeat contamination. A worn collet can let the electrode move. A damaged collet body can create poor current transfer. A clogged or damaged gas lens can disturb shielding gas. A cracked cup can pull air into the weld zone. A loose back cap or damaged rear seal can also create gas problems that look like bad tungsten prep.

    Inspection Steps

    • Tungsten: verify diameter, alloy/color code, grind direction, point symmetry, and contamination at the tip.
    • Collet: confirm it matches the tungsten diameter and grips without over-tightening.
    • Collet body/gas lens: inspect threads, seating face, screen condition, and gas flow path.
    • Cup: check for cracks, spatter, chips, or poor seating.
    • Gas system: confirm argon, hose condition, regulator flow, torch leaks, and post-flow time.
    • Base/filler metal: clean oil, oxide, mill scale, moisture, coating, and grinder residue before blaming the machine.

    Common Wrong-Part Mistakes

    • Buying a collet that does not match tungsten diameter.
    • Using a standard collet body when the cup setup requires a gas lens body.
    • Mixing torch series parts between 9/20 and 17/18/26-style torches.
    • Assuming all cups fit all torch heads.
    • Ordering tungsten by color only without confirming diameter, current type, and application.
    • Replacing tungsten repeatedly while leaving a worn collet body or leaking cup in service.

    Compatibility Notes

    Before ordering TIG support parts, verify torch series, tungsten diameter, cup thread/style, gas lens or standard collet body, back cap length, power connector, cooling type, amperage range, and process polarity. Lincolnโ€™s parts guide identifies TIG torch support items such as tungsten electrodes, collets, collet bodies, gas lens collet bodies, alumina nozzles, back caps, and connection adapters. Match by torch family and consumable system, not by appearance alone.

    Field Fix vs Proper Fix

    ConditionField FixProper Fix
    Dipped tungstenStop and re-grindCut back contaminated section, re-grind, remove affected weld if required
    Dirty grind wheelUse clean side of wheelUse dedicated tungsten grinder or dedicated wheel
    Cracked cupReplace cupInspect full front-end stack for gas leakage
    Worn colletInstall spare colletReplace collet and inspect collet body threads/taper
    Oxidized tungsten after stopIncrease post-flowVerify post-flow setting, torch leak points, and gas purity

    Related Failure Paths

    Safety Notes

    Wear eye, hand, and respiratory protection appropriate for welding and tungsten grinding. Use local extraction when grinding tungsten dust. Allow hot torch parts to cool before handling. If thoriated tungsten is used, follow your employerโ€™s safety procedure and SDS requirements. For code, sanitary, pressure, aerospace, or structural work, follow the applicable WPS and inspection requirements before accepting or repairing a contaminated weld.

  • Why TIG Tungsten Turns Black Even When the Weld Looks Clean

    TIG tungsten turning black is usually a shielding problem, not a mystery tungsten problem. The weld may still look acceptable at first, but a darkened electrode, unstable arc, dull bead edge, or repeated regrinding points to air, turbulence, contamination, or heat overload reaching the tungsten zone.

    This guide focuses on the narrow failure path where the tungsten darkens even when the bead does not immediately look destroyed. For broader tungsten failure issues, compare this checklist with TIG tungsten contamination causes and prevention, black specks from tungsten contamination, and sooty TIG weld troubleshooting.

    Key Takeaways

    • Black tungsten usually means the hot electrode is being exposed to oxygen or contamination.
    • Too much gas flow can be as bad as too little flow because turbulence can pull air into the shield.
    • A cracked cup, loose back cap, damaged O-ring, bad gas lens screen, or leaking hose can contaminate the tungsten without looking obvious.
    • Post-flow matters. Stopping shielding gas while the tungsten is still hot can discolor the electrode after the weld ends.
    • If the tungsten turns black repeatedly, inspect the torch front end before blaming the electrode type.

    Problem / Context

    A clean TIG weld needs the molten puddle, filler wire end, and tungsten electrode protected by inert shielding gas. When the tungsten turns black, the shield is not protecting the electrode consistently. The bead may still look passable on mild steel, but the same condition can cause oxidation, porosity, arc wander, gray stainless color, or inclusions on more sensitive work.

    This problem often appears after changing cups, adding a gas lens, moving to a drafty bench, shortening post-flow, switching tungsten size, or using a torch that has been dropped or overheated. It can also appear when the torch looks assembled correctly but has a small leak at the back cap, collet body, hose fitting, or gas solenoid connection.

    Root Causes

    1. Shielding Gas Flow Is Too Low

    Low argon flow may not fully cover the tungsten and weld pool. This can happen from an incorrect flowmeter setting, a partially closed cylinder valve, a kinked hose, a blocked torch screen, or a flowmeter that is being read incorrectly. Do not assume gas is reaching the torch just because the flowmeter ball moves.

    2. Shielding Gas Flow Is Too High

    More gas is not automatically better. Excessive flow can create turbulence at the cup. Turbulence can pull surrounding air into the argon stream, which can oxidize the hot tungsten and contaminate the weld zone. This is common when a small cup is run at an aggressive flow rate or when the torch is held too far from the work.

    3. Post-Flow Is Too Short

    The tungsten stays hot after the arc stops. If post-flow ends while the electrode is still hot enough to oxidize, the tip can turn dark after the weld is already finished. This can make the problem look random because the bead may look cleaner than the tungsten.

    4. Torch Parts Are Leaking or Damaged

    A loose back cap, worn O-ring, cracked cup, split torch hose, damaged collet body, or poor gas lens screen can disturb shielding. A torch can leak enough to discolor tungsten without making an obvious hissing sound. For front-end fit problems, review TIG collet and gas lens troubleshooting.

    5. Tungsten Stickout Is Too Long for the Cup Setup

    Long stickout exposes the tungsten to air unless the cup and gas lens can maintain coverage. A gas lens can help, but it does not override poor torch angle, excessive flow, drafts, or a damaged screen. If arc wander appears with the discoloration, compare the setup against TIG tungsten sharpening and arc stability checks.

    6. Contamination Is Being Carried Into the Arc

    Oil, marker residue, mill scale, filler wire oxidation, grinding dust, and dirty gloves can all contaminate the arc zone. The tungsten may darken because the weld area is giving off contaminants into the shielding envelope. This is especially common on stainless, aluminum, thin tubing, and repair work with unknown surface history.

    Solution

    • Confirm the cylinder contains the correct shielding gas for TIG welding. Pure argon is the common baseline for many TIG applications. Unknown gas mix: Unknown (Verify).
    • Set flow to a reasonable starting range for the cup size and joint access, then adjust by weld appearance and torch behavior. Exact CFH target: Unknown (Verify) for the specific torch, cup, gas lens, and procedure.
    • Check for drafts from fans, open doors, compressed air, HVAC vents, and nearby grinding stations.
    • Inspect the cup for cracks, spatter, chips, and poor seating.
    • Remove and inspect the gas lens or collet body. Look for clogged screens, damaged threads, or signs of overheating.
    • Inspect the back cap O-ring and torch body seals. Replace damaged seals before troubleshooting amperage or tungsten type.
    • Shorten tungsten stickout and test again with the same amperage and filler technique.
    • Increase post-flow long enough to keep shielding over the tungsten until it stops glowing.
    • Clean base metal and filler wire before welding. Use dedicated stainless brushes where required.
    • Regrind contaminated tungsten lengthwise using a clean wheel or dedicated tungsten grinder.

    Specs / Verification Notes

    Item to CheckWhat to VerifyWhy It Matters
    Shielding gasCorrect gas type and clean deliveryWrong or contaminated gas can oxidize the tungsten and weld pool
    Flow settingNot too low and not excessiveLow flow leaves gaps; high flow can create turbulence
    Post-flowLong enough to shield hot tungsten after arc stopHot tungsten can oxidize after the weld ends
    Cup and gas lensNo cracks, clogged screens, loose fit, or heat damageDamaged front-end parts disturb laminar gas coverage
    Back cap and O-ringSealed, tight, and not cut or flattenedSmall leaks can pull air into the torch gas path
    Tungsten prepClean, lengthwise grind, correct diameter for amperagePoor prep contributes to arc wander and tip overheating

    Comparison Table

    SymptomLikely CauseFirst Check
    Tungsten turns black after the arc stopsPost-flow too shortWatch whether gas stops while tungsten is still hot
    Tungsten turns black during the weldPoor shielding or contaminationCheck gas flow, torch angle, cup, and drafts
    Arc wanders and tungsten darkensBad tip prep, contaminated tungsten, or gas instabilityRegrind tungsten and inspect gas lens
    Weld is black or sooty tooMajor gas coverage failure or dirty materialInspect gas delivery and clean the joint
    Only one torch causes the issueTorch leak or damaged front-end partSwap cup, collet body, back cap, and hose if available

    Related Failure Paths

    Safety Notes

    TIG welding produces intense arc radiation even when the process looks clean. Use a welding helmet with the correct shade for the work, safety glasses under the hood, flame-resistant clothing, gloves, and adequate ventilation. Grinding tungsten also creates dust and eye impact hazards, so use eye protection and avoid breathing grinding dust.

    OSHA welding, cutting, and brazing rules address eye protection, fire prevention, ventilation, and protective clothing. ANSI Z49.1 is a key welding safety reference for safe welding, cutting, and allied processes. For shop procedures, verify requirements against the current employer safety program, SDS documents, and applicable local rules.

    FAQ

    Does black tungsten always mean the weld is bad?

    No. A bead may look acceptable while the tungsten still shows oxidation. However, black tungsten is a warning that shielding, post-flow, torch condition, or cleanliness should be checked before continuing on critical work.

    Can too much argon turn tungsten black?

    Yes. Excessive gas flow can create turbulence at the cup and pull air into the shielding zone. The result can look like low gas flow even though the flowmeter setting is high.

    Should the tungsten stay shiny after welding?

    It should remain clean enough to hold a stable arc. Light heat tint may appear depending on the application, but repeated blackening, soot, or arc wander means the setup needs correction.

    Is a gas lens always the fix?

    No. A gas lens can improve shielding stability, but it will not fix a leaking torch, bad post-flow, contaminated gas, dirty base metal, or poor torch angle.

    When should tungsten be re-ground?

    Regrind when the tip is contaminated, balled unexpectedly, split, dull, or causing arc wander. Grind lengthwise and keep the grinding surface clean from other metals.

    Next Step

    If the tungsten turns black again after checking flow and post-flow, isolate the torch. Swap the cup, gas lens or collet body, back cap, and tungsten one part at a time. If the issue follows the torch, inspect the hose, O-rings, and fittings for leaks before changing welding parameters.

    For the next troubleshooting step, compare the symptoms with black and sooty TIG weld causes if the bead is also dark, or use the tungsten contamination prevention guide if the bead shows inclusions or black specks.

    Sources Checked

    • AWS Recommended Practices for Gas Tungsten Arc Welding, AWS C5.5/C5.5M
    • OSHA 29 CFR 1910.252 General Requirements for Welding, Cutting, and Brazing
    • OSHA Welding, Cutting, and Brazing Standards overview
    • AWS/ANSI Z49.1 Safety in Welding, Cutting, and Allied Processes
    • Miller: How to Solve Common TIG Welding Problems
    • Miller: Proper Shielding Gas Coverage Is Key to Success in GTAW
    • WSP internal TIG contamination and TIG gas coverage articles listed above
  • TIG Gas Lens Compatibility Guide: 45V26 Gas Lens for WP-17, WP-18, and WP-26 Torches

    Why this matters

    If your TIG arc is wandering, the tungsten is overheating, or shielding gas coverage is inconsistent, the gas lens setup may be the problem. A correct gas lens collet body helps smooth gas flow and improves shielding around the tungsten.

    If you are setting up a WP-17WP-18, or WP-26 style torch, the 45V26 family is a common front-end consumable to verify first. This guide is about fitment, not guesswork. Check the torch body, tungsten size, and cup setup before ordering.

    When to replace or upgrade the front end

    • Arc starts feel unstable
    • Gas coverage looks uneven
    • Tungsten contamination happens often
    • The collet body is worn, pitted, or damaged
    • You need a setup matched to a standard TIG torch body

    Compatibility table

    Part typePart numberCompatible modelsVerifiedNotesUse cases
    Gas lens collet body45V26WP-17, WP-18, WP-26Verified on Amazon listing3/32″ size listed; confirm tungsten diameter before orderingGeneral TIG front-end setup
    Gas lens body45V2617/18/26-style TIG torchesVerified on Amazon listingCheck cup and collet compatibility before installMild steel, stainless, aluminum TIG work

    Copy table

    AAWP box: 

    No products found.

    What to verify before you buy

    • Torch model:ย WP-17,ย WP-18, orย WP-26
    • Tungsten diameter: match theย 3/32″ย size if that is your setup
    • Cup size: confirm your cup and back cap arrangement
    • Collet body thread and front-end style: match the torch family, not just the size

    Recommended use case

    Choose this setup if you want a standard TIG consumable path for a common 17/18/26-series torch and you need a verified 45V26 replacement path.

    Safety note

    Disconnect power before changing TIG consumables. Verify torch and consumable fitment against the manufacturer documentation before use. For procedure-controlled welding, follow the applicable welding code and work instructions.

  • ARCCAPTAIN TIG Torch Consumables Kit: Complete 11-Piece Setup for WP-17/18/26 Torches

    TIG welding demands precision, and that starts with reliable consumables. A worn collet, damaged cup, or mismatched gas lens can derail your arc quality and waste time troubleshooting. The ARCCAPTAIN 11-piece TIG torch consumables kit bundles the essential parts you need to keep your torch running clean and consistent.

    What’s Included in This Kit

    The ARCCAPTAIN kit covers the core consumables for WP-17, WP-18, and WP-26 torches:

    • 1x Alumina Nozzle โ€” Ceramic cup for shielding gas flow
    • 2x Collets โ€” Electrode holders (standard sizes for 1/16″ and 3/32″ tungsten)
    • 2x Back Caps โ€” Torch body connectors
    • 2x Gas Lenses โ€” Improved gas coverage and shielding
    • 2x Ceramic Cups โ€” Replacement nozzles for wear
    • 2x Insulating Bushings โ€” Electrical isolation components

    This multi-pack approach means you have spares on hand, reducing downtime when a part fails mid-job.

    Who Should Buy This Kit

    This kit is ideal for:

    • Hobby and shop welders stepping up from single-piece replacements to a complete consumables set
    • TIG welders running WP-17/18/26 torches who want to avoid emergency supply runs
    • Fabricators and instructors who need backup parts for multiple torches or training setups
    • Budget-conscious shops looking for a multipack at a reasonable price point

    ARCCAPTAIN 11Pcs TIG Welding Torch Consumables Kit Collets Alumina Ceramic Cups for WP-17/18/26
    • Complete TIG Torch Kit – 11pcs Tig Welding Torch accessories (consumables) kit. This set includes all the essential TIG torch accessories and consumables, so you can get started on your welding projects right away.
    • Compatible – This TIG torch accessories kit fits all WP-17 WP-18 WP-26 TIG Welding Torch, including the ARCCAPTAIN TIG welding torches(quick connector 10-25mm/35-50mm/XS12-5P).
    • Highlights – Pure Copper Material, Accurate Punching, Precise Cutting. Electric conductivity is similar to a 2% thoriated tungsten electrode at either AC or DC. No need to change any welding program. With excellent plasticity, toughness, and crack resistance, especially low-temperature impact toughness higher.
    • Wide application – WP-17 WP-18 WP-26 TIG Welding Torch, for many locations of the pipeline TIG welding arc welding and arc welding, can be welded carbon steel and some low alloy steel.
    • Note – The insulator rings can not match the CK Torch.

    Last update on 2026-07-14 / Affiliate links / Images from Amazon Product Advertising API

    Performance & Use

    What to Compare Before You Buy

    • Torch Compatibility โ€” Verify your torch model (WP-17, WP-18, or WP-26); this kit is NOT compatible with WP-9 or larger industrial torches
    • Tungsten Size โ€” Confirm whether you run 1/16″, 3/32″, or mixed tungsten sizes; collet sizing matters for arc stability
    • Gas Lens vs. Standard Cup โ€” Gas lenses improve shielding in drafty environments; standard cups work fine for bench work
    • Material Grade โ€” Alumina cups are standard; some shops prefer ceramic for specific applications
    • Quantity โ€” This is an 11-piece set; if you run multiple torches daily, consider buying two kits

    Comparable Amazon Picks (Optional)

    Installation & Maintenance

    Swapping consumables is straightforward:

    1. Cool the torch โ€” Let it sit for 2โ€“3 minutes after your last weld
    1. Unscrew the back cap โ€” Use a 7/16″ or 1/2″ wrench; don’t force it
    1. Remove the old collet and cup โ€” They slide out together
    1. Insert new collet and cup โ€” Align the collet with the torch body; it should sit flush
    1. Reattach the back cap โ€” Hand-tighten, then snug with a wrench; over-tightening can crack the collet

    Maintenance tip: Clean the torch body and collet threads every 20โ€“30 hours of welding to prevent carbon buildup and stuck parts.

    Durability & Lifespan

    Consumables wear at different rates depending on amperage, duty cycle, and shielding gas:

    • Collets โ€” 40โ€“80 hours of active welding before replacement
    • Ceramic cups โ€” 30โ€“60 hours; cracks indicate replacement time
    • Gas lenses โ€” 50โ€“100 hours; clogging reduces gas coverage
    • Back caps โ€” 100+ hours; rarely need replacement unless cross-threaded

    At $25โ€“$35 for this 11-piece kit, you’re looking at roughly $2โ€“$3 per consumable part, making it a cost-effective backup supply.

    Safety Notes

    • Always wear welding gloves when handling hot torches or consumables
    • Ensure your torch is cool before disassembly
    • Check gas lens alignment; misaligned lenses can cause poor shielding and porosity
    • Use only argon or argon/COโ‚‚ blends with this torch; check your machine’s gas compatibility

    When to Replace This Kit’s Parts

    Replace consumables when you notice:

    • Erratic arc โ€” Worn collet or misaligned cup
    • Visible cracks or pitting on ceramic cups
    • Gas coverage loss โ€” Clogged gas lens or damaged nozzle
    • Difficulty inserting tungsten โ€” Worn collet

        1. TIG Welds Turning Black and Sooty? Fix Gas Coverage Fast

          If your TIG welds are coming out black, sooty, or โ€œdirty,โ€ youโ€™re not aloneโ€”this is one of the most common early warning signs of shielding gas problems. It usually shows up mid-bead when everything seems set correctly. Hereโ€™s why it happens and how to fix it.

          Symptoms (what youโ€™ll see)

          • Black soot around the bead (sometimes a โ€œsmoke trailโ€ look)
          • Tungsten turns dark/sooty or balls up unexpectedly
          • Porosity starts showing up even on clean steel
          • Arc feels unstable or wanders
          • Weld color looks dull/gray instead of clean and consistent

          Root cause (whatโ€™s actually happening)

          Black soot is typically a sign that your weld puddle (and/or hot tungsten) is seeing oxygen and contaminants because shielding gas coverage is breaking down. That can come from too little flow, turbulent flow, a leak, a blocked cup/screen, or drafts pulling the argon away.

          On steel, poor shielding can leave soot and surface oxidation; on stainless, it can show up as heavy discoloration; on aluminum, it often stacks with porosity and โ€œdirtyโ€ looking puddle behavior. The key point: argon has to form a stable envelope around the tungsten and puddleโ€”when it doesnโ€™t, contamination happens fast.

          The fix (step-by-step)

          1. Check flow rate and stop turbulence
            Start around 15โ€“20 CFH (0.42โ€“0.57 mยณ/h) for typical cups, then adjust. Too low starves coverage; too high can create turbulence that pulls air in.
          2. Inspect the cup, collet body, and gas lens screen
            Remove the cup and look for spatter, dust, or a partially blocked gas lens screen. If the screen is dirty or damaged, replace it.
          3. Leak-check the gas path
            Confirm tight connections from the regulator to the torch. If you suspect leaks, isolate sections (regulator, hose, torch) and re-test. Leaks can cause inconsistent shielding and โ€œrandomโ€ soot.
          4. Increase stickout control (or switch to a gas lens)
            If youโ€™re running long tungsten stickout (common in corners/fillets), a standard setup can lose coverage. A gas lens helps laminar flow and supports longer stickout without losing shielding.
          5. Fix post-flow and regrind tungsten
            If the tungsten is sooty/contaminated, stop and regrind. Also ensure post-flow is long enough to protect the tungsten as it cools.

          Safety note during troubleshooting

          If youโ€™re chasing shielding issues, donโ€™t โ€œtestโ€ by hovering the torch and blasting gas near your face. Keep your hood down and gloves onโ€”hot tungsten and UV exposure are still hazards even during quick checks.

          Real-world tip (what experienced welders do)

          When soot shows up, experienced TIG welders donโ€™t keep pushing the bead hoping it clears. They stop, regrind the tungsten, and do a fast gas-system sanity check: flow, leaks, cup/lens condition, and drafts. If theyโ€™re working with longer stickout or tight joints, they often move straight to a gas lens setup because it reduces sensitivity to small technique changes.

        2. TIG Torch Slipping Tungsten? Your Collet Body Is Worn (Here’s the Fix)

          Intro

          You’re TIG welding and the tungsten keeps slipping out of the collet. You tighten the back cap, it holds for a few seconds, then slides again. The arc starts inconsistent, the puddle wanders, and your bead looks rough. The problem isn’t the tungstenโ€”it’s a worn collet body that can’t grip anymore.

          Key Takeaways

          • Tungsten slipping is almost always caused by a worn or damaged collet body, not the tungsten itself
          • A collet body wears from repeated insertion and removal of tungsten
          • Replacement collet bodies are cheap ($5โ€“$15) and take 30 seconds to swap
          • Gas coverage improves dramatically with a fresh collet body
          • Keep spares on hand for every torch size you use

          The Problem

          A worn collet body shows up as:

          • Tungsten slides out even when the back cap is tight
          • Inconsistent arc initiation
          • Poor gas coverage (visible oxidation on the weld)
          • Difficulty maintaining arc length
          • Collet body threads are stripped or loose

          The collet is a small tapered sleeve that grips the tungsten. Every time you insert or remove tungsten, the collet compresses and expands. Over hundreds of cycles, the taper wears out. The grip weakens. Eventually, no amount of back cap tightening will hold the tungsten in place.

          Why It Matters

          A slipping tungsten means an unstable arc. Your puddle control suffers. Weld quality drops. On precision work (aerospace, stainless, thin-wall), a wandering arc is a reject. On production runs, it’s rework and lost time. Plus, a loose tungsten can break mid-weld and contaminate your shielding gas.

          The Fix

          1. Disconnect the torch and let it cool. Safety first.
          1. Unscrew the back cap and remove the old collet body.
          1. Inspect the threads. If they’re stripped, you may need a new torch head (rare).
          1. Install the new collet body. Slide it in and hand-tighten the back cap.
          1. Insert tungsten and tighten firmly. The tungsten should not move when you pull on it.
          1. Test the arc. You should see immediate improvement in arc stability and gas coverage.

          Why This Product Solves It

          The TIG Gas Lens Collet Body #17, 18, 26 Torch 2PK (45V27-1/8″) is a direct replacement for standard TIG torches and includes a gas lens design that improves shielding gas flow. The tapered bore is precision-machined to grip tungsten consistently, and the gas lens allows larger tungsten stick-out for better visibility and control. Two-pack means you have a spare.

          Product Link:  Product not found.

          “>
          Product not found.
           

          What to Check Before You Buy

          • Torch series: This fits #17, #18, and #26 torches (most common sizes)
          • Tungsten size: This collet is sized for 1/8″ (3.2mm) tungsten
          • Gas lens compatibility: Confirm your torch head accepts a gas lens (most do)
          • Thread type: Standard collet body threads (verify if you have an older torch)

          Real-World Use

          A TIG fabricator working on stainless tubing noticed poor gas coverage and arc wander. Swapped the collet body. Tungsten stayed put, arc was stable, and the bead came out clean. One collet body lasted 18 months before needing replacement.

          Common Mistakes

          • Tightening the back cap excessively (damages the new collet body)
          • Using the wrong collet size for your tungsten diameter (loose fit)
          • Not replacing the collet body when it’s visibly worn (keeps struggling with slipping)
          • Forgetting to clean the collet body threads before installation (cross-threading)
          • Buying a single collet body instead of keeping spares (downtime when it fails)

          Safety Notes

          Always let the torch cool before handling. Collet bodies get hot during welding. Wear gloves when removing hot components. If tungsten slips during welding, stop immediatelyโ€”a loose electrode can break and contaminate your argon supply.

          Always follow the manufacturer’s instructions and your shop’s safety procedures. If you’re unsure about fitment or ratings, verify before you buy or install.

          Related Reading

      1. TIG Torch Consumables Wearing Out Fast? Stock Up With This 123-Piece Kit

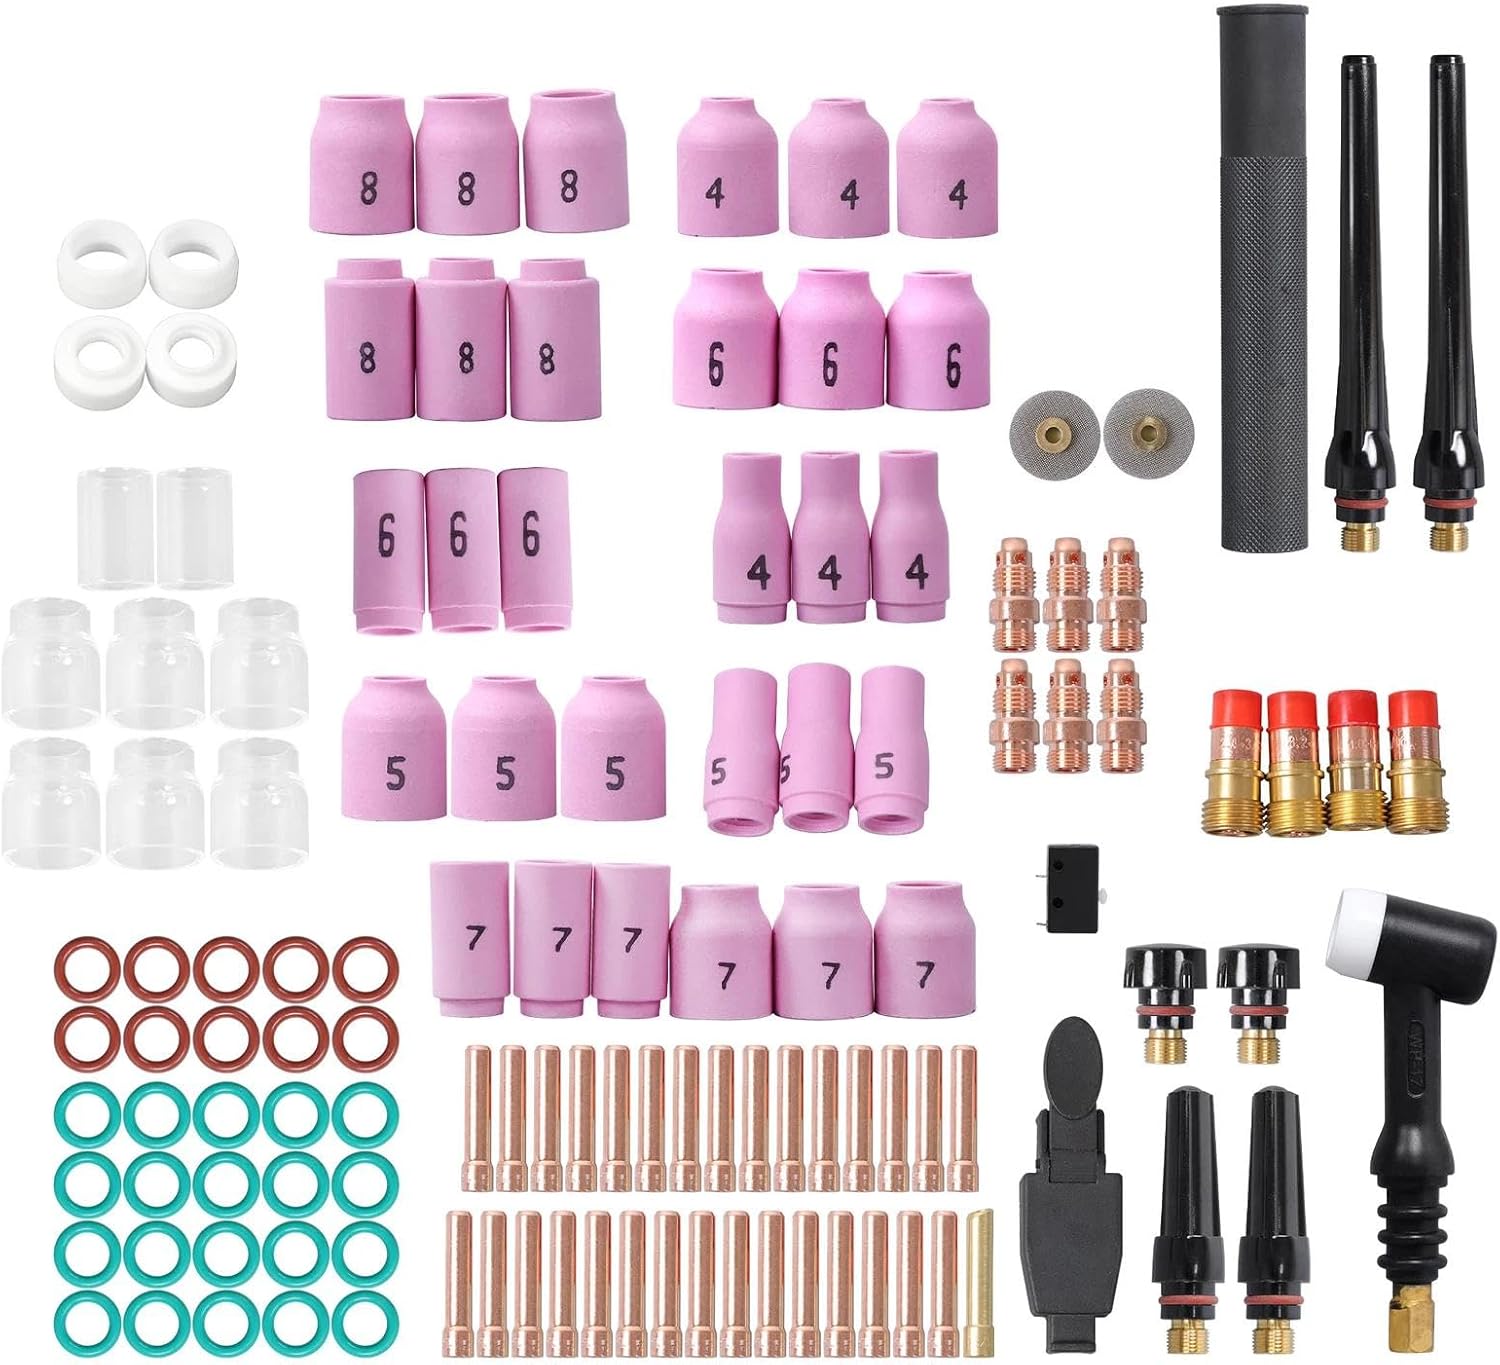
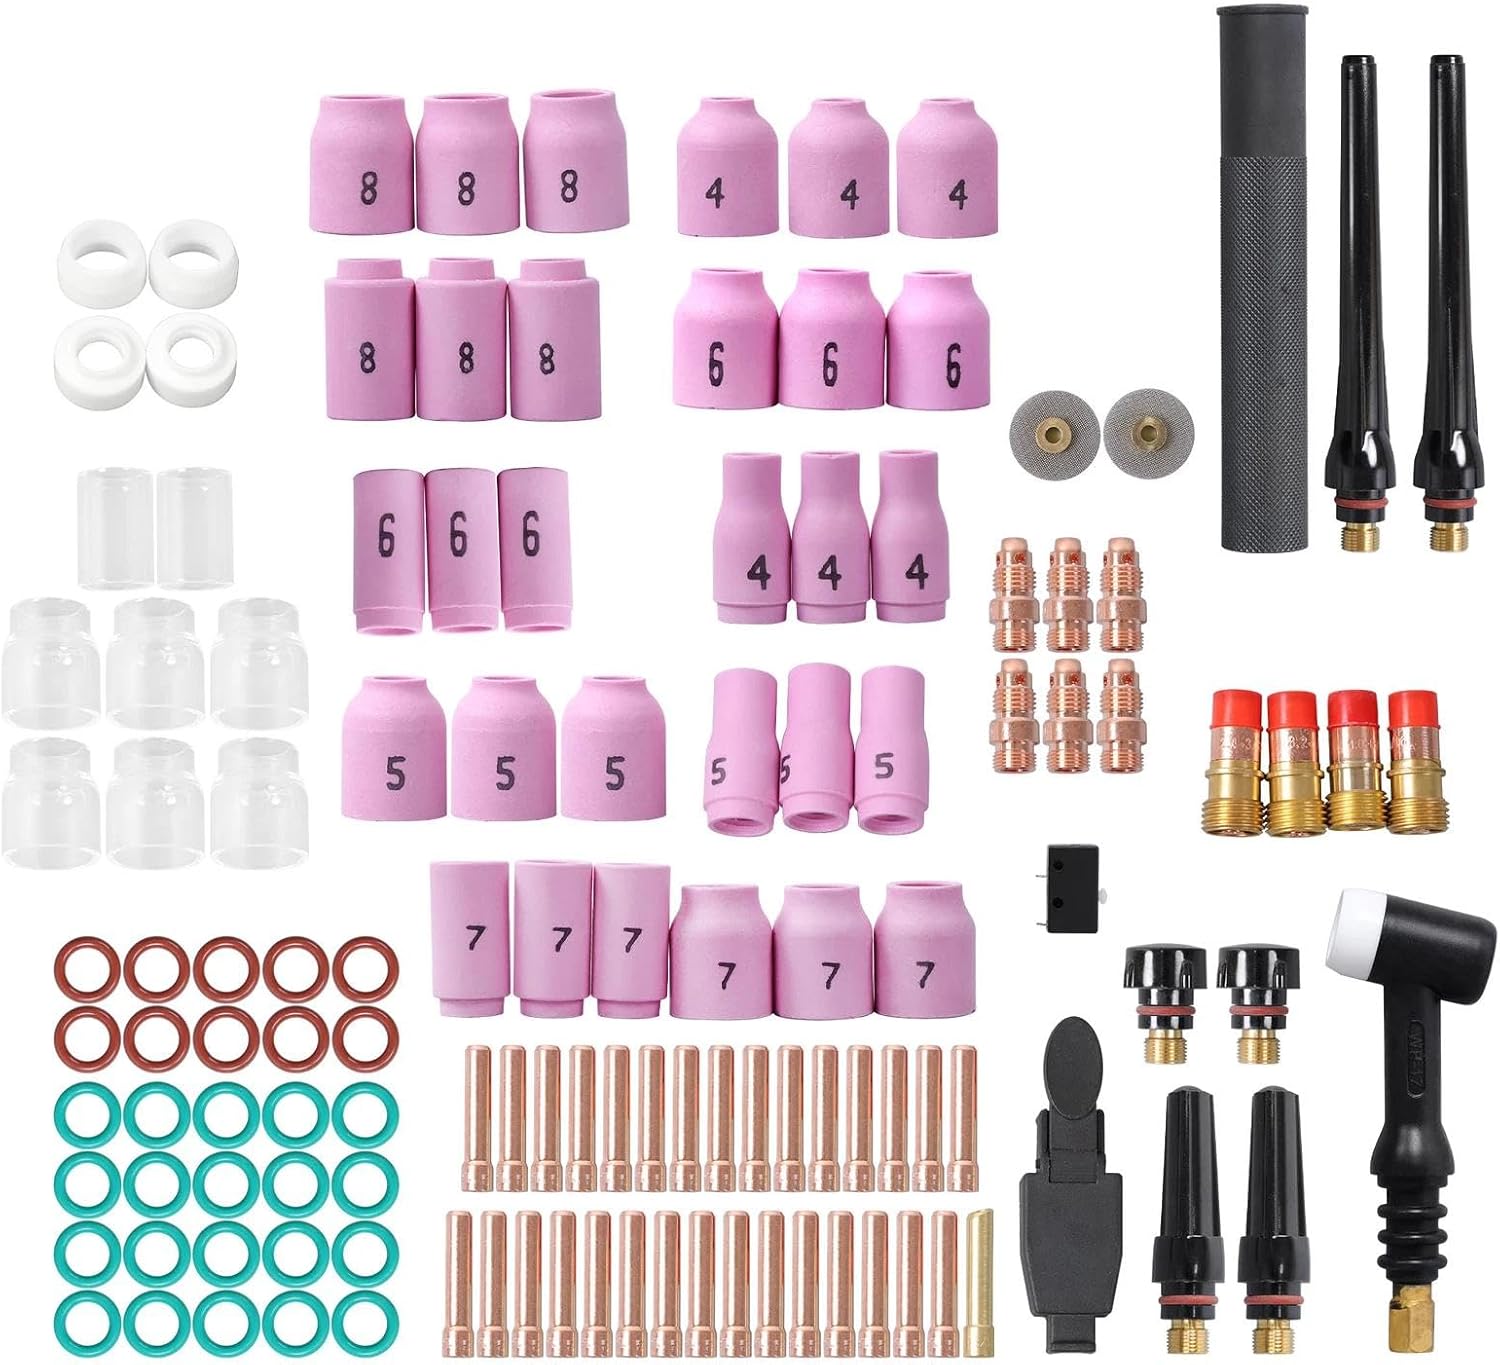
        TIG Torch Consumables Wearing Out Fast? Stock Up With This 123-Piece Kit

        Intro: TIG torch consumables wear out fastโ€”especially with aluminum or stainless jobs. This 123-piece kit gives WP-17/18/26 users a complete, ready-to-go stock of nozzles, collets, and gas lenses for pro-level results without the downtime of waiting for parts.

        Key Takeaways

        • 123 pieces: nozzles, collets, gas lenses, and ceramic cups for WP-17/18/26 torches
        • Precision-manufactured for reliable fit and consistent gas coverage
        • Heatproof glass cups and alumina nozzles resist cracking under high temps
        • Supports both AC and DC TIG work; ideal for aluminum, stainless, and mild steel
        • One-time stock eliminates repeated small orders and shop delays

        PHUOC LOC THO for TIG Welding Torch Kit 123 Pcs Stubby Lens, Alumina Nozzle, Collets
        • For TIG Welding Torch Kit 123 Pcs Stubby Lens, Alumina Nozzle, Collets
        • Includes 123 pieces for TIG welding torch kit, featuring stubby lens, alumina nozzle, and collets for welding applications.
        • components like alumina nozzle and collets reliable performance and precise welding results with TIG torch kit 123 Pcs.
        • Upgrade Your Gear, Upgrade Your Performance โ€“ Choose Our Reliable Replacement Parts.
        • To ensure a perfect fit and make an informed decision, we encourage you to carefully review both the product’s dimensions and visually inspect it in the provided photos.

        Last update on 2026-07-14 / Affiliate links / Images from Amazon Product Advertising API

        Performance & Use

        All parts are precision-manufactured for reliable fit and gas coverage. Designed for both AC and DC TIG work (verify for your machine). Suits most US-shop WP-17/18/26 torches.

        What to compare before you buy

        • Torch compatibility: Verify your torch model (WP-17, WP-18, or WP-26) before ordering
        • Collet sizes: Kit includes 0.040″, 1/16″, 3/32″, and 1/8″ colletsโ€”confirm your electrode diameter
        • Glass vs. ceramic: Kit includes both heatproof glass cups and alumina nozzles; choose based on your material and duty cycle
        • Gas lens setup: Verify whether you run stubby or regular gas lens configuration
        • Storage: Check if included storage case or organizer meets your shop layout needs

        Comparable Amazon picks (optional)

        Durability & Build

        Heatproof glass cups and alumina nozzles resist cracking under high temps. All collets and lenses are built for repeated useโ€”ideal for daily welding or instructional settings. Precision tolerances ensure tight, consistent seals that minimize gas leakage and porosity.

        Who It’s For

        • TIG welders running WP-17/18/26 torches on aluminum, stainless, or mild steel
        • Fabrication shops that need backup consumables in stock to avoid downtime
        • Instructors teaching TIG welding who need a complete parts kit for multiple torch setups
        • Hobbyists and pros upgrading from single-part orders to bulk stock

        Quick FAQ

        Q: Will this fit my torch?
        A: Compatible with WP-17, WP-18, WP-26 (verify torch model before ordering).

        Q: Are all parts included for aluminum and stainless?
        A: Yes, supports both (verify machine settings and gas type).

        Q: Are the cups glass or ceramic?
        A: Both heatproof glass and alumina nozzles included.

        Q: Can I use this for AC and DC TIG?
        A: Yes (verify for your machine).

        Q: Does it include a storage case?
        A: Unknown (Verify on listing).

        Safety Notes

        • Always allow torch to cool before handling consumables
        • Inspect collets and gas lenses for cracks or damage before use; replace if compromised
        • Verify gas flow and coverage before starting production welds
        • Follow ANSI Z49.1 safety standards for TIG welding
      2. 123 Pcs TIG Welding Torch Kit for WP-17/18/26

        123 Pcs TIG Welding Torch Kit for WP-17/18/26

        Intro:
        TIG torch consumables wear out fastโ€”especially with aluminum or stainless jobs. This 123-piece kit gives WP-17/18/26 users a complete, ready-to-go stock of nozzles, collets, and gas lenses for pro-level results.

        Key Takeaways

        • Full kit: 123 pieces for WP-17/18/26 torches.
        • Includes alumina nozzles, stubby gas lens, collets, glass cups.
        • Supports steel, stainless, and aluminum TIG jobs.
        • Compatible with most standard torch bodies (verify model).
        • Saves time and downtimeโ€”no emergency parts runs.

        Performance & Use

        All parts are precision-manufactured for reliable fit and gas coverage. Designed for both AC and DC TIG work (verify for your machine). Suits most US-shop WP-17/18/26 torches.

        Durability & Build

        Heatproof glass cups and alumina nozzles resist cracking under high temps. All collets and lenses are built for repeated useโ€”ideal for daily welding or instructional settings.

        Power / Specs

        • Kit size: 123 pieces
        • Torch fit: WP-17, WP-18, WP-26
        • Materials: Alumina, glass, copper
        • Process: TIG (AC/DC), steel, stainless, aluminum
        • Standards: Unknown (Verify)
        • Included: Nozzles, collets, gas lenses, glass cups, accessories

        Who Itโ€™s For

        • TIG welders (pro, hobby, instructional) using WP-17/18/26.
        • Shops needing full consumable stock.
        • Not for: Non-compatible torch models (verify fit).

        Quick FAQ

        Q: Will this fit my torch?
        A: Compatible with WP-17, WP-18, WP-26 (verify torch model).

        Q: Are all parts included for aluminum and stainless?
        A: Yes, supports both (verify machine settings).

        Q: Are the cups glass or ceramic?
        A: Both glass and alumina nozzles included.

        Q: Can I use this for AC and DC TIG?
        A: Yes (verify for your machine).

        Q: Does it include a storage case?
        A: Unknown (Verify on listing).

        Safety Notes

        • Inspect all consumables before use.
        • Replace cracked or worn parts promptly.
        • Use proper PPE (gloves, eyewear) during installation.
        • Always follow the machine manual, SDS, and applicable code requirements. If unsure, verify with the manufacturer.

        Where to Buy

        • Amazon pick: 123 Pcs TIG Welding Torch Kit for WP-17/18/26 โ€” ASIN: B0FWJVW4NT
        • Amazon listing
        • PHUOC LOC THO for TIG Welding Torch Kit 123 Pcs Stubby Lens, Alumina Nozzle, Collets
          • For TIG Welding Torch Kit 123 Pcs Stubby Lens, Alumina Nozzle, Collets
          • Includes 123 pieces for TIG welding torch kit, featuring stubby lens, alumina nozzle, and collets for welding applications.
          • components like alumina nozzle and collets reliable performance and precise welding results with TIG torch kit 123 Pcs.
          • Upgrade Your Gear, Upgrade Your Performance โ€“ Choose Our Reliable Replacement Parts.
          • To ensure a perfect fit and make an informed decision, we encourage you to carefully review both the product’s dimensions and visually inspect it in the provided photos.

          Last update on 2026-07-14 / Affiliate links / Images from Amazon Product Advertising API

      3. Try Amazon Prime Free