ESAB Savage A40 PAPR Main Filter Replacement – NIOSH Certified, Pack of 1
$47.87
In Stock
View ProductPowered Air Helmets, consumables, parts breakdowns, and accessories
$47.87
In Stock
View Product
Use this checklist to decide when a PAPR filter replacement is due and to reduce the chance of restricted airflow during welding. Treat filter condition as a maintenance item, not a guess. If the blower, hose, or face seal is also suspect, check those parts before installing a new filter.
Replace the filter when any of the following are true:
If the unit still alarms after replacement, use the troubleshooting steps in the airflow guide and check the blower, hose, battery, and seals.
For airflow-related problems that look like filter failure, use this guide first:
That article covers common causes of reduced airflow that can lead to unnecessary filter replacement.
If you need the supported replacement part for this topic, use the ArcWeld listing below.
Upgrade your safety gear with the ESAB 0700002403, Savage A40 PAPR Main Filter. This essential component is designed for those who prioritize both health and performance in their workplace. The PAPR main filter replacement is specifically engineered to ensure the highest level of air quality while you work, allowing you to focus on the job at hand without constant concerns about airborne contaminants. With rigorou…
View at Arc Weld StoreProduct note: ESAB Savage A40 PAPR Main Filter Replacement – NIOSH Certified, Pack of 1. Compatibility beyond the listed product name is Unknown (Verify). Use only where the equipment model matches the replacement part specification.
How often should a PAPR filter be replaced?
Unknown (Verify). Replacement interval depends on dust loading, duty cycle, and the equipment manual.
Can I clean a loaded PAPR filter and reuse it?
Usually no. If airflow is restricted or the filter is damaged, replace it. Do not improvise cleaning methods unless the manufacturer allows it.
What if the new filter does not fix the low-flow alarm?
Check the blower, hose, battery, seals, and installation. The issue may not be the filter.
Do I need to replace the prefilter too?
If the system uses one, inspect it at the same time. A blocked prefilter can reduce airflow and shorten main filter life.
Category: PAPR Helmet Support
$34.20
In Stock
View Product
If your PAPR helmet airflow feels weak, start with the basic flow path: intake, pre-filter, main filter, blower, hose, battery, and helmet seals. Low airflow is usually caused by restriction, a failing power source, or a leak in the air delivery path.
A loaded pre-filter can restrict airflow before the blower can compensate. Remove the pre-filter and inspect it for dust buildup, discoloration, or collapse. If it is loaded, replace it.
Also inspect the main filter element. If the system still feels weak after a fresh pre-filter, the main filter may be restricted. Use the manufacturerโs replacement schedule and alarm guidance.
Low battery output can reduce blower speed. Charge the battery fully, then retest the system. If the airflow improves after charging, the battery may be nearing end of service life. Battery health details are Unknown (Verify) without the system manual.
Run your hand along the hose and check for:
A hose leak or restriction can make the helmet feel underfed even if the blower is running normally.
Power the unit on and listen for the blower. A healthy blower should run consistently. If it sounds weak, surges, rattles, or changes pitch under load, there may be a motor, bearing, or electrical issue. Exact service limits are Unknown (Verify) without the OEM documentation.
Make sure the helmet inlet, internal air channel, and face seal area are clean and properly installed. A mis-seated component can block or divert airflow. Remove dust or spatter buildup that could interfere with delivery.
If the low-flow alarm is active, do not ignore it. The alarm can be triggered by filter loading, airflow restriction, battery issues, or blower faults. If the alarm continues after basic checks, take the unit out of service until the fault is found.
If the pre-filter is visibly loaded, replace it before moving on to deeper troubleshooting. For the ESAB Savage A40 PAPR system, use the replacement pre-filter below.
Enhance your protection while welding with the ESAB 0700002404 Savage A40 PAPR Pre-Filter. This essential pre-filter acts as a replacement part for the esteemed ESAB Savage A40 Powered Air Purifying Respirator (PAPR) system, ensuring that you maintain optimal air quality while you work in hazardous environments. Designed for professionals, this pack of 5 PAPR pre-filter replacements provides a reliable solution fo…
View at Arc Weld StoreProduct note: ESAB Savage A40 PAPR Pre-Filter Replacement, NIOSH Approved, Pack of 5 Filters. Compatibility is limited to the listed ESAB Savage A40 PAPR pre-filter replacement application. Verify fitment against your system manual before purchase or installation.
Most often, the cause is filter loading, a battery that cannot maintain output, or a hose restriction or leak.
Yes. A loaded pre-filter is one of the most common causes of weak airflow and low-flow alarms.
Replace or inspect the filter first if it is visibly loaded. If the filter is clean, check the battery and blower performance next.
Inspect the hose, battery, blower, and helmet air path. If the issue remains, the fault may be in the blower assembly or another component. Unknown (Verify) without OEM diagnostics.
Category: PAPR Helmet Support
If a PAPR welding helmet has weak airflow, a low-flow alarm, fogging, heat buildup, or reduced breathing comfort, stop welding and troubleshoot before continuing. A PAPR depends on a battery-powered blower, correct filter, sealed hose, clean airflow path, and compatible helmet/headtop. Common causes are loaded filters, blocked spark arrestors or prefilters, weak batteries, loose hose connections, damaged breathing tubes, clogged inlet screens, poor face seal or shroud fit, and blower faults.
Do not silence or ignore a low-airflow alarm. Install a fully charged battery, replace the prefilter and main filter if loaded, inspect the hose and seals, verify the headtop connection, and perform the manufacturerโs airflow check with the correct flow indicator. If the unit still fails the airflow test, remove it from service and replace the failed component or send it for qualified service.
Related helmet and respiratory checks include welding helmet replacement parts, auto-darkening welding helmet buying guide, PAPR welding safety support, and respirator-under-helmet fit checks.
| Symptom | Likely Cause | First Check |
|---|---|---|
| Low-flow alarm sounds | Loaded filter, blocked prefilter, weak battery, hose restriction | Replace prefilter/filter and run airflow test |
| Weak airflow in helmet | Battery low, blower inlet blocked, hose kinked | Fully charge battery and inspect hose route |
| Lens fogs inside headtop | Low airflow, poor shroud fit, blocked outlet | Check airflow and head seal/shroud position |
| Airflow starts strong then drops | Battery capacity issue or filter loading under load | Test with fresh battery and clean filters |
| Blower runs louder than normal | Filter restriction or blower working against blockage | Inspect filter stack and inlet screen |
| No blower operation | Dead battery, bad contacts, switch/blower failure | Check battery seating and contacts |
A powered air-purifying respirator uses a fan/blower to pull air through approved filters and deliver filtered air into the helmet or headtop. The filter protects against the approved hazard class only when the correct filter is installed, the blower delivers required airflow, the breathing tube is sealed, and the headtop is worn as designed. A PAPR is not a substitute for ventilation, fume extraction, confined-space controls, or correct filter selection.
Welding fume, grinding dust, metal dust, and shop debris load filters faster than clean-air use. A clogged prefilter or spark arrestor can trigger alarms even when the main filter still looks usable. If airflow improves after replacing the prefilter but drops again quickly, check the work process, fume extraction, filter type, and whether grinding dust is overloading the system.
| Problem | Field Fix | Proper Fix |
|---|---|---|
| Low-flow alarm | Stop welding and move to clean air | Replace loaded filters and pass airflow test |
| Weak battery | Install charged spare battery | Test charger, contacts, and battery runtime |
| Kinked hose | Reroute hose | Replace crushed or cracked breathing tube |
| Fogging in helmet | Check head seal and fan speed | Fix airflow restriction and worn shroud/seal |
| Alarm remains after new filters | Remove from service | Inspect blower, sensors, hose seals, and service parts |
PAPR parts must match the complete system approval: blower, battery, charger, filter/cartridge, prefilter, spark arrestor, breathing tube, belt, helmet/headtop, face seal or shroud, and airflow indicator. Do not mix 3M, Miller, Lincoln, ESAB, ArcOne, Jackson, or other PAPR components unless the manufacturer specifically approves the configuration. For verified WSP category references, see welding helmet and PAPR support by brand and ESAB welding helmet support.
If a welding helmet is hard to see through, will not stay up, flickers, fails to darken, or feels loose on the head, the repair usually starts with replacement partsโnot a new helmet. The most common welding helmet replacement parts are outside cover lenses, inside cover lenses, sweatbands, headgear assemblies, batteries, ADF cartridges, lens seals, shell parts, magnifying lenses, hard hat adapters, and PAPR filters. The part must match the exact helmet series, lens size, cartridge style, and shell design before ordering.
Do not order by appearance alone. Two helmets can look similar and use different inside lenses, ADF cartridges, gasket profiles, or headgear hardware. Verify the brand, helmet series, model number, lens dimensions, ADF part number, battery type, and whether the hood is passive, auto-darkening, flip-front, grind-shield, hard-hat compatible, or PAPR-equipped.
| Symptom | Likely Part | What To Check First |
|---|---|---|
| Cloudy view or haze | Outside cover lens / inside cover lens | Scratches, smoke film, spatter pits, heat warping |
| Helmet will not stay up | Headgear assembly | Stripped knobs, cracked pivots, worn ratchet band |
| ADF flickers or goes light | Battery, sensors, ADF cartridge | Battery condition, sensor blockage, mode setting |
| Light leaks around lens | Lens seal / gasket / ADF holder | Missing seal, warped holder, wrong cover lens thickness |
| Sweatband torn or soaked | Sweatband | Contamination, odor, slipping headgear |
| Helmet shell cracked | Replacement shell | Impact damage, heat damage, broken lens frame |
| Need closer puddle view | Cheater / magnifying lens | Correct diopter and compatible lens slot |
| PAPR airflow warning | Filter, pre-filter, battery, breathing tube | Loaded filters, low battery, blocked hose, poor seal |
The outside cover lens protects the ADF or passive filter from spatter, sparks, grinding dust, and scratches. It is the part most shops replace first because it directly affects puddle visibility. The inside cover lens protects the rear side of the filter from dust, fingerprints, and fumes trapped inside the hood.
The ADF cartridge is the auto-darkening filter. If the helmet powers on but does not darken reliably after batteries and sensors are checked, the cartridge may be the failed component. The headgear assembly controls fit, balance, lift tension, and working position. A worn headgear can make a good helmet feel unsafe or unusable.
Sweatbands are low-cost wear items. They do not just improve comfort; they help keep the helmet stable on the head. Lens seals, gaskets, holders, and front frames keep the filter seated correctly and help prevent light leaks around the cartridge.
Helmet replacement parts are not universal unless the manufacturer states that they are. Lincoln VIKING 2450 and VIKING 3350 helmets both use KP2898-1 outside cover lenses and KP2930-1 sweatbands in the Lincoln parts data, but their inside cover lenses and ADF cartridges differ. The VIKING 2450 listing uses KP2931-1 inside cover lenses and KP2932-4 ADF cartridge, while the VIKING 3350 listing uses KP3044-1 inside cover lenses and KP3045-4 ADF cartridge.
The VIKING 3250D FGS uses larger front protection parts than standard VIKING shells, including KP3700-1 outside cover lenses, KP3701-1 inside cover lenses, KP3702-1 grind shield clear lens, KP3703-3 ADF cartridge, KP3704-1 replacement shell, and KP3706-1 headgear assembly.
Miller Performance and Classic helmet families use their own shell, lens cover, gasket, lens assembly, headgear, and battery tray part numbers. 3M Speedglas helmets also have series-specific outside plates, inside plates, filters, batteries, headbands, and hard-hat adapters. Dynaflux lists replacement cover lenses and auto-darkening replacement lenses by helmet family, including Miller, Jackson, and Speedglas-compatible listings. Treat every brand and series as its own parts system.
Replace the outside lens when scratches, spatter pits, fogging, distortion, or heat waves make it harder to see the puddle. Replace the inside lens when it is cloudy, cracked, coated with fume residue, or no longer locks flat in the filter frame. Replace headgear if the helmet drops unexpectedly, feels unbalanced, or cannot hold adjustment.
Inspect the shell for cracks around the lens frame, pivot mounts, and top edge. A cracked shell can allow light entry or fail to support the filter. On PAPR helmets, inspect the face seal, breathing tube, filter cover, pre-filter, and battery connection before assuming the blower is bad.
After replacing helmet parts, perform a safe function check before welding. Confirm the ADF powers up, shade and delay controls respond, grind mode turns off before welding, and the helmet darkens consistently from multiple arc angles. Do not weld with a cracked lens, missing cover plate, missing gasket, damaged shell, or uncertain ADF response.
For PAPR helmets, follow the manufacturer airflow check procedure. If the low-flow alarm triggers after replacing the pre-filter or particle filter, inspect the breathing tube, battery charge, filter seating, and face seal. Do not treat a loaded filter as a comfort issue; it is a respiratory protection issue.
| Problem | Field Fix | Proper Fix |
|---|---|---|
| Scratched outside lens | Clean lens to finish a non-critical task | Replace with correct outside cover lens |
| Loose helmet | Tighten knobs | Replace worn headgear assembly |
| Dirty sweatband | Wipe down | Replace sweatband |
| Weak ADF battery | Stop and replace battery | Use specified battery and confirm operation |
| Light leak | Do not weld | Replace seal, holder, lens, or shell as needed |
| PAPR low flow | Leave weld area | Replace filters or repair system per manufacturer procedure |
For Lincoln VIKING 2450 and 3350 families, start by confirming whether the part needed is KP2898-1 outside cover lens, KP2930-1 sweatband, the correct inside lens, or the correct ADF cartridge for that series. For Miller helmets, use the correct Miller series breakdown before ordering shells, lens covers, gaskets, headgear, or ClearLight lens assemblies. For Speedglas, confirm the exact helmet family because 9002, 9100, G5, and PAPR systems do not share every part.
Unknown (Verify): cross-brand ADF cartridge swaps, non-OEM lens thickness, imported clone shell fitment, and hard-hat adapter fitment unless confirmed by the manufacturer or a verified parts breakdown.

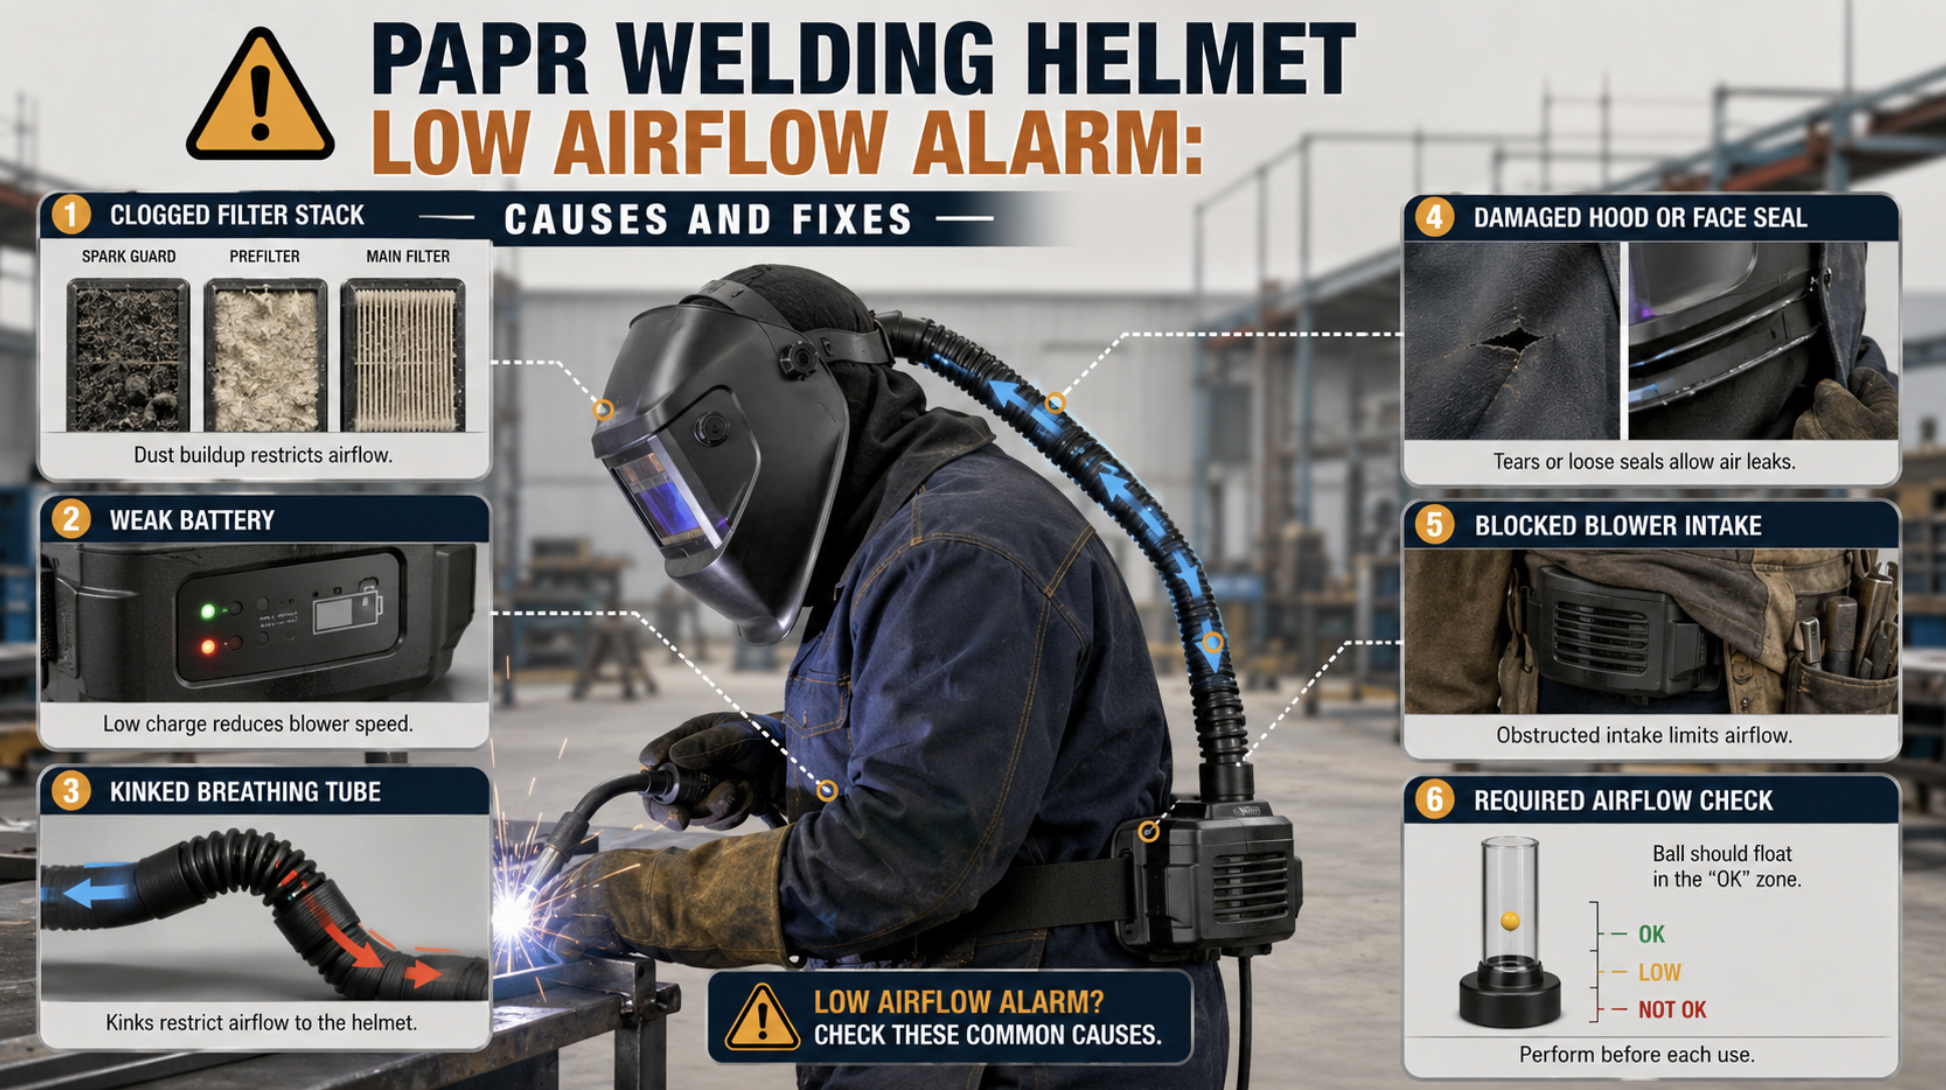
A PAPR welding helmet’s low airflow alarm usually means the blower cannot deliver the required air volume through the hood, breathing tube, filter stack, or battery-powered blower system. The most common causes are clogged filters, blocked prefilters, a weak battery, a kinked breathing tube, a damaged face seal or hood seal, or a system that has not passed its required airflow check before use.
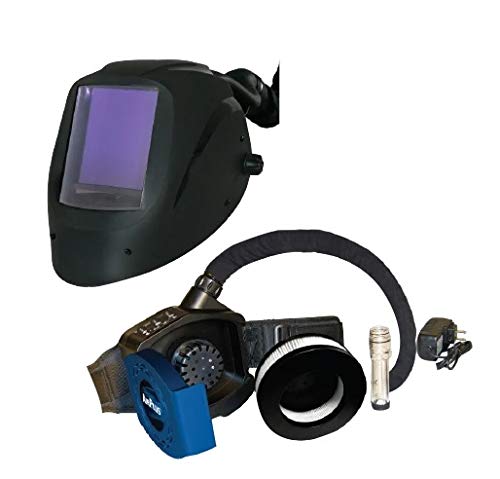
This PAPR Helmet Support guide is a troubleshooting follow-up to Lincoln K3930-1 PAPR welding helmet setup and ArcOne AirPlus PAPR kit selection. It focuses on low-airflow alarms, maintenance checks, and respiratory-protection failure paths instead of general PAPR buying advice.
PAPR welding helmets are used to reduce exposure to welding fumes and particulates while improving comfort during long weld, grind, and fabrication work. A powered air-purifying respirator uses a battery-powered blower to pull contaminated air through approved filters or cartridges and deliver filtered air to the wearerโs breathing zone.
When the low airflow alarm sounds, the system may not be moving enough air through the breathing zone. That can happen during high-fume MIG, flux-core, stainless, galvanized, hardfacing, gouging, or grinding work. If the shop is also struggling with source capture, review welding fume extractor airflow troubleshooting because a PAPR should not be used as the only control when ventilation and fume extraction are required.
Grinding dust, spatter, smoke residue, and shop debris can load the outer protection layers before the main filter is fully used. A dirty prefilter or spark guard can restrict airflow enough to trigger the alarm even when the main filter looks usable.
Main PAPR filters have specific fitment, approval, and service requirements. A clogged filter increases resistance and makes the blower work harder. A non-approved substitute may fit physically but fail the system approval or airflow requirement. Only use filters listed for the exact blower and helmet assembly.
A battery can show charge but still fail under blower load, especially if it is old, cold, damaged, or not fully seated. Low airflow alarms that appear late in a shift often trace back to battery capacity, dirty contacts, or a charger problem.
The breathing tube must move air from the blower to the helmet without restriction. Kinks behind the shoulder, crushed sections under a harness, loose bayonet fittings, torn cuffs, or heat damage can reduce airflow or leak filtered air before it reaches the helmet.
Loose-fitting PAPR helmets depend on the complete hood or head seal assembly. A torn seal, missing cape, worn head seal, or poorly seated helmet can disrupt the intended airflow pattern around the breathing zone. If the issue is mostly helmet fit and visibility, compare it with auto-darkening helmet fit and lens standards before assuming the blower is the only problem.
A jacket, tool belt, harness, welding curtain, or body position can partially cover the blower intake. This can happen when welding out of position, crawling inside equipment, or leaning against a workpiece. The alarm may stop when the welder stands up because the intake is no longer blocked.
Many PAPR systems require a pre-use airflow check with a manufacturer-specified airflow indicator or procedure. Skipping this step can hide clogged filters, weak batteries, damaged tubes, or incorrect assembly until the alarm sounds during welding.
Do not keep welding through a low airflow alarm. Stop the arc, leave the fume area when safe, and inspect the PAPR in clean air. A low airflow alarm means the respirator may not be performing as intended.
Inspect the spark guard, prefilter, main filter, filter cover, gasket, and latch. Replace loaded or damaged consumables according to the manufacturerโs instructions. Do not blow filters clean with compressed air unless the manufacturer specifically allows it. Compressed air can damage filter media or drive contamination deeper into the filter.
Remove and reseat the battery. Inspect contacts for dirt, corrosion, heat damage, or looseness. Confirm the charger is the correct charger for the battery. If the low-airflow alarm appears on one battery but not the other, tag the questionable battery out of service.
Run a hand along the full breathing tube. Look for flattened sections, cracks, melted spots, loose swivel fittings, missing O-rings, or damaged cuffs. Re-route the tube so it does not pinch when the welder bends, kneels, or turns the head.
Check the hood seal, cape, head seal, sweatband, headgear, and helmet shell. Replace torn or contaminated soft goods. Do not tape over damaged seals as a permanent repair. If the helmet is uncomfortable enough that workers loosen or misposition it, the respiratory protection may not be used consistently. For half-mask alternatives under a hood, compare P100 welding respirator options and low-profile respirator fit under welding helmets.
Use the manufacturerโs airflow indicator, test tube, or built-in test procedure. Pass/fail values are system-specific. Do not estimate airflow by feel. A helmet can feel breezy and still fail the required test, especially if the flow path is leaking or assembled incorrectly.
If the PAPR fails the airflow check after filters, battery, tube, and seals are inspected, remove it from service. Tag the blower, battery, hose, or helmet assembly and follow the employerโs repair procedure. Do not return a failed respirator to production because replacement parts are inconvenient.
| Item to Verify | Why It Matters | Field Note |
|---|---|---|
| NIOSH approval | PAPR protection depends on approved complete assemblies. | Verify exact blower, helmet, filter, battery, and tube combination. |
| Airflow test method | Low airflow checks are system-specific. | Unknown (Verify in manual). |
| Filter part number | Wrong filters can void approval or restrict airflow. | Use manufacturer-listed filters only. |
| Prefilter and spark guard | Loaded outer layers can cause alarms before the main filter is fully spent. | Inspect before each shift. |
| Battery runtime | Runtime varies by battery age, filter load, airflow setting, and temperature. | Unknown (Verify). |
| Breathing tube condition | Kinks, leaks, and heat damage reduce delivered airflow. | Inspect full length. |
| Helmet seal or hood seal | Damaged soft goods can disrupt airflow pattern. | Replace damaged seals. |
| Hazard type | Particulate filters may not control gases or vapors. | Verify exposure and cartridge/filter selection. |
If the existing PAPR welding helmet repeatedly fails airflow checks or replacement parts are no longer available, a complete manufacturer-matched PAPR welding helmet system may be a better path than mixing parts. The listing below is for a Lincoln Electric VIKING 3350 XG PAPR welding helmet system. Confirm part number, battery type, included filters, replacement consumables, approval status, and workplace requirements before ordering.
Last update on 2026-07-12 / Affiliate links / Images from Amazon Product Advertising API
| Symptom | Likely Cause | Check First | Do Not Do |
|---|---|---|---|
| Alarm starts as soon as blower turns on | Blocked filter stack, wrong assembly, failed airflow test | Filter cover, prefilter, main filter, airflow indicator | Do not weld until it passes the test. |
| Alarm starts late in the shift | Battery sag or filter loading | Battery charge, charger, filter condition | Do not assume the battery is good by indicator lights only. |
| Alarm changes when bending or kneeling | Kinked tube or blocked blower intake | Tube routing, belt position, clothing interference | Do not route the tube under straps that crush it. |
| Helmet feels drafty but fails flow check | Leak, missing seal, wrong setup, or incorrect test method | Hood seal, breathing tube, manual procedure | Do not judge airflow by feel. |
| Alarm appears during grinding | Heavy dust loading or intake blockage | Spark guard, prefilter, intake screen | Do not use damaged or clogged filters. |
OSHA 29 CFR 1910.134 requires an appropriate respiratory protection program when respirators are necessary to protect employee health. That program includes selection, medical evaluation, fit testing where required, use procedures, maintenance, training, and program evaluation. Loose-fitting PAPR hoods and helmets may not require fit testing, but they still require correct selection, training, inspection, cleaning, storage, and maintenance.
NIOSH describes PAPRs as reusable respirators that use a battery-powered blower to pull air through filters, cartridges, or canisters before delivering it to the breathing zone. PAPRs can protect against gases, vapors, or particles only when equipped with the correct approved filter, cartridge, or canister. A particulate PAPR filter should not be assumed to protect against gases, vapors, oxygen deficiency, or unknown atmospheres.
PAPR welding helmets do not supply oxygen. Do not use a PAPR in oxygen-deficient spaces, immediately dangerous to life or health atmospheres, confined spaces without proper evaluation, or areas with unknown contaminants. Welding stainless, galvanized, painted, coated, or plated materials may require exposure assessment, ventilation, source capture, and specific respiratory protection beyond a basic particulate setup.
No. Stop welding and move to clean air when safe. Inspect the PAPR and run the required airflow check before returning it to service.
No. Battery charge is only one part of the system. Filters, prefilters, tubes, seals, blower condition, and assembly all affect delivered airflow.
Do not clean filters with compressed air unless the manufacturer specifically allows it. Many filters are replaceable consumables, and compressed air can damage the media or spread contamination.
Loose-fitting PAPR hoods and helmets generally do not require fit testing, while tight-fitting PAPR facepieces do. OSHA respiratory protection requirements still apply when the respirator is required for workplace protection.
No. A PAPR is respiratory PPE, not source capture. Use ventilation, local exhaust, process controls, and exposure assessment as required by the job and employer program.
No. Use only parts approved for the exact PAPR assembly. Mixing parts can affect airflow, approval status, and respiratory protection.
If the low airflow alarm keeps going off, start with the filter stack, battery, breathing tube, intake blockage, helmet seal, and required airflow test. If the system fails after approved replacement consumables are installed, remove it from service. For broader shop exposure control, pair this check with fume extractor troubleshooting and verify whether the job requires a PAPR, half-mask respirator, ventilation change, or process control.
If you run an ESAB Savage A40 PAPR, the pre-filter is a simple part that protects the main filter and helps keep airflow consistent in dusty, fume-heavy work. This ESAB pre-filter replacement is sold as a pack of 5 and is intended to drop into the Savage A40 PAPR system as a routine maintenance consumable. It is a low-cost failure point compared to the downtime of running a restricted filter stack.
| Spec | Value |
|---|---|
| Brand | ESAB |
| Product type | PAPR pre-filter replacement |
| Compatible system | ESAB Savage A40 PAPR |
| Pack size | 5 filters |
| SKU (store listing) | 700002404 |
| Part number (in title) | 0700002404 |
| Certification / compliance | NIOSH (per product page) |
| Price | Unknown (Verify) |
Copy table
Pros
Cons
Buy direct from ArcWeld.store: $34.20 In Stock
ESAB Savage A40 PAPR Pre-Filter Replacement (0700002404), Pack of 5 โ Price: Unknown (Verify)
ESAB Savage A40 PAPR Pre-Filter Replacement, NIOSH Approved, Pack of 5 Filters
$34.20
In Stock
View ProductCTA: Buy now at Arc Weld.store.
If youโre on the ESAB Savage A40 PAPR, this is a straightforward maintenance consumable worth keeping stockedโespecially in dusty workflows where pre-filters load quickly.

Intro
If youโre looking at a PAPR kit, youโre usually solving one of two problems: fume exposure in real-world shop conditions, or comfort that keeps you wearing protection consistently. The ArcOne AirPlus w/Vison BFFVX kit is a packaged option on ArcWeld.store, but the smart buy depends on verifying whatโs included and how it fits your workflow.
Key Takeaways
Performance & Use
PAPR setups are about delivering filtered air to reduce exposure and improve comfort during long welding or grinding sessions. The practical performance questions are: does it fit with your hood/helmet setup, does it stay comfortable for a full shift, and can you keep it maintained with readily available consumables.
What to compare before you buy
Durability & Build
PAPR kits live in harsh environments: grinding dust, spatter, and daily handling. Look for protected hose routing, robust connectors, and a battery mount that doesnโt loosen over time. If you canโt confirm these details from manufacturer documentation, mark them Unknown (Verify) and verify before purchase.
Power / Specs
ArcWeld.store does not display detailed specs in the scraped view for this listing. Treat all technical specs as Unknown (Verify) until you confirm from ArcOne documentation or the included manual:
Who Itโs For
Quick FAQ
Q: Is this a respirator replacement for every environment?
A: Unknown (Verify). Respiratory selection depends on hazards present. Verify with your safety program requirements and manufacturer guidance.
Q: How often do filters need replacement?
A: Unknown (Verify). Replacement depends on exposure and filter type. Confirm the exact filter model used in this kit and follow manufacturer guidance.
Q: Will it work with my current welding helmet?
A: Unknown (Verify). Confirm the headtop/visor configuration and compatibility with your helmet/hood setup.
Safety Notes (include verbatim closing line)
PAPR systems still require correct use, correct filters, and routine inspection. If the system doesnโt fit right or isnโt maintained, protection drops fast. Align selection with your shopโs hazard assessment and follow the manufacturerโs maintenance schedule.
Always follow the manufacturerโs instructions and your shopโs safety procedures. If youโre unsure about fitment or ratings, verify before you buy or install.
Where to Buy (ArcWeld.store link + optional Amazon fallback)

Welding fumes have always carried health risks, but 2025 brings a major shift in how OSHA, AWS, and safety professionals are treating long-term exposure. Injury rates in welding have dropped 15% since 2020, but chronic inflammation, respiratory diseases, and cumulative metal-fume toxicity are getting significantly more attention.
Whatโs driving the change?
Stricter exposure limits, new PPE technologies, and better data on how manganese, hexavalent chromium, nickel, and aluminum fumes impact long-term health.
This guide explains whatโs new, whatโs trending, and which respirators provide real protectionโnot just marketing.
Research now links long-term fume exposure to:
OSHA has signaled more aggressive enforcement on fume control, especially in enclosed fabrication environments.
ANSI Z49.1 (Safety in Welding, Cutting, and Allied Processes) now emphasizes:
Shops that relied on โgeneral ventilationโ are being pushed toward mechanical extraction.
Old disposable masks donโt cut it anymore. For metal fume exposure, the standard is shifting toward:
Shops are required to treat fume protection as โessential PPE,โ not optional.
The highest fume loads appear in:
High particulate, high manganese content.
Hexavalent chromium risk.
High metal concentration and oxide generation.
Sustained exposure on thick materials increases cumulative load.
Below are two Miller respirators your audience already trusts and you want to sell. These are ideal for 2025โs stricter fume-control expectations.
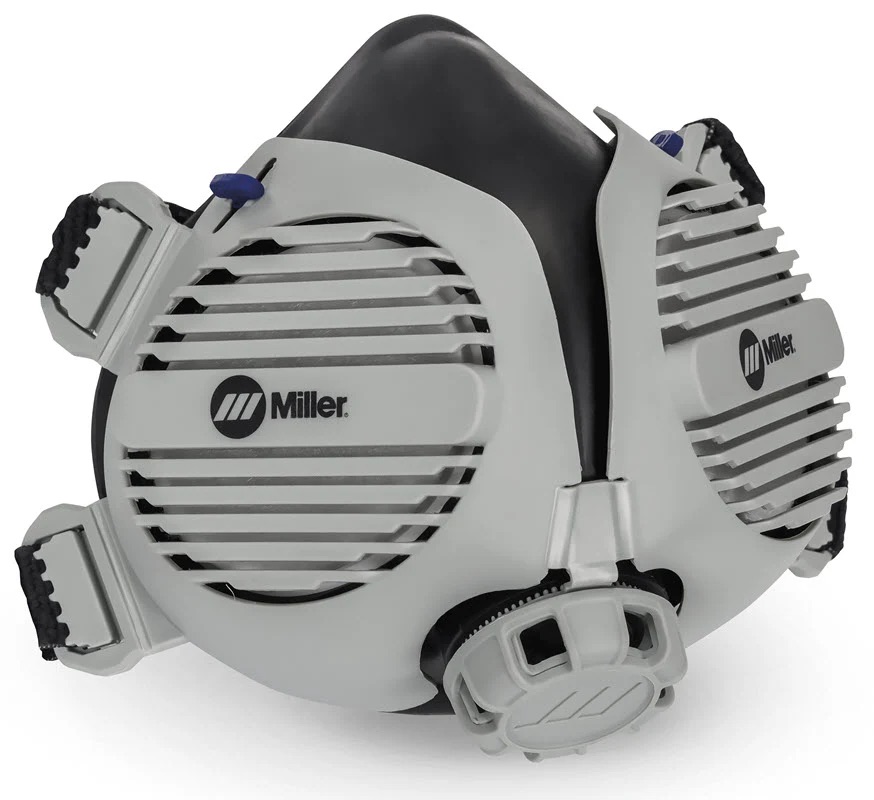
A low-profile, P100-rated respirator designed specifically for welding hoods.
ArcWeld Store: $60.28 In Stock
Miller 295273 LPR-100 Gen. II Half Mask Respirator with Nuisance OV Relief, S/M Size
$60.28
In Stock
View Product
$60.28 In Stock
Miller LPR-100 Gen. II Half Mask Respirator with P-100 Nuisance Organic Vapor Relief, M/L
$60.28
In Stock
View ProductAmazon:
Last update on 2026-07-12 / Affiliate links / Images from Amazon Product Advertising API
Disclosure: This article contains affiliate links. As an Amazon Associate, I earn from qualifying purchases.
Most effective. Pulls fumes at the arc before they reach the welder.
Good for small fabrication shops; less ideal for high-production cells.
Best for stainless or long-duration welding. (Optrel Helix Pure Air, 3M Adflo, Miller PAPR)
High-end solution for training centers and production facilities.
OSHAโs 2025 inspection priority includes fume exposure logs and ventilation plans.
Reduced inflammation = fewer chronic issues = lower insurance cost.
Because the PPE requirements are stricter and more expensive.
Do welders need a respirator in 2025?
For most shop workโyes. Exposure standards are stricter, and many shops mandate P100 or PAPR.
Is a disposable mask enough?
Not for welding. Disposable masks do not meet P100 fume protection standards.
Which is better, a PAPR or a tight-fitting respirator?
PAPR = best for long-duration or stainless welding.
P100 = excellent for general welding and a huge improvement over older PPE.
Does fume extraction replace respirators?
No. They work together. Extraction reduces airborne load; respirators protect your lungs directly.

Miller 295274 LPR-100 Gen II Respirator Review & Guide
Note for Readers: This post may contain affiliate links. If you purchase through them, we may earn a small commission at no cost to you. Thank you for supporting our site.
—
The Miller 295274 LPR-100 Gen II Respirator is a next-generation low-profile respirator designed specifically for welding and metal fabrication environments. Built for professionals who need superior respiratory protection without sacrificing comfort, visibility, or mobility, this advanced PPE (personal protective equipment) is ideal for high-particulate operations such as grinding, cutting, plasma arc cutting (PAC), GMAW (MIG), GTAW (TIG), FCAW (flux-cored), and SMAW (stick welding).
This respirator is commonly used by:
– Professional welders
– Fabrication technicians
– Welding instructors and students
– Industrial maintenance crews
– Engineers and inspectors working on active job sites
Whether you’re welding galvanized steel or cutting aluminum, the LPR-100 Gen II offers a critical level of respiratory protection against harmful metal fumes and airborne particulates.
—
While the Miller LPR-100 series has multiple models, the 295274 Gen II version is an upgraded design that builds upon the success of the original LPR-100 respirator. Here’s how the Gen II compares to earlier versions:
– LPR-100 Gen I: Original model with basic comfort and protection features; widely used for general welding applications.
– LPR-100 Gen II (295274):
– Redesigned headgear and improved face seal for better comfort and fit
– Adjustable straps with quick-release buckles
– Integrated adjustable exhaust valves for better breathability
– Optional HEPA filter compatibility
The 295274 Gen II version delivers improved ergonomics and safety specs that make it more suitable for long-term wear in high-use industrial environments.
—
The Miller 295274 LPR-100 Gen II Respirator is built to meet rigorous workplace demands. Below are key features and what they mean for welders:
– Low-Profile Design:
– Fits under most welding helmets, including Miller Digital Infinity and Digital Elite series.
– Great for tight workspaces and precise fabrication jobs.
– Two-Stage Filtration System:
– P100/HEPA filters capture โฅ99.97% of airborne particulates.
– Protects against metal fumes from mild steel, stainless, aluminum, and galvanized metals.
– Replaceable Filters:
– Easy twist-on design promotes hygienic filter changes.
– Compatible with P100 filters specific to Miller (sold separately).
– Superior Seal Design:
– Medical-grade silicone face seal minimizes leakage, remains soft and conformable during extended wear.
– Durable Construction:
– Built from impact- and heat-resistant materials for rugged environments.
– Certifications:
– NIOSH Certified P100 โ verified filtration and safety system compliant with U.S. occupational safety standards.
Specs Overview:
– Weight: ~7.5 oz
– Compatibility: Most major welding helmet brands (especially Miller)
– Size Options: One size fits most (adjustable strap system)
– ASIN: B0DKLYQRL4
—
The LPR-100 Gen II is exceptionally versatile across welding processes. Here’s how and where it fits in:
– SMAW (Stick Welding): Great for outdoor or shielded applications where heavy particle exposure is likely.
– GMAW (MIG) and FCAW (Flux-Cored): Ideal when welding galvanized or painted steel where zinc oxide fumes are a hazard.
– GTAW (TIG): Low-profile allows unimpeded head movement and close-up focus, making it suitable for precision TIG work.
– Plasma Cutting & Grinding: Combines with face shields or auto-darkening helmets to maintain respiratory protection without bulk.
Compatibility Notes:
– Fits under most Miller helmets, including the Digital Infinity, T94i, and Titanium 9400i.
– Compatible with grinding shields and face protection systems.
– Not designed for use with supplied air or powered air-purifying respirator (PAPR) systems.
Pros:
– Excellent fit and comfort for long shifts.
– Easy filter replacement and maintenance.
– Superior low-profile ergonomics.
Cons:
– Filters must be purchased separately.
– Not for use in oxygen-deficient or IDLH environments.
—
The Miller 295274 LPR-100 Gen II shines in metalworking sectors where clean breathing air is critical:
– Heavy Fabrication & Structural Welding:
– Protects against thick fume concentrations in shipbuilding, steel bridges, and structural metalwork.
– Vehicle & Equipment Repair:
– Ideal for tasks involving rusted or painted metal surfaces that emit chemical fumes or particulates.
– Industrial Maintenance:
– Great for routine welding or grinding during plant turnarounds or refinery shutdowns.
– Welding Schools and Training Shops:
– Lightweight and student-friendly, the Gen II is popular in welding education for extended learning environments.
—
To get the most from your Miller LPR-100 Gen II:
– Fit Check Before Each Use:
– Ensure a snug seal around the nose and cheeks; perform a positive/negative pressure test.
– Change Filters Regularly:
– Replace filters after 40 hours of use or sooner if breathing becomes difficult. Donโt wait for visible signs of clogging.
– Clean After Each Day:
– Wipe the inner seal and shell with a damp cloth.
– Avoid harsh chemicals that can degrade the silicone.
– Helmet Compatibility:
– Test fit with your welding helmet before field use. Make sure the face seal doesnโt interfere with the helmet’s down position.
– Storage:
– Keep in a sealed plastic bag or respirator case between uses to prevent dirt and dust accumulation.
Avoid These Common Mistakes:
– Using damaged or expired filters.
– Wearing over facial hair, which can break the seal.
– Failing to flush exhaust valves if breath condensation builds up.
—
The Miller 295274 LPR-100 Gen II Respirator is a top-tier choice for welders, metalworkers, and fabrication professionals who need compact, comfortable, and effective respiratory protection. Its improved Gen II fit, certified filtration, and low-profile design make it ideal for daily use in high-fume applicationsโwithout compromising helmet compatibility or range of motion.
Whether you’re laying down MIG welds on mild steel or TIG-ing stainless pipe in a tight corner, this respirator helps you breathe easier and stay compliant with workplace safety guidelines.
If you’re serious about protecting your lungs on the job, the LPR-100 Gen II is an investment in both safety and comfort.
—
Last update on 2026-07-12 / Affiliate links / Images from Amazon Product Advertising API
**Check the latest price and read (Incomplete: max_output_tokens)

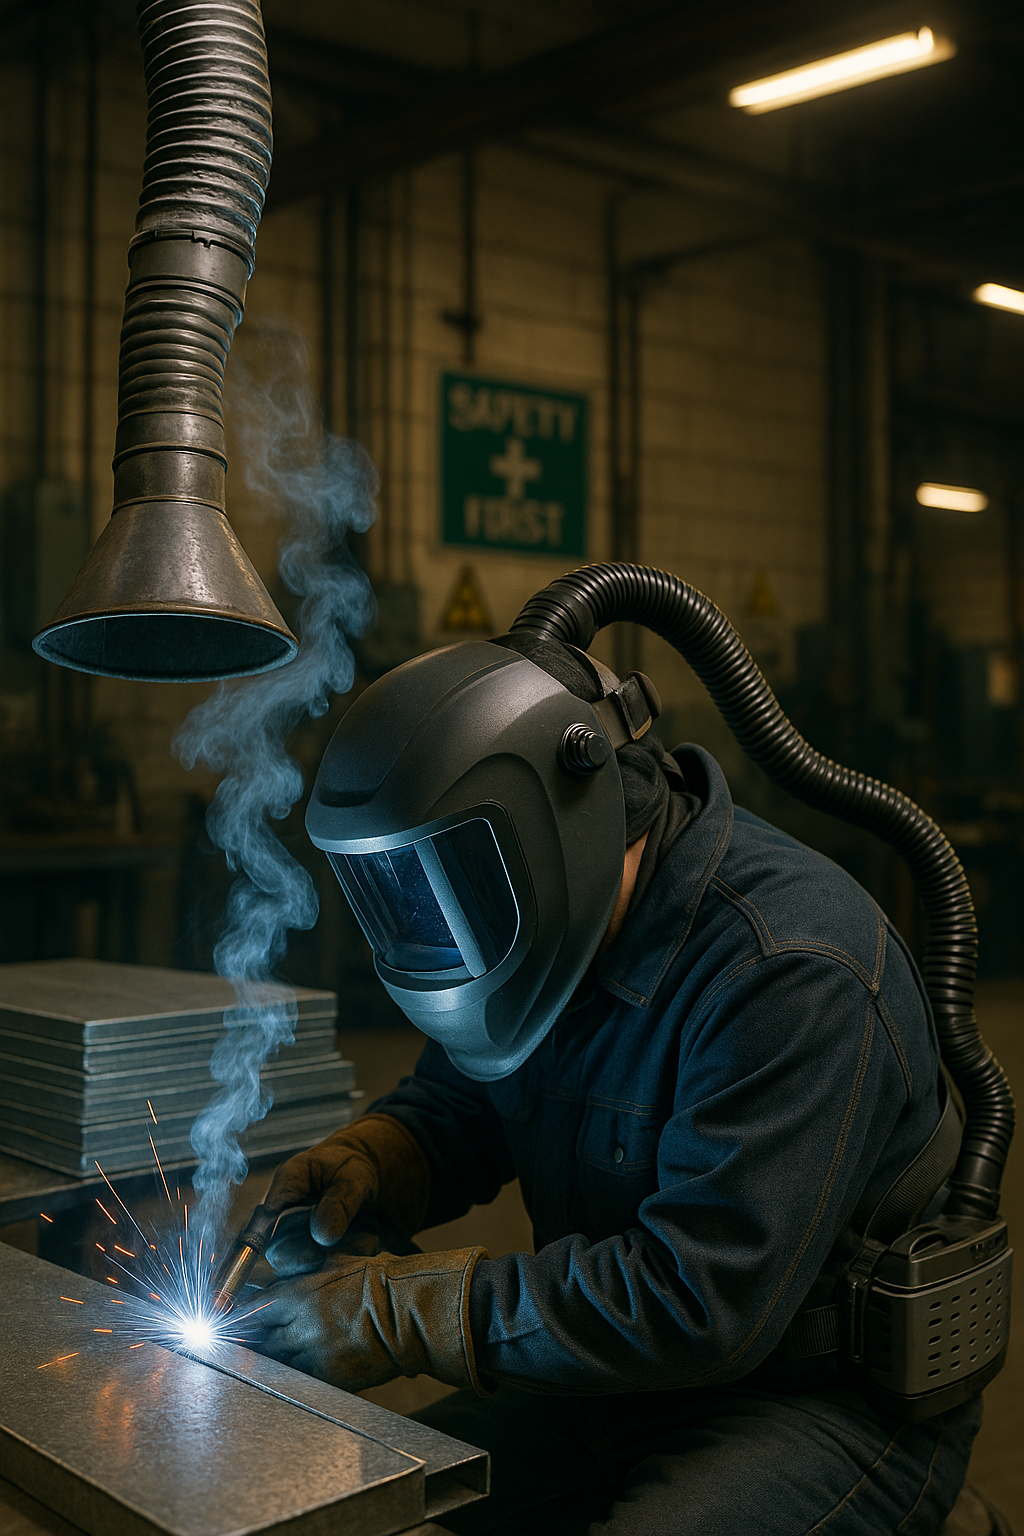
Welding galvanized steel presents a unique challenge: toxic fumes. The galvanizing process coats steel with a layer of zinc, which vaporizes when exposed to welding temperatures, releasing hazardous zinc oxide gas. Left uncontrolled, these fumes can lead to serious short- and long-term health effects, including metal fume fever and chronic respiratory issues.
Understanding safe fume control tactics isnโt just about complianceโitโs about protecting your lungs, your team, and the quality of your welds. Whether you’re a structural welder, pipefitter, fabrication shop operator, or welding student, mastering this topic is crucial when working with zinc-coated metals.
Galvanized steel is carbon steel thatโs been hot-dip coated in zinc to resist corrosion. While excellent for long-term durability in outdoor and moist environments, that zinc layer becomes dangerous when melted.
Zinc fume hazards include:
Additional risk factors:
Controlling zinc oxide fumes isnโt a one-size-fits-all fix. Multiple strategies should be combined for safe welding on galvanized materials. Here are the primary categories:
Last update on 2026-07-12 / Affiliate links / Images from Amazon Product Advertising API
Letโs break down why fume control is a non-negotiable when working with galvanized:
| Factor | Details |
|---|---|
| Zinc Vaporization Point | ~ 1650ยฐF (899ยฐC) โ much lower than steelโs melting point |
| Toxicity Threshold (ZnO) | 5 mg/mยณ TWA (OSHA limit) โ easily exceeded without ventilation |
| Fume Production Rate | Increases with amperage, travel speed, and preheat |
| Affected Processes | All fusion welding processes can produce zinc fumes |
Example Scenario:
A welder using FCAW at 250 amps on a 3/8″ galvanized plate without ventilation can easily exceed safe fume thresholds within minutes. That same weld with LEV and a PAPR drastically reduces the inhaled fume load.
Welding galvanized materials is common in industries where corrosion resistance is critical:
Why use it? Zinc prevents rust, extending metal lifespan in outdoor or moist environments, making galvanized a smart choice for long-term infrastructure. But only when fumes are properly managed.
Welding galvanized steel demands more than skillโit requires awareness, preparation, and the right gear. Fume control isnโt optional. Itโs a safety-critical component of every galvanized job. Whether you’re laying beads on a ranch gate or structural bracing in a warehouse, make sure youโre not trading your health for corrosion resistance.
Key takeaway: If you smell it, you’re breathing it. Use ventilation, PPE, and coating removal techniques in conjunction to stay safe while welding galvanized materials.