Tag: welding helmet support

  • Powerweld Horizontal Single Auto-Darkening Filter for Welding, 2 x 4″, (Shade 11): Product Breakdown

    Powerweld Horizontal Single Auto-Darkening Filter for Welding, 2 x 4″, (Shade 11): Product Breakdown

    Product not found.
    “>Powerweld Horizontal Single Auto-Darkening Filter for Welding, 2 x 4", (Shade 11)

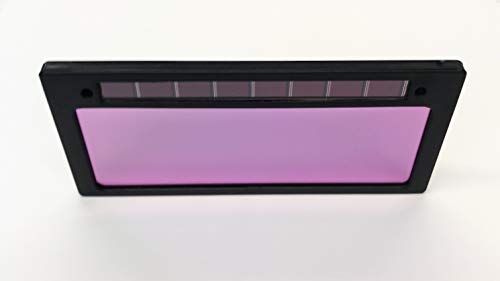
    The Powerweld Horizontal Single Auto-Darkening Filter for Welding, 2 x 4″, (Shade 11) is a helmet-support component for users who need a compact auto-darkening lens format and are already working within a 2 x 4 in. lens system. For buyers and maintenance teams, the main job is not just to read the advertised values. It is to verify fit, viewing area, cover plate requirements, and how the lens will be used in the helmet assembly.

    Key Takeaways

    • Format is 2 x 4 in. and the listed view size is 1.3 in. x 3.5 in. (34 mm x 88 mm).
    • Listed speed is 0.2 ms, light state shade is 3, and dark state shade is listed as Unknown (Verify) in the source data.
    • Thickness is listed as 1/5 in. (5.0 mm) and weight is 45 g.
    • It must be used with a protective cover plate.
    • Do not assume compatibility with any helmet shell, cartridge holder, or cover plate without measuring and checking the manufacturer’s requirements.

    What this lens is for

    This is an auto-darkening filter intended for welding helmet support use. In practical terms, that means it belongs in the front-window stack of a compatible helmet, where it can switch from a light state to a dark state during arc exposure. For the maintenance buyer, the critical issue is not only the shade number. It is whether the lens dimensions, thickness, and mounting style match the helmet and whether the front cover plate package is correct.

    Inspect before you install

    Use these checks before the lens goes into service:

    • Check the lens opening. Measure the helmet window and verify that a 2 x 4 in. filter is the correct format.
    • Inspect the cover plate requirement. The source states the filter must use a protective cover plate. Verify the cover plate size, thickness, and orientation before installation.
    • Verify the view area. The listed viewing area is 1.3 in. x 3.5 in. Confirm whether that matches the operator’s field-of-view needs and the helmet frame.
    • Check thickness. The source lists 5.0 mm thickness. Verify the cartridge pocket or front assembly has clearance.
    • Inspect the lens face and edges. Look for scratches, cracked housing, or warping before use.
    • Verify light state behavior. The source lists light state shade 3. Confirm the lens transitions correctly in a safe test setup before welding.

    Troubleshooting and support checks

    If the lens is not behaving as expected, work through the problem in order:

    • Check the helmet fit. If the lens shifts or gaps at the frame, verify the helmet opening and retaining hardware.
    • Inspect the cover plate. A missing or incorrect protective cover plate can expose the filter and reduce service life. Replace with the correct plate if required.
    • Verify orientation. Horizontal single filters are directional in practice. Confirm the lens is installed in the intended orientation and seated evenly.
    • Check the arc response in a controlled setting. If the lens is not darkening or appears inconsistent, verify that the problem is not from installation, damage, or contaminated front surfaces.
    • Inspect for contamination. Grinding dust, spatter, and smoke film on the cover plate can affect visibility and perceived response.

    For general auto-darkening helmet troubleshooting, see the support guide on welding helmet flickering and shade troubleshooting. For broader buying criteria on lens speed, shade range, and standards, see Auto-Darkening Welding Helmet Buying Guide 2025.

    Product and parts breakdown

    According to the source product data, the following details are available:

    • Product: Powerweld Horizontal Single Auto-Darkening Filter for Welding, 2 x 4″, (Shade 11)
    • Speed: 0.2 ms
    • Light state shade: 3
    • Dark state shade: Unknown (Verify)
    • View size: 1.3 in. x 3.5 in. (34 mm x 88 mm)
    • Thickness: 1/5 in. (5.0 mm)
    • Weight: 45 g
    • Installation note: Must use with a protective cover plate

    For the product page itself, use the ArcWeld source listing: Product not found.

    “>Powerweld Horizontal Single Auto-Darkening Filter for Welding, 2 x 4″, (Shade 11).

    Do not assume the dark state shade, mounting pattern, or sensor arrangement beyond what is listed. If your helmet model requires a specific cartridge profile, verify that against the actual shell and front frame measurements.

    Verify before production use

    Before putting the lens into regular service, confirm the following:

    1. Lens format matches the helmet opening.
    2. Cover plate is installed and fits without pinching the filter.
    3. Lens sits flat and does not rock in the frame.
    4. Operator can see the weld joint clearly in the light state.
    5. Auto-darkening transition is acceptable in a non-production test.
    6. Replacement schedule is defined for the cover plate and any damaged lens components.

    Safety notes

    • Use a protective cover plate as required by the product source.
    • Do not weld with a damaged filter, cracked housing, or missing front protection.
    • Verify that the lens is appropriate for the task and the helmet before arc exposure.
    • Do not rely on unverified shade assumptions when selecting a filter for a process or amperage range.
    • If the helmet setup is unclear, stop and verify the shell, lens, and cover plate stack before use.

    FAQ

    Is this lens ready to use in any 2 x 4 helmet?
    No. The format is 2 x 4 in., but fit still depends on the helmet frame, thickness clearance, retaining system, and cover plate requirements. Verify before installation.

    What is the dark shade on this filter?
    The source title references Shade 11, but the provided technical field for dark state shade is Unknown (Verify). Confirm the actual dark state shade from the product documentation or packaging before assigning it to a work cell.

    Why is the cover plate important?
    The source states the filter must use a protective cover plate. That means the cover plate is part of the working stack, not an optional accessory. It helps protect the filter surface and maintain service life.

    Can I use this as a procedure approval reference?
    No. A filler or lens page is a selection and fit starting point, not a guaranteed procedure approval. Verify against your own welding procedure, helmet requirements, and shop standards.

    Sources Checked

    • ArcWeld product page: Powerweld Horizontal Single Auto-Darkening Filter for Welding, 2 x 4″, (Shade 11)
    • Internal article: Auto-Darkening Welding Helmet Buying Guide 2025 | Lens Speed, Shade Range & Standards
    • Internal article: YESWELDER Large View Auto Darkening Welding Helmet (LYG‑M800H)
    • Internal article: ArcOne S240-10 Auto-Darkening Welding Filter: Shade 10 Lens Support Guide
    • Internal article: Welding Helmet Flickering Shade Troubleshooting: Auto-Darkening Lens, Sensors, Batteries, Sensitivity, and Delay

    Related Arc Weld Part

    Powerweld Horizontal Single Auto-Darkening Filter for Welding, 2 x 4", (Shade 11)

    Powerweld Horizontal Single Auto-Darkening Filter for Welding, 2 x 4", (Shade 11)

    '- Speed .2 ms – Light State Shade: 3 – Dark State Shade: – View Size 1.3" x 3.5" (34mm x 88mm) – Thickness: 1/5" (5.0 mm) – Weight: 45g – Must use with a protective cover plate

    View at Arc Weld Store

    Related Weld Support Guides

  • Tillman 566, Helmet Bib With Metal Clips, Pack of (1): Product Breakdown

    Tillman 566, Helmet Bib With Metal Clips, Pack of (1): Product Breakdown

    Product not found.
    “>Tillman 566, Helmet Bib With Metal Clips, Pack of (1)

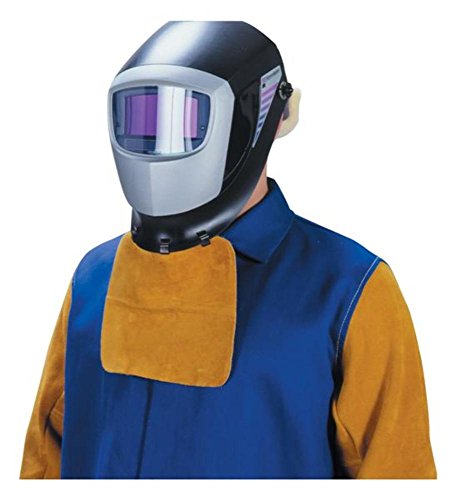
    The Tillman 566, Helmet Bib With Metal Clips, Pack of (1), is a welding helmet support item used to add lower-face and neck coverage at the helmet line. Based on the product listing provided by ArcWeld, it is identified as a leather work bib with metal clips. The available listing data also shows UNSPC code 46181500 and the product type as work bibs. Other technical details are not provided in the source and should be treated as Unknown (Verify).

    Key Takeaways

    What the product is for

    A helmet bib is a simple support accessory. In welding work, it is commonly used to help reduce direct exposure at the lower edge of the helmet opening, where sparks, slag, and radiant heat can reach the neck area. The product listing does not state an assigned duty cycle, flame-resistance rating, or certified protection level. Do not infer those details. Verify the exact material behavior for your application before use.

    Product breakdown

    The source data identifies three things clearly:

    Everything beyond that remains Unknown (Verify). That includes bib size, neckline shape, total coverage area, clip finish, thickness, and whether the bib is intended for a specific helmet model or general use. For buyers and maintenance teams, that means the purchase decision should be based on verified fit and verified work conditions, not assumptions from the name alone.

    Check, inspect, verify

    Before issue

    1. Check the helmet interface. Confirm the bib can sit at the lower edge of the helmet without blocking shell movement or interfering with the headgear adjustment system.
    2. Inspect the clips. Look for bent metal, weak spring tension, burrs, corrosion, or sharp edges that could damage the bib or snag other PPE.
    3. Verify coverage needs. Make sure the bib covers the area your task exposes, especially the neck and upper chest. If your job requires side coverage or extended drape, verify that this accessory is sufficient.
    4. Inspect the leather. Check for cracks, stiffened spots, burn-through, tears, oil saturation, or previous heat damage. Replace if the material no longer performs as intended.
    5. Verify compatibility with other PPE. Confirm the bib does not interfere with a hard hat, respirator, face shield, hearing protection, or hoodie used under the helmet.

    During use

    1. Check for movement. If the bib shifts, twists, or opens gaps during head movement, stop and correct the fit.
    2. Inspect after spatter exposure. Look for heat marks or clip loosening after each job cycle.
    3. Verify visibility and access. The bib should not obstruct switching lenses, lifting the hood, or checking weld position.

    At removal

    1. Clean off dust and debris. Wipe down according to your site PPE practice.
    2. Inspect the clip points. Repeated attachment cycles can damage the leather around the clip area.
    3. Verify serviceability. If the bib no longer hangs properly or the clips no longer hold, take it out of service.

    Troubleshooting and support

    Problem: bib will not stay attached

    Check whether the clip jaws are fully seated on the helmet edge. Inspect the clip tension and the shell edge profile. Verify that the helmet model has an edge profile the clip can grip securely. If not, the accessory may not be suitable for that setup.

    Problem: bib interferes with a respirator or PAPR hood

    Check the overlap zone between the bib and the respirator facepiece, hose routing, or hood seal. Verify whether the bib is causing lift, leaks, or a snag point. Do not force a fit. Remove the bib if the respiratory setup cannot be maintained correctly.

    Problem: heat damage appears after light exposure

    Inspect the exposed area for stiffening, discoloration, or edge curling. Verify whether the task demands more robust coverage or a different accessory arrangement. If the bib shows damage, replace it.

    Product and parts notes

    This listing is for a single helmet bib. No replacement parts, alternate clip kits, or accessory components are provided in the source data. If your maintenance group needs a matching spare set, verify the exact product source before ordering. Do not assume that generic clips or aftermarket replacements will fit correctly.

    Related support references

    For adjacent welding PPE topics, see the Weld Support Parts articles on a low-profile respirator under a welding helmet and PAPR helmet integration. These are useful context pieces when a helmet bib is being evaluated alongside other face and neck coverage items.

    Safety notes

    FAQ

    Does the Tillman 566 helmet bib fit every welding helmet?

    Unknown (Verify). The source confirms metal clips, but it does not confirm universal fit. Check helmet edge profile, clip tension, and clearance before use.

    Is this bib suitable for respirator use under a helmet?

    Unknown (Verify). Compatibility depends on the specific respirator, hood, and helmet arrangement. Verify seal integrity and movement clearance before task use.

    What material is listed for this product?

    The source lists leather clothing / leather work bib. Other construction details are Unknown (Verify).

    Should worn clips be repaired or replaced?

    Verify the condition first. If the metal clips are bent, loose, or no longer hold securely, the bib should be removed from service. Do not use improvised repairs unless your site procedure explicitly allows them.

    Sources Checked

    “>Tillman 566, Helmet Bib With Metal Clips, Pack of (1)
  • Provided product short description and source notes for Tillman 566
  • Weld Support Parts internal links listed in the task brief
  • Note: No WSP lookup page, filler metal finder page, ASINs, or additional verified compatibility data were provided for this topic. Unknown (Verify) was used where the source did not supply technical details.

    Related Arc Weld Part

    Tillman 566, Helmet Bib With Metal Clips, Pack of (1)

    Tillman 566, Helmet Bib With Metal Clips, Pack of (1)

    TIL566 Features: -UNSPC CODE: 46181500. -Leather Clothing Leather Clothing. -HELMET BIB-CD. Product Type: -Work Bibs. Pack of (1)

    View at Arc Weld Store

    Related Weld Support Guides

  • PAPR Filter Replacement Checklist

    ESAB Savage A40 PAPR Main Filter Replacement - NIOSH Certified, Pack of 1
    “>ESAB Savage A40 PAPR Main Filter Replacement - NIOSH Certified, Pack of 1

    Use this checklist to decide when a PAPR filter replacement is due and to reduce the chance of restricted airflow during welding. Treat filter condition as a maintenance item, not a guess. If the blower, hose, or face seal is also suspect, check those parts before installing a new filter.

    Key Takeaways

    Filter Replacement Checklist

    When to Replace the PAPR Filter

    Replace the filter when any of the following are true:

    If the unit still alarms after replacement, use the troubleshooting steps in the airflow guide and check the blower, hose, battery, and seals.

    Support and Troubleshooting

    For airflow-related problems that look like filter failure, use this guide first:

    PAPR Welding Helmet Airflow Troubleshooting: Low-Flow Alarm, Filter Loading, Hose Leaks, Battery, and Blower Checks

    That article covers common causes of reduced airflow that can lead to unnecessary filter replacement.

    Product / Parts

    If you need the supported replacement part for this topic, use the ArcWeld listing below.

    ESAB Savage A40 PAPR Main Filter Replacement - NIOSH Certified, Pack of 1

    ESAB Savage A40 PAPR Main Filter Replacement – NIOSH Certified, Pack of 1

    Upgrade your safety gear with the ESAB 0700002403, Savage A40 PAPR Main Filter. This essential component is designed for those who prioritize both health and performance in their workplace. The PAPR main filter replacement is specifically engineered to ensure the highest level of air quality while you work, allowing you to focus on the job at hand without constant concerns about airborne contaminants. With rigorou…

    View at Arc Weld Store

    Product note: ESAB Savage A40 PAPR Main Filter Replacement – NIOSH Certified, Pack of 1. Compatibility beyond the listed product name is Unknown (Verify). Use only where the equipment model matches the replacement part specification.

    Safety Notes

    FAQ

    How often should a PAPR filter be replaced?
    Unknown (Verify). Replacement interval depends on dust loading, duty cycle, and the equipment manual.

    Can I clean a loaded PAPR filter and reuse it?
    Usually no. If airflow is restricted or the filter is damaged, replace it. Do not improvise cleaning methods unless the manufacturer allows it.

    What if the new filter does not fix the low-flow alarm?
    Check the blower, hose, battery, seals, and installation. The issue may not be the filter.

    Do I need to replace the prefilter too?
    If the system uses one, inspect it at the same time. A blocked prefilter can reduce airflow and shorten main filter life.

    Sources Checked

    Category: PAPR Helmet Support

    Related Weld Support Guides

  • ArcOne S240-10 Auto-Darkening Welding Filter: Shade 10 Lens Support Guide

    A 2 x 4-inch auto-darkening filter is often used when a welder wants an auto-darkening function in a compact helmet or fixed-front hood format. The ArcOne S240-10 is listed under ASIN B00206Y4B8 as a horizontal single auto-darkening filter for welding with a fixed shade 10 dark state.

    This guide covers practical selection points, common fit and visibility issues, safety checks, and when a fixed shade 10 auto-darkening filter may or may not be the right choice.

    Key Takeaways

    • Verified ASIN: B00206Y4B8.
    • Product type: auto-darkening welding helmet filter lens.
    • Category: Welding Helmet Support.
    • Known listing details include 2 x 4 inch size, shade 10, two independent sensors, 5.25 square inch active viewing area, and 0.5 millisecond switching speed.
    • Always confirm helmet fit, safety markings, and shade suitability before welding.

    Problem / Context

    Many compact welding hoods use a 2 x 4 inch filter opening. A passive lens can work well, but it requires the operator to flip the hood down before striking the arc. An auto-darkening filter can help reduce repeated hood flipping and can make arc starts easier to see.

    The main concern is not only whether the lens darkens. The filter also needs to fit the helmet correctly, provide the correct shade for the process, and remain protected from spatter, grinding dust, and handling damage.

    Root Causes

    • Wrong lens size: A 2 x 4 inch filter may not fit every helmet shell or retaining frame.
    • Shade mismatch: Shade 10 may be appropriate for many common arc welding ranges, but the required shade depends on process, amperage, electrode size, and viewing conditions.
    • Blocked sensors: Hood position, work angle, pipe joints, or tight spaces can block sensor exposure to the arc.
    • Dirty cover plates: Spatter and smoke film can reduce visibility and affect sensor response.
    • Assumed compatibility: A lens should never be assumed compatible with a helmet unless size, retaining system, and safety requirements are confirmed.

    Solution

    Use the ArcOne S240-10 only where a 2 x 4 inch horizontal auto-darkening filter is suitable for the helmet and the welding process. Before use, inspect the helmet shell, retaining clips, cover plates, gasket or lens frame, and filter condition. Replace cracked, loose, or contaminated components before welding.

    For welding procedures that require a shade lighter or darker than shade 10, select a different approved filter or an adjustable-shade helmet. Do not use a fixed shade lens as a substitute for a procedure-specific shade selection review.

    Specs / Notes

    ASINB00206Y4B8
    BrandArcOne
    Model / part referenceS240-10 / S240-10AON
    Product typeHorizontal single auto-darkening welding filter
    Lens size2 x 4 inch listing format; listed product dimensions also show 2″L x 4.25″W
    Dark shadeShade 10
    SensorsTwo independent sensors
    Active viewing area5.25 square inches
    Switching speed0.5 milliseconds
    Dark-to-light delay0.2 seconds
    Water / dust resistanceListed as water and dust resistant; verify current manufacturer documentation before industrial use
    Battery requirementListed as batteries not required
    Helmet compatibilityUnknown (Verify)
    ANSI marking on current unitUnknown (Verify)

    Product Section

    The ASIN below was verified as an Amazon product listing for the ArcOne S240-10 horizontal single auto-darkening welding filter.

    No products found.

    Selection Table

    Use CaseCheck Before UseSupport Note
    Replacing a passive 2 x 4 lensOSHA tables list the minimum shade by process and currentDo not force the filter into a tight or warped holder
    Stick weldingConfirm shade 10 is suitable for amperage and electrode sizeTest the response before welding in a tight joint
    MIG / flux-cored weldingConfirm shade and sensor exposureGun angle and joint position can shadow sensors
    TIG weldingConfirm low-amp sensitivity requirementsFixed shade 10 may be too dark for some low-amperage work
    Pipe or restricted-position weldingCheck for sensor blockageUse only with an approved helmet and eye protection program
    Training or shop useConfirm ANSI / employer safety requirementsUse only with approved helmet and eye protection program

    Safety: ANSI / AWS Notes

    Welding eye and face protection should comply with applicable ANSI Z87.1 and ANSI Z49.1 safety requirements. The correct filter shade depends on the welding or cutting process, amperage, and work conditions. OSHA filter shade tables provide minimum protective shade guidance for common welding and cutting operations.

    Wear approved safety glasses under the welding helmet where required. Inspect the auto-darkening filter before use. Do not weld with a cracked filter, a missing cover plate, a loose retaining frame, a damaged helmet shell, or a lens that does not darken correctly during a safe function check.

    FAQ

    Is B00206Y4B8 a verified Amazon ASIN?

    Yes. B00206Y4B8 was found as an Amazon ASIN for the ArcOne S240-10 horizontal single auto-darkening welding filter.

    Is shade 10 right for every welding process?

    No. Shade 10 is common for many arc welding applications, but shade selection must be matched to the process, amperage, electrode size, and applicable safety rules.

    Will this fit every 2 x 4 welding hood?

    No. The size format is 2 x 4 inch, but helmet compatibility is Unknown (Verify). Confirm the retaining system, cover plate size, and manufacturer requirements before use.

    Does an auto-darkening lens replace safety glasses?

    No. Safety glasses may still be required under the hood for impact protection and workplace compliance.

    What should be checked before striking an arc?

    Check lens condition, cover plates, helmet fit, shade suitability, sensor visibility, and whether the filter darkens correctly during a safe pre-use check.

    Next Step

    Before ordering or installing the ArcOne S240-10, confirm that the helmet accepts a 2 x 4 inch horizontal filter and that shade 10 matches the welding process and amperage range used in the shop.

    Sources

    • Amazon product listing for ASIN B00206Y4B8, ArcOne S240-10 Horizontal Single Auto-Darkening Filter for Welding.
    • Device.Report product data for ArcOne S240-10AON, including ASIN, model reference, size, and listing details.
    • OSHA 1910.133 Eye and Face Protection, filter lens shade guidance for radiant energy.
    • OSHA Eye Protection Against Radiant Energy During Welding and Cutting fact sheet.
    • AWS Eye and Face Protection for Welding and Cutting Operations, Fact Sheet No. 31.
  • Stream with Amazon Music