Tag: shop supplies

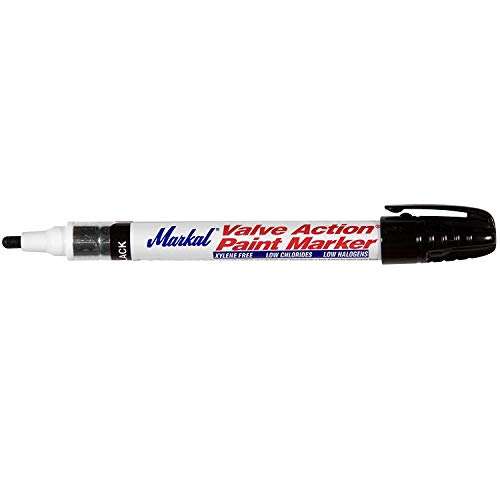
  • Markal 96823, Valve Action Black Paint Marker, Pack of (1): Product Breakdown

    Markal 96823, Valve Action Black Paint Marker, Pack of (1): Product Breakdown

    Product not found.
    “>Markal 96823, Valve Action Black Paint Marker, Pack of (1)

    The Markal 96823, Valve Action Black Paint Marker, Pack of (1) is a shop marking tool for layout, identification, and field marking where a standard ink marker is not enough. The product information provided identifies it as a real paint marker with valve action, a replaceable fiber nib, and a stated dry time of about 3 minutes. For welders, fabricators, and maintenance teams, the main value is simple: a marker that lays down visible paint on work surfaces and is built for repeated use.

    Key Takeaways

    • Valve action releases paint as needed for continuous marking.
    • The marker uses real paint, not standard pen ink.
    • Stated dry time is 3 minutes.
    • Lead-free and low halogens are listed features.
    • The fiber nib is replaceable, which supports full use of the marker body.
    • Overall product weight is listed as 0.1 pounds.

    Where this marker fits in a welding and fabrication shop

    A black paint marker is generally used for part identification, cut lines, fit-up notes, and general shop marking on surfaces where visibility matters. The valve-action design helps control paint flow, which is useful when marking long runs or repeated notes. If you need a mark that stays visible through handling, the real-paint format is usually more practical than a standard felt-tip marker.

    This is not a process-control device. It does not approve materials, procedures, or weld parameters. Use it as a shop marking tool only.

    Check, inspect, verify before use

    • Check the surface: Verify the material is suitable for paint marking. Clean, dry surfaces usually give better visibility. Unknown (Verify) on adhesion to coated, oily, or heavily oxidized surfaces.
    • Inspect the nib: Make sure the fiber nib is present, seated, and not damaged before first use.
    • Verify flow: Test on scrap or a non-critical area to confirm paint release before marking production parts.
    • Check drying time: The stated dry time is 3 minutes, but actual dry time can vary with surface condition, film thickness, temperature, and airflow. Verify on your actual work surface.
    • Inspect for contamination: If the marker has been stored open or in a dirty area, verify the nib is not clogged before relying on it for layout.

    Troubleshooting and support

    If the marker does not perform as expected, use a simple inspection sequence before replacing it.

    • No paint transfer: Check that the nib is fully engaged. Then verify the tip is primed per normal paint-marker practice. If flow does not start, inspect for clogging or drying at the nib.
    • Weak or uneven line: Verify the surface is not dusty, oily, or excessively rough. Inspect the nib for wear. The replaceable fiber nib is intended to support continued use once the tip wears.
    • Excessive paint release: Check whether the marker is being pressed too hard. Valve-action markers are meant to release paint as needed; too much pressure can flood the line.
    • Poor visibility: Verify the base material color and finish. Black paint may be difficult to read on dark or contaminated surfaces.

    Handling and use notes

    The listed features suggest a marker designed for straightforward manual use in the shop or field. Because it is a paint marker, treat it as a consumable that can dry out if left uncapped or handled incorrectly. Keep the cap secured when not in use. If the nib becomes worn, the replaceable tip supports continued use without discarding the entire body immediately.

    Use the marker for identification and layout only. Do not assume the mark remains permanent under grinding, blasting, heat, solvent exposure, or weather. Unknown (Verify) on resistance to these conditions because no additional performance data was provided.

    Product and parts notes

    Provided product information for the Markal 96823 identifies these details:

    • Product type: Marker
    • Category: Paint
    • Marker style: Valve action
    • Nib: Fiber nib, replaceable
    • Paint type: Real paint
    • Lead status: Lead-free
    • Halogens: Low halogens
    • Dry time: 3 minutes
    • Overall product weight: 0.1 pounds

    Any use beyond those statements should be treated as Unknown (Verify). Do not assume surface chemistry, temperature limits, or chemical resistance without a current manufacturer data sheet or direct product confirmation.

    Safety notes

    • Use the marker in a ventilated area if you are sensitive to paint odors.
    • Avoid skin and eye contact with wet paint.
    • Keep away from ignition sources unless the manufacturer documentation states otherwise. Unknown (Verify) on flammability details.
    • Do not mark parts where paint contamination is prohibited without verifying downstream process requirements.
    • Follow local shop rules for solvent, paint, and waste handling.

    FAQ

    Is the Markal 96823 a standard ink marker?
    No. The provided product information identifies it as a real paint marker with valve action.

    Can it be used on any metal surface?
    Unknown (Verify). Surface condition matters, and no full compatibility list was provided. Test on scrap or a non-critical area first.

    Does the marker dry fast enough for shop use?
    The stated dry time is 3 minutes. Actual dry time can change based on surface, film thickness, and environment, so verify on the part being marked.

    Can the nib be replaced?
    Yes. The provided information states that the fiber nib is replaceable.

    Sources Checked

    • ArcWeld product page: Markal 96823, Valve Action Black Paint Marker, Pack of (1)
    • Provided product summary fields for features and dimensions

    Related Arc Weld Part

    Markal 96823, Valve Action Black Paint Marker, Pack of (1)

    Markal 96823, Valve Action Black Paint Marker, Pack of (1)

    434-96823 Features: -Marks with real paint, dries in 3 minutes. -Nib releases paint as needed for continuous marking. -Lead-free, low halogens. -The fiber nib is replaceable to assure complete use of each marker. Product Type: -Markers. Category: -Paint. Dimensions: Overall Product Weight: -0.1 Pounds.

    View at Arc Weld Store
  • Markal 96100 Red-Riter Welders Pencil for Torch-Resistant Marks During Metal Layout and Fabrication, Red (Pack of 12) Made in USA: Replacement Part Breakdown

    No products found.

    Layout marks are part of the job. If the line is wrong, the cut is wrong, the fit-up is wrong, and the time loss shows up fast. The Markal 96100 Red-Riter Welders Pencil is used for metal layout and fabrication marking where a durable visible line is needed. For buyers and shop teams, the main question is not whether it writes. The question is what it does well, what it does not do, and how to verify it matches the job before you buy in quantity.

    Key Takeaways

    • Use this type of marking pencil for layout work where standard shop markers may fail or become hard to read.
    • Confirm the marking surface, visibility, and cleanup method before using it on production parts.
    • Do not assume torch resistance or heat survival on every alloy, coating, or process without testing.
    • Pack quantity, packaging, and origin are provided by the listing; technical fit still needs shop verification.

    What this product is for

    The Markal 96100 Red-Riter is a welders pencil used for layout and fabrication marking. In a shop setting, that usually means part identification, cut lines, reference marks, and fit-up notes on metal. The red color improves contrast on many surfaces, but the actual readability depends on the base material, mill scale, finish, lighting, and whether the part is oily or dusty.

    For maintenance buyers, this is a consumable marking tool, not a repair part. The listing is for a pack of 12. Beyond that, technical details such as core composition, marking temperature limit, or exact surface compatibility are Unknown (Verify) from the provided source set.

    Practical check, inspect, verify

    Before stocking or issuing this pencil to the shop, run a basic verification process.

    • Check the surface: Identify the most common materials in your workflow: carbon steel, stainless, coated plate, tube, or cast parts.
    • Inspect visibility: Test the red mark under shop lighting and on the actual base material, not just on clean test coupons.
    • Verify transfer: Make one layout mark, handle the part normally, and confirm the line remains readable through cutting, grinding, and fit-up handling.
    • Check cleanup: Confirm whether the mark must be removed before welding, painting, inspection, or coating.
    • Verify process fit: If the part will be exposed to heat, preheat, or torch work, test on scrap first. Do not assume the mark will survive unchanged.

    Troubleshooting support

    If the mark does not perform as expected, isolate the failure point.

    • Mark is too faint: Inspect the surface for oil, rust, mill scale, or heavy oxide. Clean the area and retest.
    • Mark wipes off too easily: Verify whether the part is handled with gloves, wiped with solvent, or exposed to abrasion before use.
    • Mark burns away during heat work: Check the actual process temperature at the mark location. Torch resistance claims should be verified in your own application.
    • Mark interferes with downstream work: Confirm whether your procedure requires removal before welding or coating.

    For a related consumables reference, see 17-Piece TIG Welding Torch Kit for WP-17/18/26: Complete Consumables Breakdown and How to Identify and Replace Compatible TIG Torch Consumables for Optimal Welding Performance. Those guides cover the same kind of shop discipline: identify the job, verify the fit, and do not assume compatibility.

    Product and parts note

    This item is a marking tool, not a machine component. There are no replacement parts listed in the provided sources. If your team treats marking pencils as controlled consumables, confirm ordering units, storage method, and issue process internally. Product details such as exact lead construction, temperature performance, or certification status are Unknown (Verify) from the available source set.

    The allowed Amazon registry reference for this product is ASIN B005YT1Z7O. The approved product shortcode is

    No products found.

    . No raw Amazon link is used here.

    WSP lookup section

    No WSP lookup page was provided for this topic. Because of that, there is no source lookup URL to cite or cross-check in this draft.

    Safety notes

    • Do not use any marking tool on a part without understanding whether the mark must be removed before welding, coating, or final inspection.
    • Keep marking tools away from open flame, hot slag, and direct torch exposure unless you have verified performance in your own process.
    • Store consumables dry and clean to reduce contamination of marked parts.
    • If the mark is applied to a part that will go into a controlled process, verify the mark material will not create contamination or quality issues.

    FAQ

    Is the Markal 96100 Red-Riter suitable for all metal surfaces?
    No. Surface performance depends on the material, finish, contamination, and lighting. Test on the actual substrate before shop-wide use.

    Does it have verified torch-resistant performance?
    The product is described as torch-resistant in the listing title, but the exact limit and application boundary are Unknown (Verify) from the provided sources. Validate it in your process before relying on the claim.

    Is this a replacement part or a consumable?
    It is a consumable marking tool, not a machine replacement part. No spare components were provided in the source set.

    Can it be used for fit-up and layout on fabricated assemblies?
    Yes, that is the intended use case. Still verify line visibility, durability, and cleanup requirements on your specific assembly and workflow.

    Sources Checked

    • Provided Amazon registry reference for ASIN B005YT1Z7O
    • Allowed internal link: 17-Piece TIG Welding Torch Kit for WP-17/18/26: Complete Consumables Breakdown
    • Allowed internal link: How to Identify and Replace Compatible TIG Torch Consumables for Optimal Welding Performance

    Bottom line: the Markal 96100 Red-Riter is a layout consumable for welding and fabrication work. Verify its visibility, cleanup behavior, and heat exposure performance in your own shop before standardizing it across jobs.

    Disclosure: As an Amazon Associate, Weld Support Parts may earn from qualifying purchases.

    Related Weld Support Guides

  • How to Build a Basic Welding Maintenance Kit

    How to Build a Basic Welding Maintenance Kit

    Jackson Safety Respirator

    A welding maintenance kit should keep a machine, torch setup, and work area in service without guesswork. The goal is not to collect every accessory on the market. The goal is to keep basic wear items, cleaning tools, and inspection supplies in one place so a welder or maintenance tech can find what is needed before a job starts.

    For a buyer, the best kit is the one that matches the processes used in the shop. A light fabrication bay does not need the same contents as a multi-shift maintenance department. Start with the items that support cleaning, inspection, routine wear replacement, and safe housekeeping. Then build from actual use.

    Key Takeaways

    • Build the kit around the processes in use: SMAW, GMAW, FCAW, GTAW, or mixed service.
    • Stock common wear and cleaning items first, then add process-specific parts.
    • Keep inspection tools in the same kit so problems are found before downtime starts.
    • Use labeled containers and a simple checklist so the kit can be verified quickly.
    • Do not buy parts based on assumptions. Verify torch model, liner size, tip size, and connector type before ordering.

    Basic kit categories

    A practical welding maintenance kit usually includes five categories.

    1. Cleaning and prep items

    These help remove spatter, dust, soot, and surface contamination. Common items include a chipping hammer, wire brush, nozzle cleaning tools, shop rags, and a non-flammable cleaner approved by your site. If solvent use is allowed, verify compatibility with painted surfaces, plastics, cable jackets, and seals. Unknown (Verify) for any cleaner not listed by your site procedure.

    2. Wear parts and consumables

    Keep the items that fail most often. For MIG and flux-cored setups, that usually means contact tips, nozzles, diffusers, liners, drive rolls, and O-rings where applicable. For TIG setups, include collets, collet bodies, cups, back caps, and tungstens if your procedure allows onsite sharpening and replacement. For stick welding, keep electrode holders, cable lugs, and spare lead hardware in mind. Do not assume compatibility. Verify machine brand, torch series, and part numbering before stocking anything.

    3. Inspection tools

    Inspection tools help prevent failures that look like bad welding but are actually maintenance issues. A basic set can include a flashlight, tape measure, feeler gauges, multimeter, temperature indicator if used by your shop, and a magnifier for connector or tip inspection. If your department uses torque-critical hardware, verify torque values from the equipment manual. Unknown (Verify) if the manual is not available.

    4. Cable and connection hardware

    Damage to power cables, ground clamps, and connectors can stop production. Keep spare lugs, heat-shrink, electrical tape approved for the application, replacement clamps, and strain-relief hardware. Inspect cable jackets for cuts, flattened sections, exposed conductor, and heat damage. Verify that replacement components match conductor size and connector style before installation.

    5. Storage and labeling supplies

    The kit should stay organized. Use bins, labeled pouches, or a hard case with compartments. Add a contents list, reorder list, and date tracking for high-use items. Maintenance kits fail when parts are thrown in loose and no one knows what was removed. A simple inventory sheet is better than a large box with no control.

    Check, inspect, verify: build the kit step by step

    Check: list the welding processes and machines in use. Note torch models, feeder types, lead lengths, and common failure points. This defines the kit.

    Inspect: review the current spare parts drawer or tool cabinet. Separate what is used, what is obsolete, and what is unlabeled.

    Verify: confirm model numbers, cable sizes, tip sizes, and connector types from manuals, nameplates, or internal records. Do not rely on memory.

    Check: identify consumables that are replaced weekly, monthly, or after a known failure mode.

    Inspect: make sure cleaning tools are not damaged. A worn brush or cracked nozzle tool becomes wasted space.

    Verify: that each item in the kit has a clear use case. If no one can explain why it is there, remove it.

    Troubleshooting support: what the kit should help you catch

    A maintenance kit should support fast diagnosis, not just replacement.

    • Poor arc stability: Check contact tips, cable connections, and work clamp condition. Inspect for heat damage and loose fittings. Verify correct consumable size and wire diameter.
    • Wire feed issues: Check liner condition, drive roll wear, spool tension, and gun cable routing. Inspect for birdnesting, debris, or sharp bends. Verify the liner and drive roll match the wire type and diameter.
    • Gas coverage problems: Check for clogged nozzles, damaged gas hoses, loose fittings, and excessive drafts. Inspect seals and O-rings. Verify gas flow settings and leak-free connections per shop procedure.
    • Overheating or intermittent output: Check duty-cycle use, cable condition, and terminal tightness. Inspect for discoloration, brittleness, and hot spots. Verify the machine is not being operated outside its intended service range.

    WSP lookup section

    For respiratory safety support, the only provided WSP lookup page is the Jackson Safety Respirator page. This is useful as a reference point for PPE-related maintenance planning, but the available page data is limited. Product fit, respirator type, filter compatibility, and certification details are Unknown (Verify). Confirm all respirator selection and replacement-part requirements directly from the product page and site documentation before purchase or use.

    Safety notes

    • Do not service energized equipment unless your site lockout/tagout procedure allows it and the machine is verified safe.
    • Replace damaged cables, cracked insulation, burned connectors, and loose clamps before reuse.
    • Keep compressed air, solvents, and cleaning chemicals within site safety rules.
    • Verify PPE requirements before using wire brushes, grinders, or chemical cleaners.
    • If a part shows heat damage, corrosion, or deformation, do not return it to service without inspection by a qualified person.

    FAQ

    What is the most important part of a welding maintenance kit?
    The most important part is the set of wear items and inspection tools tied to your actual process. A kit that matches your machines is more useful than a larger generic box.

    Should every shop use the same kit?
    No. A maintenance kit should be built around the equipment in service, the wire or electrode types used, and the failure modes seen in that shop.

    How often should the kit be checked?
    Check it on a fixed schedule, such as weekly or at the start of each shift rotation. Verify missing items, damaged tools, and expired or obsolete supplies.

    Can I stock universal replacement parts?
    Only if compatibility is verified. Many welding parts look similar but are not interchangeable. Confirm series, size, and connector type before stocking universal items.

    Sources Checked

    • Provided WSP lookup page: Jackson Safety Respirator
    • Task instructions and allowed source limits
    • No additional product pages, ASINs, or internal links were provided

    A basic welding maintenance kit is not complicated. It is a controlled set of cleaning tools, wear parts, inspection items, and labeled storage built around actual shop use. Keep it simple, verify compatibility before buying, and review it often enough that missing parts are caught before they stop production.

  • Try Amazon Prime Free