Tag: pulse mig

  • Millermatic 255 Pulse MIG Setup Problems: Wire, Gas, Arc Length, and Gun Checks

    Most Millermatic 255 pulse MIG setup problems come from a mismatch between the selected pulse program and the actual wire, gas, material, gun, or feed path. If the arc is harsh, ropey, cold, wandering, or spattery in pulse mode, first verify the screen selection: material/gas, wire diameter, and material thickness. Then check contact tip size, liner range, drive roll groove, gas blend, polarity, work clamp, and whether the installed MDX-250 gun uses AccuLock S or AccuLock MDX consumables.

    Do not troubleshoot pulse MIG like basic short-circuit MIG. Pulse programs are built around a specific wire diameter and shielding gas. If the gas does not match the listed program, the machine may still weld, but arc length and arc control may need correction. If wire delivery is inconsistent, pulse mode will exaggerate the problem because the machine is trying to control a transfer pattern that the wire feed system is not supporting.

    Common Symptoms

    SymptomLikely Setup CauseFirst Check
    Arc feels long, lazy, or wanderingArc length too high or wrong gas/programReturn arc length toward default and verify gas selection
    Arc is harsh, narrow, or diggingArc length too low or arc control too tightAdjust in small steps after verifying program
    Excess spatter in pulse modeWrong gas, wrong wire diameter, feed issue, or bad tipConfirm selected wire/gas and replace tip
    Ropey aluminum beadWrong aluminum program, poor feeding, or gun mismatchVerify aluminum wire size, gun type, and gas
    Burnback at the tipWire feed slowing before the arcInspect tip, liner, drive rolls, and spool brake
    Program changes unexpectedlyEZ-Select gun enabled or wrong saved programCheck program mode and gun settings

    What Pulse MIG Is Doing

    Pulse MIG controls current in a repeating high/low pattern so droplets transfer without running a constant high-energy spray arc. On the Millermatic 255, the operator still has to provide the correct setup inputs. The machine cannot fix a wrong gas bottle, a .035 program running .030 wire, a worn contact tip, a dirty liner, or poor work clamp contact.

    Millermatic 255 Pulse Setup Checklist

    1. Select Pulse mode, then confirm whether you are using Auto-Set or Manual pulse.
    2. Select the actual material and shielding gas being used.
    3. Select the actual wire diameter loaded in the feeder.
    4. In Auto-Set pulse, select the material thickness.
    5. In Manual pulse, set wire feed speed from the chart for the metal and thickness.
    6. Start with arc length at the default value before tuning.
    7. Only adjust arc control after wire, gas, and arc length are verified.
    8. Confirm the work clamp is on clean metal close to the weld.
    9. Confirm polarity for the process and wire type.
    10. Test on clean scrap of the same material before changing stored programs.

    Arc Length and Arc Control

    Arc length is the first pulse tuning control to check. If the arc feels too long, unstable, or wide, reduce arc length gradually. If the arc feels too tight, harsh, or digging, increase arc length gradually. Large changes can make the machine feel worse, especially when the gas or wire selection is already wrong.

    Arc control changes the width and character of the pulse arc cone. Use it after the basic program is correct. If you are using a gas that is not the gas listed for the selected pulse program, arc length and arc control may need adjustment, but they should not be used to hide a major gas mismatch.

    Compatibility Notes: MDX-250, AccuLock S, and AccuLock MDX

    For Millermatic 255 gun and consumable replacement, verify the installed gun before ordering. Weld Support Parts lists the Millermatic 255 with MDX-250 AccuLock S as the recommended replacement gun path on the Miller gun selection chart: Miller MIG Gun Selection Chart.

    Use the correct consumable family for the gun that is actually installed. The Miller MDX-250 AccuLock S page lists MDX-250 AccuLock S guns and AccuLock S tips, nozzles, diffusers, and liners. The Miller MDX-250 AccuLock MDX page lists the AccuLock MDX version. Do not mix AccuLock S and AccuLock MDX contact tips or diffusers.

    What Wears Out First

    • Contact tip: worn or oversized tips cause unstable current transfer and pulse arc wandering.
    • Liner: drag in the liner causes wire feed variation that shows up as pulsing, burnback, or ropey bead shape.
    • Drive rolls: wrong groove or pressure causes slipping, shaving, or crushed wire.
    • Nozzle and diffuser: spatter buildup changes gas coverage and can create porosity or arc instability.
    • Work clamp: poor contact makes a pulse problem look like a machine problem.

    Test Procedure

    1. Install a known-good contact tip matching the wire diameter.
    2. Clean the nozzle and confirm diffuser is tight and correct for the gun series.
    3. Lay the gun cable straight and jog wire through the gun.
    4. Check drive roll groove, pressure, and spool hub tension.
    5. Select the correct pulse program for wire, material, and gas.
    6. Return arc length near default and run a bead on clean scrap.
    7. Adjust arc length in small steps only after confirming the weld pool is stable.
    8. Use arc control only for final arc-cone tuning.
    9. If the fault remains in both standard MIG and pulse MIG, troubleshoot feed, power, ground, or service-level machine faults.

    Common Wrong-Part Mistakes

    • Ordering consumables by “Millermatic 255” instead of the actual MDX-250 gun version.
    • Mixing AccuLock S tips with AccuLock MDX diffusers.
    • Using a .045 tip for .035 wire to reduce burnback instead of fixing feed drag.
    • Using the wrong liner range for .030, .035, or .045 wire.
    • Using the wrong drive roll profile for aluminum or flux-cored wire.
    • Trying to tune pulse settings while the gas bottle does not match the selected program.

    Field Fix vs Proper Fix

    A field fix is to replace the contact tip, clean the nozzle, return arc length toward default, reselect the correct pulse program, straighten the gun lead, and clamp to clean metal.

    The proper fix is to verify the entire setup chain: machine program, shielding gas, wire diameter, wire type, drive rolls, liner, contact tip, gun series, work lead, and saved program settings. If the machine still has setup errors, overtemperature messages, trigger errors, or unstable output after verified setup, send it to a qualified Miller service center.

    Related Parts Breakdown

    Safety Notes

    Disconnect input power before servicing internal feeder parts, changing drive rolls, or inspecting internal connections. Keep fingers out of the drive rolls while jogging wire. Wear proper welding PPE and use adequate ventilation. Do not continue welding with damaged gun cable, cracked work lead, loose weld terminals, or repeated machine error messages.

  • Weldpro Omni 210 MultiProcess Welder Review (2025): Precision Power for Every Job

    Weldpro Omni 210 MultiProcess Welder Review (2025): Precision Power for Every Job

    Quick Look

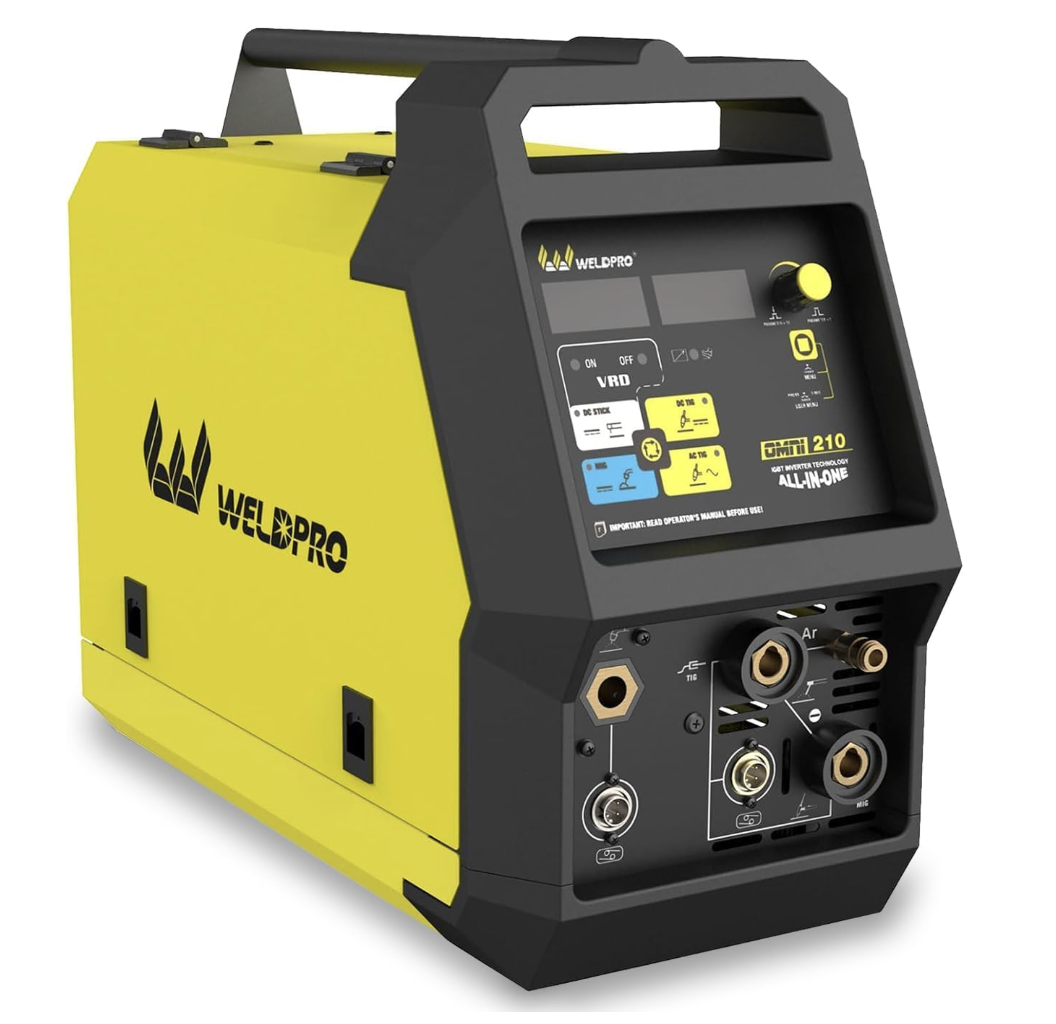
    The Weldpro Omni 210 brings full multi-process capability into one compact frame — MIG, Stick, AC/DC TIG, flux core, spool gun, and pulse welding. Designed for welders who want pro-level precision without hauling multiple machines, it blends smart controls with a durable, field-ready design.

    Key Takeaways

    • Processes: MIG, Flux Core, Stick, Spool Gun, AC/DC TIG (6-in-1)
    • Input Power: Dual Voltage 110 V / 220 V
    • Output Current: Up to 200 A for MIG and TIG
    • Synergic MIG: Auto-set function for easy setup and consistent bead quality
    • Display & Controls: Digital interface with VRD, hot start, arc force, and protection indicators

    Performance and Use

    The Omni 210 balances brute amperage with refined control. Its synergic MIG mode automatically adjusts wire feed to match voltage and gas settings, letting you focus on torch control. The AC/DC TIG function expands capability to aluminum and stainless work, while the built-in pulse mode minimizes heat distortion on thin metals.

    With its digital multi-function display and onboard thermal/overload protection, this machine handles everything from home fabrication to light industrial jobs. Welders switching between steel, aluminum, and stainless will appreciate the one-machine workflow.

    In-Box / Not Included

    Included:

    • Weldpro Omni 210 power source
    • MIG gun and ground clamp
    • TIG torch with foot pedal
    • Power adapter for 110 V / 220 V
    • User manual

    Not Included:

    • Shielding gas and cylinders
    • Wire spool and consumables
    • Spool gun sold separately

    Applications

    • Shop and field fabrication
    • Aluminum TIG or MIG projects
    • Structural repair and automotive restoration
    • Maintenance welding across multiple metals

    Comparison Table

    ModelInput / OutputBest ForAmazon
    Weldpro Omni 210110 V/220 V • 200 A • 6-in-1Aluminum and multiprocess weldingSee on Amazon

    Safety Notes

    Always follow ANSI Z49.1 welding safety standards. Keep power leads dry, use grounded outlets, and wear appropriate PPE. Verify duty cycle before extended runs — exceeding rated limits can trigger thermal protection.

    FAQ

    Q: Can it weld aluminum out of the box?
    Yes, when paired with a spool gun or by using the AC TIG mode.

    Q: Does it include a foot pedal?
    Yes — a foot pedal is included for TIG operation.

    Q: Is this beginner-friendly?
    The synergic MIG and digital display make setup easy for new users, while advanced controls appeal to professionals.

    No products found.

    Where to Buy

    Amazon: Weldpro Omni 210 6-in-1 MultiProcess Welder

    We may earn a commission from qualifying purchases made through our links, at no extra cost to you.

Listen with Audible