Tag: PAPR

  • Savage A40 PAPR Parts: Parts Lookup and Buying Checks

    Savage A40 PAPR Parts: Parts Lookup and Buying Checks

    Savage A40 PAPR Parts

    The ESAB Savage A40 PAPR setup uses multiple wear items and service parts that can age out before the helmet body does. For buyers and maintenance teams, the main task is not just finding a part number. It is verifying which component is needed, whether it matches the specific Savage A40 PAPR configuration, and whether the order is complete enough to keep the helmet in service.

    This guide focuses on lookup and buying checks for Savage A40 PAPR parts. Use it when you are replacing consumables, checking damaged items, or trying to avoid ordering the wrong lens, seal, hose, or headgear-related part.

    Key Takeaways

    • Start with the WSP lookup page for the Savage A40 PAPR system: Savage A40 PAPR Parts.
    • Do not assume every Savage A40 accessory fits every helmet variant. Verify the exact model and revision before ordering.
    • Wear items should be checked for cracks, loss of seal, scratches, distortion, or airflow issues before replacement.
    • If a detail is not confirmed on the lookup page, mark it as Unknown (Verify) and confirm it before purchase.
    • Use the lookup page as the starting point for parts identification, not as a substitute for the manufacturer’s service documentation.

    What to Verify Before You Buy

    For helmet and PAPR parts, a wrong order usually comes from skipping basic checks. Before submitting a purchase request, verify the following:

    • Exact product name: Savage A40 PAPR, not a different Savage A40 variant.
    • Helmet configuration: confirm whether you need helmet-only parts, PAPR-related parts, or both.
    • Part condition: inspect the existing part for damage and compare it to the replacement requirement.
    • Connection points: verify hose ends, seals, covers, and mounting points visually before ordering.
    • Revision or package details: if not clearly stated, use Unknown (Verify) and confirm with the seller or documentation.

    Practical Check, Inspect, Verify Steps

    1) Check the helmet body and outer surfaces

    • Check the shell for impact damage, heat distortion, or cracks.
    • Inspect the front and side areas for warped edges that could affect seals or covers.
    • Verify that any mounting points or retention areas are intact.

    2) Inspect the viewing and protection layers

    • Inspect outer lenses, inner protection layers, and covers for pitting, spatter damage, or clouding.
    • Verify that the replacement layer matches the existing format and attachment method.
    • If lens dimensions are not confirmed on the lookup page, record them as Unknown (Verify).

    3) Check headgear and comfort interfaces

    • Inspect the headgear straps, pivots, and adjustment points for wear or loss of tension.
    • Verify that the helmet still holds position during use.
    • Replace worn pads, straps, or retention components before they cause fit problems.

    4) Inspect PAPR-related airflow parts

    • Check hoses, inlet points, and seals for cuts, collapse, or loose fit.
    • Verify that airflow is unobstructed and that no part of the hose is pinched.
    • If the blower, filter, or battery status is not confirmed by the source page, mark those details as Unknown (Verify).

    How to Use the WSP Lookup Page

    The WSP lookup page is the correct first stop when identifying Savage A40 PAPR parts. Use it to confirm the part family and to narrow the replacement search. Open the page here: Savage A40 PAPR Parts.

    Use the lookup page to support these buying checks:

    • Confirm you are in the right system family.
    • Check whether the item is a replacement wear part or a larger service component.
    • Compare the page listing to the damaged part in hand before ordering.
    • Capture any unknown details for verification with the buyer, user, or supplier.

    If a replacement detail is not fully described, do not infer compatibility. Treat it as Unknown (Verify) until confirmed.

    Common Buying Mistakes

    • Ordering by helmet name alone without verifying the PAPR variant.
    • Replacing only the visible worn item while ignoring the seal, retention, or interface part that caused the failure.
    • Assuming a part from another helmet line will fit because it looks similar.
    • Skipping visual inspection and finding the wrong part only after the machine is down.
    • Using an unconfirmed spec or measurement as if it were confirmed data.

    Support Planning for Maintenance Buyers

    For shops that keep helmets in rotation, it helps to track the highest-wear items first. Build a short internal list of the parts that fail most often in your environment. For example, keep notes on lens wear, seals, hose damage, and headgear adjustment issues. If a part description is incomplete, enter the missing detail as Unknown (Verify) instead of guessing.

    Also document the unit ID, user name, and failure mode. That makes repeat orders cleaner and reduces returns. When a helmet is down, that record is often more useful than a generic “need parts” request.

    Safety Notes

    • Do not use damaged helmet, lens, or airflow components in a welding environment.
    • Verify protection items before returning the unit to service.
    • If airflow performance is questionable, remove the unit from service until inspected.
    • Replacement parts should match the intended system. Do not force-fit unknown components.

    FAQ

    How do I confirm I have the right Savage A40 PAPR part?

    Start with the WSP lookup page and compare the listed item to the part in hand. Verify the helmet variant, the mounting style, and the function of the part before ordering.

    What if the part description is incomplete?

    Treat the missing detail as Unknown (Verify). Do not assume compatibility or dimensions without confirmation from the seller, the manufacturer documentation, or a verified sample part.

    Can I use the lookup page as a procedure approval source?

    No. The lookup page is a parts identification starting point. It does not replace welding procedure approval, respiratory program requirements, or site-specific safety rules.

    What should I inspect first on a worn helmet setup?

    Check the lens stack, seals, headgear, and hose or airflow interfaces first. Those are common wear points and often explain fit, visibility, or airflow complaints.

    Sources Checked

    Details not confirmed on the provided source should be treated as Unknown (Verify).

    Disclosure: As an Amazon Associate, Weld Support Parts may earn from qualifying purchases.

    Related Weld Support Guides

  • PAPR Filter Replacement Checklist

    ESAB Savage A40 PAPR Main Filter Replacement - NIOSH Certified, Pack of 1
    “>ESAB Savage A40 PAPR Main Filter Replacement - NIOSH Certified, Pack of 1

    Use this checklist to decide when a PAPR filter replacement is due and to reduce the chance of restricted airflow during welding. Treat filter condition as a maintenance item, not a guess. If the blower, hose, or face seal is also suspect, check those parts before installing a new filter.

    Key Takeaways

    • Replace the filter when airflow drops, alarms occur, or the filter is visibly loaded.
    • Do not assume a filter is still usable based on time alone. Check condition and system performance.
    • Inspect the blower, hose, battery, and helmet seal at the same time.
    • If the system performance remains poor after replacement, the cause is likely elsewhere.

    Filter Replacement Checklist

    • Check airflow: Confirm the blower moves air normally at startup. If airflow is weak, investigate loading or system faults.
    • Check alarm status: Any low-flow alarm or abnormal warning is a replacement trigger until the cause is verified.
    • Inspect the filter surface: Look for heavy dust loading, discoloration, damage, or collapse.
    • Check the housing and seal: Confirm the filter seats correctly and the housing closes as designed.
    • Review exposure conditions: Heavy particulate loading will shorten filter life. Unknown (Verify) for exact service interval.
    • Verify the prefilter, if used: A blocked prefilter can make the main filter appear failed early.
    • Confirm hose condition: Cracks, loose connections, or kinks can mimic filter problems.
    • Check battery status: Low battery voltage can reduce blower performance and trigger false filter concerns.

    When to Replace the PAPR Filter

    Replace the filter when any of the following are true:

    • Airflow is reduced and does not recover after cleaning or inspection of related parts.
    • The unit alarms for low flow or restricted operation.
    • The filter is visibly loaded with dust or welding-related particulates.
    • The filter is damaged, deformed, or not seated correctly.
    • Contamination or exposure history makes reuse uncertain.

    If the unit still alarms after replacement, use the troubleshooting steps in the airflow guide and check the blower, hose, battery, and seals.

    Support and Troubleshooting

    For airflow-related problems that look like filter failure, use this guide first:

    PAPR Welding Helmet Airflow Troubleshooting: Low-Flow Alarm, Filter Loading, Hose Leaks, Battery, and Blower Checks

    That article covers common causes of reduced airflow that can lead to unnecessary filter replacement.

    Product / Parts

    If you need the supported replacement part for this topic, use the ArcWeld listing below.

    ESAB Savage A40 PAPR Main Filter Replacement - NIOSH Certified, Pack of 1

    ESAB Savage A40 PAPR Main Filter Replacement – NIOSH Certified, Pack of 1

    Upgrade your safety gear with the ESAB 0700002403, Savage A40 PAPR Main Filter. This essential component is designed for those who prioritize both health and performance in their workplace. The PAPR main filter replacement is specifically engineered to ensure the highest level of air quality while you work, allowing you to focus on the job at hand without constant concerns about airborne contaminants. With rigorou…

    View at Arc Weld Store

    Product note: ESAB Savage A40 PAPR Main Filter Replacement – NIOSH Certified, Pack of 1. Compatibility beyond the listed product name is Unknown (Verify). Use only where the equipment model matches the replacement part specification.

    Safety Notes

    • Do not continue welding with a PAPR that alarms for low flow until the cause is corrected.
    • Do not reuse a damaged or overloaded filter.
    • Verify the replacement part against the helmet/blower model before installation.
    • Follow the equipment manual and site respiratory protection procedure. If there is any mismatch, remove the unit from service until verified.

    FAQ

    How often should a PAPR filter be replaced?
    Unknown (Verify). Replacement interval depends on dust loading, duty cycle, and the equipment manual.

    Can I clean a loaded PAPR filter and reuse it?
    Usually no. If airflow is restricted or the filter is damaged, replace it. Do not improvise cleaning methods unless the manufacturer allows it.

    What if the new filter does not fix the low-flow alarm?
    Check the blower, hose, battery, seals, and installation. The issue may not be the filter.

    Do I need to replace the prefilter too?
    If the system uses one, inspect it at the same time. A blocked prefilter can reduce airflow and shorten main filter life.

    Sources Checked

    • Allowed internal link: PAPR Welding Helmet Airflow Troubleshooting: Low-Flow Alarm, Filter Loading, Hose Leaks, Battery, and Blower Checks
    • Allowed ArcWeld product listing: ESAB Savage A40 PAPR Main Filter Replacement – NIOSH Certified, Pack of 1

    Category: PAPR Helmet Support

    Related Weld Support Guides

  • PAPR Helmet Airflow Feels Weak

    ESAB Savage A40 PAPR Pre-Filter Replacement, NIOSH Approved, Pack of 5 Filters
    “>ESAB Savage A40 PAPR Pre-Filter Replacement, NIOSH Approved, Pack of 5 Filters

    If your PAPR helmet airflow feels weak, start with the basic flow path: intake, pre-filter, main filter, blower, hose, battery, and helmet seals. Low airflow is usually caused by restriction, a failing power source, or a leak in the air delivery path.

    Key Takeaways

    • Check the pre-filter and main filter first. Loading and clogging reduce airflow.
    • Verify battery condition and charge state. Low voltage can reduce blower output.
    • Inspect the hose for kinks, cracks, loose ends, or internal blockage.
    • Listen for blower changes. A weak, uneven, or noisy blower can indicate a fault.
    • Confirm the helmet seals and air channel are seated correctly.

    Troubleshooting Steps

    1) Check the filter condition

    A loaded pre-filter can restrict airflow before the blower can compensate. Remove the pre-filter and inspect it for dust buildup, discoloration, or collapse. If it is loaded, replace it.

    Also inspect the main filter element. If the system still feels weak after a fresh pre-filter, the main filter may be restricted. Use the manufacturer’s replacement schedule and alarm guidance.

    2) Confirm the battery is charged and healthy

    Low battery output can reduce blower speed. Charge the battery fully, then retest the system. If the airflow improves after charging, the battery may be nearing end of service life. Battery health details are Unknown (Verify) without the system manual.

    3) Inspect the hose

    Run your hand along the hose and check for:

    • Kinks or sharp bends
    • Cracks or punctures
    • Loose couplers or poor seating
    • Dust or debris inside the hose

    A hose leak or restriction can make the helmet feel underfed even if the blower is running normally.

    4) Listen to the blower

    Power the unit on and listen for the blower. A healthy blower should run consistently. If it sounds weak, surges, rattles, or changes pitch under load, there may be a motor, bearing, or electrical issue. Exact service limits are Unknown (Verify) without the OEM documentation.

    5) Check the helmet air path

    Make sure the helmet inlet, internal air channel, and face seal area are clean and properly installed. A mis-seated component can block or divert airflow. Remove dust or spatter buildup that could interfere with delivery.

    6) Check for alarm conditions

    If the low-flow alarm is active, do not ignore it. The alarm can be triggered by filter loading, airflow restriction, battery issues, or blower faults. If the alarm continues after basic checks, take the unit out of service until the fault is found.

    When to Replace Parts

    If the pre-filter is visibly loaded, replace it before moving on to deeper troubleshooting. For the ESAB Savage A40 PAPR system, use the replacement pre-filter below.

    ESAB Savage A40 PAPR Pre-Filter Replacement, NIOSH Approved, Pack of 5 Filters

    ESAB Savage A40 PAPR Pre-Filter Replacement, NIOSH Approved, Pack of 5 Filters

    Enhance your protection while welding with the ESAB 0700002404 Savage A40 PAPR Pre-Filter. This essential pre-filter acts as a replacement part for the esteemed ESAB Savage A40 Powered Air Purifying Respirator (PAPR) system, ensuring that you maintain optimal air quality while you work in hazardous environments. Designed for professionals, this pack of 5 PAPR pre-filter replacements provides a reliable solution fo…

    View at Arc Weld Store

    Product note: ESAB Savage A40 PAPR Pre-Filter Replacement, NIOSH Approved, Pack of 5 Filters. Compatibility is limited to the listed ESAB Savage A40 PAPR pre-filter replacement application. Verify fitment against your system manual before purchase or installation.

    Safety Notes

    • Do not weld with a PAPR that has weak airflow until the cause is corrected.
    • Replace damaged hoses, cracked housings, and failed filters before returning the unit to service.
    • Follow the OEM inspection and replacement intervals.
    • If the system cannot maintain proper airflow after basic checks, remove it from service and escalate to maintenance or the manufacturer.

    FAQ

    Why does my PAPR helmet feel weak even when the blower is on?

    Most often, the cause is filter loading, a battery that cannot maintain output, or a hose restriction or leak.

    Can a dirty pre-filter cause low airflow?

    Yes. A loaded pre-filter is one of the most common causes of weak airflow and low-flow alarms.

    Should I replace the battery or the filter first?

    Replace or inspect the filter first if it is visibly loaded. If the filter is clean, check the battery and blower performance next.

    What if the airflow is still weak after changing the filter?

    Inspect the hose, battery, blower, and helmet air path. If the issue remains, the fault may be in the blower assembly or another component. Unknown (Verify) without OEM diagnostics.

    Sources Checked

    Category: PAPR Helmet Support

    Related Weld Support Guides

  • ArcOne AP1K-V-BFFVX AirPlus w/Vison BFFVX Kit

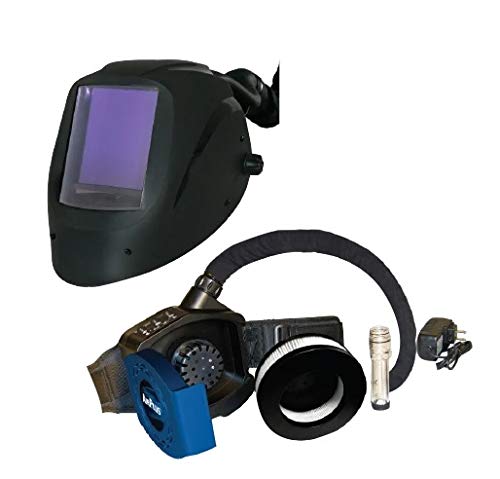
    ArcOne AP1K-V-BFFVX AirPlus w/Vison BFFVX Kit

    Intro
    If you’re looking at a PAPR kit, you’re usually solving one of two problems: fume exposure in real-world shop conditions, or comfort that keeps you wearing protection consistently. The ArcOne AirPlus w/Vison BFFVX kit is a packaged option on ArcWeld.store, but the smart buy depends on verifying what’s included and how it fits your workflow.

    Key Takeaways

    • Treat this as a system purchase: helmet/facepiece + blower + filters + battery (contents: Unknown (Verify)).
    • Fit, seal, and maintenance are the difference between “owned” and “used.”
    • Verify replacement filter availability and part numbers before you commit (Unknown (Verify)).

    Performance & Use
    PAPR setups are about delivering filtered air to reduce exposure and improve comfort during long welding or grinding sessions. The practical performance questions are: does it fit with your hood/helmet setup, does it stay comfortable for a full shift, and can you keep it maintained with readily available consumables.

    What to compare before you buy

    • Included components in the kit (blower unit, battery, charger, hose, headtop/visor) — Unknown (Verify)
    • Filter type and replacement part numbers — Unknown (Verify)
    • Airflow settings and indicators — Unknown (Verify)
    • Compatibility with welding helmet/hood configuration — Unknown (Verify)
    • Weight and belt/strap system comfort — Unknown (Verify)
    • Cleaning procedure and replacement schedule — Unknown (Verify)

    Durability & Build
    PAPR kits live in harsh environments: grinding dust, spatter, and daily handling. Look for protected hose routing, robust connectors, and a battery mount that doesn’t loosen over time. If you can’t confirm these details from manufacturer documentation, mark them Unknown (Verify) and verify before purchase.

    Power / Specs
    ArcWeld.store does not display detailed specs in the scraped view for this listing. Treat all technical specs as Unknown (Verify) until you confirm from ArcOne documentation or the included manual:

    • Battery type/capacity: Unknown (Verify)
    • Runtime: Unknown (Verify)
    • Rated airflow: Unknown (Verify)
    • Filter classification: Unknown (Verify)
    • Applicable standards/compliance: Unknown (Verify)

    Who It’s For

    • Welders doing frequent MIG/flux-core work where fume volume is a daily reality
    • Shops that want a more consistent “wear rate” than disposable masks typically achieve
    • Anyone who needs a reusable system and is willing to maintain filters and clean components

    Quick FAQ
    Q: Is this a respirator replacement for every environment?
    A: Unknown (Verify). Respiratory selection depends on hazards present. Verify with your safety program requirements and manufacturer guidance.

    Q: How often do filters need replacement?
    A: Unknown (Verify). Replacement depends on exposure and filter type. Confirm the exact filter model used in this kit and follow manufacturer guidance.

    Q: Will it work with my current welding helmet?
    A: Unknown (Verify). Confirm the headtop/visor configuration and compatibility with your helmet/hood setup.

    Safety Notes (include verbatim closing line)
    PAPR systems still require correct use, correct filters, and routine inspection. If the system doesn’t fit right or isn’t maintained, protection drops fast. Align selection with your shop’s hazard assessment and follow the manufacturer’s maintenance schedule.
    Always follow the manufacturer’s instructions and your shop’s safety procedures. If you’re unsure about fitment or ratings, verify before you buy or install.

    Where to Buy (ArcWeld.store link + optional Amazon fallback)

    ” target=”_blank” rel=”noreferrer noopener”>
    ArcOne AP1K-V-BFFVX AirPlus w/Vison BFFVX Kit

    ArcOne AP1K-V-BFFVX AirPlus w/Vison BFFVX Kit

    $1,262.62

    In Stock

    View Product
  • Read with Kindle Unlimited