Flap disc edge wear usually happens when the grinder angle is too steep, pressure is excessive, the wrong disc type is being used, or the operator is grinding primarily on the disc edge instead of the face. Premature edge wear reduces abrasive life, creates uneven grinding performance, increases heat buildup, and can damage both the workpiece and grinder.
Common Symptoms
Outer edge of the flap disc wears much faster than the center.
Grinding becomes uneven or difficult to control.
Disc cuts aggressively at first but loses performance quickly.
Visible flap tearing or uneven flap separation.
Increased vibration during grinding.
Excessive heat discoloration on the workpiece.
Likely Causes
Grinding angle too steep: Excessive angle concentrates force on the outer edge of the disc.
Too much pressure: Heavy force overheats and overloads the abrasive flaps.
Incorrect flap disc style: Type 27 and Type 29 discs perform differently depending on grinding angle and application.
Wrong grit selection: Coarse grits used for finishing work can wear unevenly.
Improper grinder RPM: Overspeeding increases edge stress and heat generation.
Using the edge like a grinding wheel: Flap discs are designed primarily for face contact, not aggressive edge digging.
Inspection Steps
Inspect flap wear pattern across the full disc face.
Verify grinder RPM matches the flap disc rating.
Check grinding angle during operation.
Inspect for excessive heat discoloration or flap glazing.
Verify correct flap disc style and grit for the application.
Inspect grinder spindle and backing flange condition.
Visual Wear Indicators
Outer edge worn down faster than the center.
Missing or torn abrasive flaps.
Glazed abrasive surface from overheating.
Uneven flap height around the disc.
Discoloration from excessive grinding heat.
Common Wrong-Part Mistakes
Using Type 27 discs where Type 29 geometry is more appropriate.
Running flap discs above rated RPM.
Using coarse grinding discs for fine finishing applications.
Using worn backing flanges that create disc instability.
Field Fix vs Proper Fix
Field fix: Reduce grinding pressure, flatten the grinder angle slightly, and rotate the disc contact area more evenly. Proper fix: Select the correct flap disc geometry, grit, RPM range, and grinder setup for the application while correcting operator technique issues.
Always follow abrasive RPM ratings and grinder compatibility requirements. Use face shields, gloves, hearing protection, and safety glasses when grinding. Never use damaged or delaminating flap discs.
A grinding wheel that wobbles during operation is usually caused by damaged flanges, incorrect wheel mounting, bent spindles, worn bearings, improper wheel storage, or using the wrong wheel for the grinder. Even minor wheel runout can reduce grinding accuracy, overload bearings, increase vibration, and create a dangerous wheel failure risk at operating RPM.
Common Symptoms
Visible side-to-side wheel movement during rotation.
Vibration through the grinder body or handle.
Uneven grinding marks or gouging.
Premature edge wear on flap discs or grinding wheels.
Difficulty maintaining straight cuts.
Excessive operator fatigue from vibration.
Likely Causes
Improper wheel mounting: Dirt, burrs, or metal debris trapped behind the wheel prevent proper seating.
Damaged mounting flanges: Bent or worn flanges create uneven clamping pressure.
Bent spindle shaft: Impact damage from dropped grinders commonly bends spindle assemblies.
Worn grinder bearings: Bearing play allows oscillation under load.
Wheel damage: Cracked, warped, moisture-damaged, or expired wheels may not rotate true.
Incorrect wheel selection: Oversized or incompatible wheels create instability and imbalance.
Inspection Steps
Disconnect grinder power before inspection.
Remove the wheel and clean both flange surfaces completely.
Inspect the abrasive wheel for cracks, chips, or uneven wear.
Check spindle runout manually while rotating the shaft slowly.
Verify wheel RPM rating exceeds grinder RPM.
Inspect arbor fitment and mounting hardware compatibility.
Common Wrong-Part Mistakes
Installing wheels with incorrect arbor sizes.
Running cut-off wheels sideways as grinding wheels.
Using missing or incorrect flange washers.
Using moisture-damaged abrasive wheels from poor storage.
Field Fix vs Proper Fix
Field fix: Remove and remount the wheel correctly, clean flange surfaces, and replace visibly damaged abrasives. Proper fix: Replace bent spindles, worn bearings, damaged flanges, or incorrect wheel assemblies. Persistent wobble should never be ignored on high-speed grinders.
Ignored Failure Consequences
Operating with a wobbling grinding wheel increases the chance of wheel breakage, grinder damage, poor surface finish, operator fatigue, and severe injury from abrasive wheel fragmentation.
Safety Notes
Always follow abrasive RPM ratings and mounting instructions. Never use cracked wheels. Use face shields, gloves, hearing protection, and safety glasses when troubleshooting grinders and abrasive equipment.
A plasma cutter that fails to cut through material typically indicates issues with air supply, consumables, or machine setup. This problem reduces cut quality, increases dross, and can damage the torch if ignored. Diagnosing the root cause quickly restores performance and prevents unnecessary wear.
Key Takeaways
Insufficient air pressure is a leading cause of poor cutting performance
Worn consumables reduce arc energy and cut penetration
Slow or inconsistent travel speed affects cut-through
Moisture in air supply degrades plasma arc quality
Problem / Context
Plasma cutting relies on a high-temperature ionized gas stream to melt and eject metal. When any part of the system—air supply, power, or consumables—is compromised, the arc loses effectiveness. This results in incomplete cuts, excessive slag, or arc instability.
Root Causes
Low air pressure: insufficient airflow reduces arc force
Moisture contamination: water in air disrupts plasma stability
Worn consumables: degraded electrodes and nozzles reduce performance
Incorrect amperage: not matched to material thickness
Slow travel speed: excessive heat buildup without full penetration
Poor ground connection: unstable arc behavior
Solution / Explanation
Verify air pressure meets machine specifications
Install air dryers or filters to remove moisture
Replace consumables regularly based on wear
Adjust amperage according to material thickness
Maintain consistent travel speed during cutting
Ensure clean and secure ground clamp connection
Specs / Verification Notes
Air Pressure: Unknown (Verify per machine manual)
Amperage Range: Machine dependent
Consumable Life: Usage dependent
Cut Thickness Capacity: Unknown (Verify)
Air Quality Requirement: Dry, oil-free air
Comparison Table
Cause
Symptom
Impact
Fix
Low Air Pressure
Weak arc
No full cut-through
Increase pressure
Worn Consumables
Wide arc
Poor cut quality
Replace parts
Moisture in Air
Arc sputtering
Inconsistent cuts
Dry air supply
Low Amperage
Slow cutting
Incomplete penetration
Increase output
Safety Notes
Follow ANSI Z49.1 safety standards for plasma cutting. Ensure proper grounding and use appropriate PPE including eye protection and gloves. Never operate a plasma cutter with damaged consumables or unstable air supply.
FAQ
Why is my plasma cutter not cutting all the way through?
This is usually caused by low air pressure, worn consumables, or incorrect amperage settings.
Can bad air quality affect plasma cutting?
Yes. Moisture or oil in the air supply disrupts the plasma arc and reduces cutting efficiency.
How often should consumables be replaced?
Replacement depends on usage and material, but worn consumables should be changed as soon as cut quality declines.
Next Step
Check air supply quality and consumable condition before the next cut. Adjust settings based on material thickness and confirm stable operation on scrap material.
A plasma cutter that fails to pierce metal will produce arc instability, excessive spatter, or no full penetration. This issue is typically related to air supply, consumable wear, or incorrect setup parameters. Identifying the restriction point in the system is critical for restoring proper cut initiation.
Key Takeaways
Insufficient air pressure is a leading cause of failed pierce
Worn consumables disrupt arc focus and energy transfer
Incorrect amperage or travel setup prevents full penetration
Material thickness must match machine capability
Problem / Context
Plasma cutting relies on a high-velocity ionized gas stream to melt and eject metal. When the system cannot pierce, the arc may start but fail to transfer enough energy into the material. This results in surface gouging instead of a full cut-through.
Root Causes
Low air pressure or flow: weak arc and poor metal ejection
Moisture in air supply: destabilizes plasma arc
Worn electrode or nozzle: reduces arc concentration
Excessive stand-off distance: arc loses intensity before contact
Material too thick: exceeds machine rating
Solution / Explanation
Verify air compressor output meets cutter requirements (pressure and CFM)
Install a moisture separator or dryer to remove water contamination
Inspect and replace consumables if wear is visible
Set amperage appropriate to material thickness
Maintain correct torch height during pierce and cut
Confirm material thickness is within rated capacity
Specs / Verification Notes
Air Pressure Requirement: Unknown (Verify)
Air Flow (CFM): Unknown (Verify)
Amperage Range: Machine dependent
Maximum Pierce Thickness: Unknown (Verify)
Consumable Type: Model-specific
Comparison Table
Issue
Symptom
Correction
Low Air Pressure
Weak arc, no penetration
Increase PSI/CFM
Worn Consumables
Wide arc, spatter
Replace electrode/nozzle
Moisture in Air
Arc instability
Add dryer/filter
Incorrect Settings
Incomplete pierce
Adjust amperage
Safety Notes
Follow ANSI Z49.1 for safe cutting practices. Ensure proper ventilation and use appropriate eye and face protection rated for plasma cutting. Disconnect power before servicing consumables or air systems.
FAQ
Why won’t my plasma cutter pierce thick steel?
The material may exceed the machine’s rated pierce capacity or settings may be too low.
Does air pressure affect piercing?
Yes. Low pressure reduces arc force and prevents molten metal from being expelled.
How often should consumables be replaced?
Replace when wear is visible or cut quality declines. Frequency depends on usage and material.
Next Step
Check air supply and inspect consumables before the next cut. Correct setup and maintenance resolve most piercing failures without equipment changes.
Intro: Grinding and chipping slag by hand takes time and wears out your wrists. An electric needle scaler—like this 1100W Beachtiful model—removes rust, scale, and light slag fast without the dust cloud of a grinder. Learn when to reach for it, how to set it up safely, and what to watch for on the job.
Key Takeaways
1100W electric needle scaler removes rust, scale, and light slag quickly
Handheld design fits tight spaces and curved surfaces better than angle grinders
Lower dust and noise than grinding; reduces respiratory exposure on repetitive jobs
Ideal for prep work before welding, paint removal, and surface cleaning
Requires proper PPE and ventilation; not a substitute for full respiratory protection
No products found.
Performance & Use
The Beachtiful 1100W needle scaler delivers rapid-fire impacts (up to 3,000 strokes per minute) that chip away rust, mill scale, and light slag without overheating the base metal. The compact handheld design lets you work in tight corners, around welds, and on curved surfaces where an angle grinder would be awkward or unsafe.
What to compare before you buy
Power and stroke rate: 1100W with ~3,000 strokes/min is mid-range; verify against your shop’s duty cycle needs
Noise level: Electric needle scalers run quieter than grinders (~90 dB) but still require hearing protection
Dust generation: Produces less dust than grinding but still requires local exhaust or respiratory PPE
Grip and weight: Handheld design (~5–7 lbs typical); test for comfort during extended use
Corded vs. cordless: This model is corded; verify power outlet access on your job site
Heavy-duty steel housing and tungsten carbide needle tips resist wear and impact damage. The motor is sealed to reduce dust ingestion. Replaceable needle cartridges extend tool life and keep costs down on high-volume prep jobs. Vibration dampening in the handle reduces fatigue on longer shifts.
Who It’s For
Fabrication shops doing high-volume prep work before welding or painting
Maintenance crews removing rust and scale from structural steel or equipment
Welding instructors teaching surface prep techniques in controlled environments
Field crews working in tight spaces where grinders are impractical or unsafe
Painters and coaters prepping surfaces before application
Quick FAQ
Q: Can I use this instead of a grinder? A: For light rust and scale, yes. For heavy mill scale or thick coatings, a grinder is faster. Use both as needed.
Q: Does it create a lot of dust? A: Less than grinding, but still requires ventilation or respiratory PPE. Use in well-ventilated areas.
Q: How long do the needle tips last? A: Typically 20–40 hours of continuous use; replacements are inexpensive and widely available.
Q: Is it safe for aluminum? A: Yes, but use light pressure to avoid gouging soft aluminum surfaces.
Q: What’s the noise level? A: ~90 dB; hearing protection is required for extended use.
Safety Notes
Always wear safety glasses and hearing protection (ANSI S3.19 rated)
Use respiratory PPE (N95 minimum; P100 for heavy scale work) in poorly ventilated areas
Inspect needle cartridge for damage before each use; replace if bent or broken
Keep work area well-ventilated to manage dust and fumes
Follow OSHA guidelines for dust exposure limits (PEL: 5 mg/m³ for general dust)
Never operate with wet hands or in wet conditions
Where to Buy
Shop verified ASINs on Amazon with affiliate links:
Needle scalers are not “finish tools.” They’re for aggressive removal of weld slag, rust, and stubborn coatings where a flap disc, wire wheel, or scraper is slow—or where you’re trying to get into irregular surfaces and corners.
This post covers what to verify before buying the Beachtiful Electric Needle Scaler (1100W), where it fits in a welding workflow, and what it will not do (so you don’t buy it expecting grinder-like results).
No products found.
What a needle scaler is best at
A needle scaler uses a bundle of moving needles to “chip” at surface contamination. In welding/fab work, it’s typically used for:
Slag removal after certain processes (especially where slag is heavy or access is awkward)
Rust and coating removal during repair prep
Cleaning irregular surfaces where a disc can’t sit flat
It’s not a replacement for final surface conditioning. Most jobs still need a follow-up pass (wire wheel, flap disc, sanding) depending on your finish requirements.
Performance & Use
What to compare before you buy
Power and duty expectations: The listing states “1100W” in the title; verify the electrical requirements and whether it matches your shop power.
Needle replacement availability: Confirm replacement needle sets are easy to source (Unknown (Verify) unless clearly listed).
Vibration and control: Needle scalers can be fatiguing. Look for grip/handle design that supports two-hand control.
Access vs grinder: If you mainly need flat-surface blending, a flap disc may be faster. If you need corners/irregular surfaces, the scaler can win.
Noise and debris management: Plan for hearing protection and eye/face protection. Debris can eject unpredictably.
Plasma cutters use ionized gas to cut conductive metals. Choosing the right cutter depends on material thickness, duty cycle, air supply, and cut quality requirements—not just amperage rating.
Key Specifications Explained
Amperage Rating & Cut Capacity
Amperage
Recommended Cut
Maximum Cut
Typical Material
20-30A
1/8”-3/16”
1/4”
Sheet metal, auto body, HVAC
40-50A
1/4”-3/8”
1/2”
Light fabrication, farm repair
60-80A
3/8”-1/2”
3/4”
General fabrication, structural steel
85-100A
1/2”-3/4”
1”
Heavy fabrication, thick plate
Recommended cut = Clean cut with minimal dross (slag on bottom edge) Maximum cut = Severance cut (rough edge, heavy cleanup required)
Rule of thumb: Buy 20-30% more amperage than your typical material thickness for clean cuts and longer consumable life.
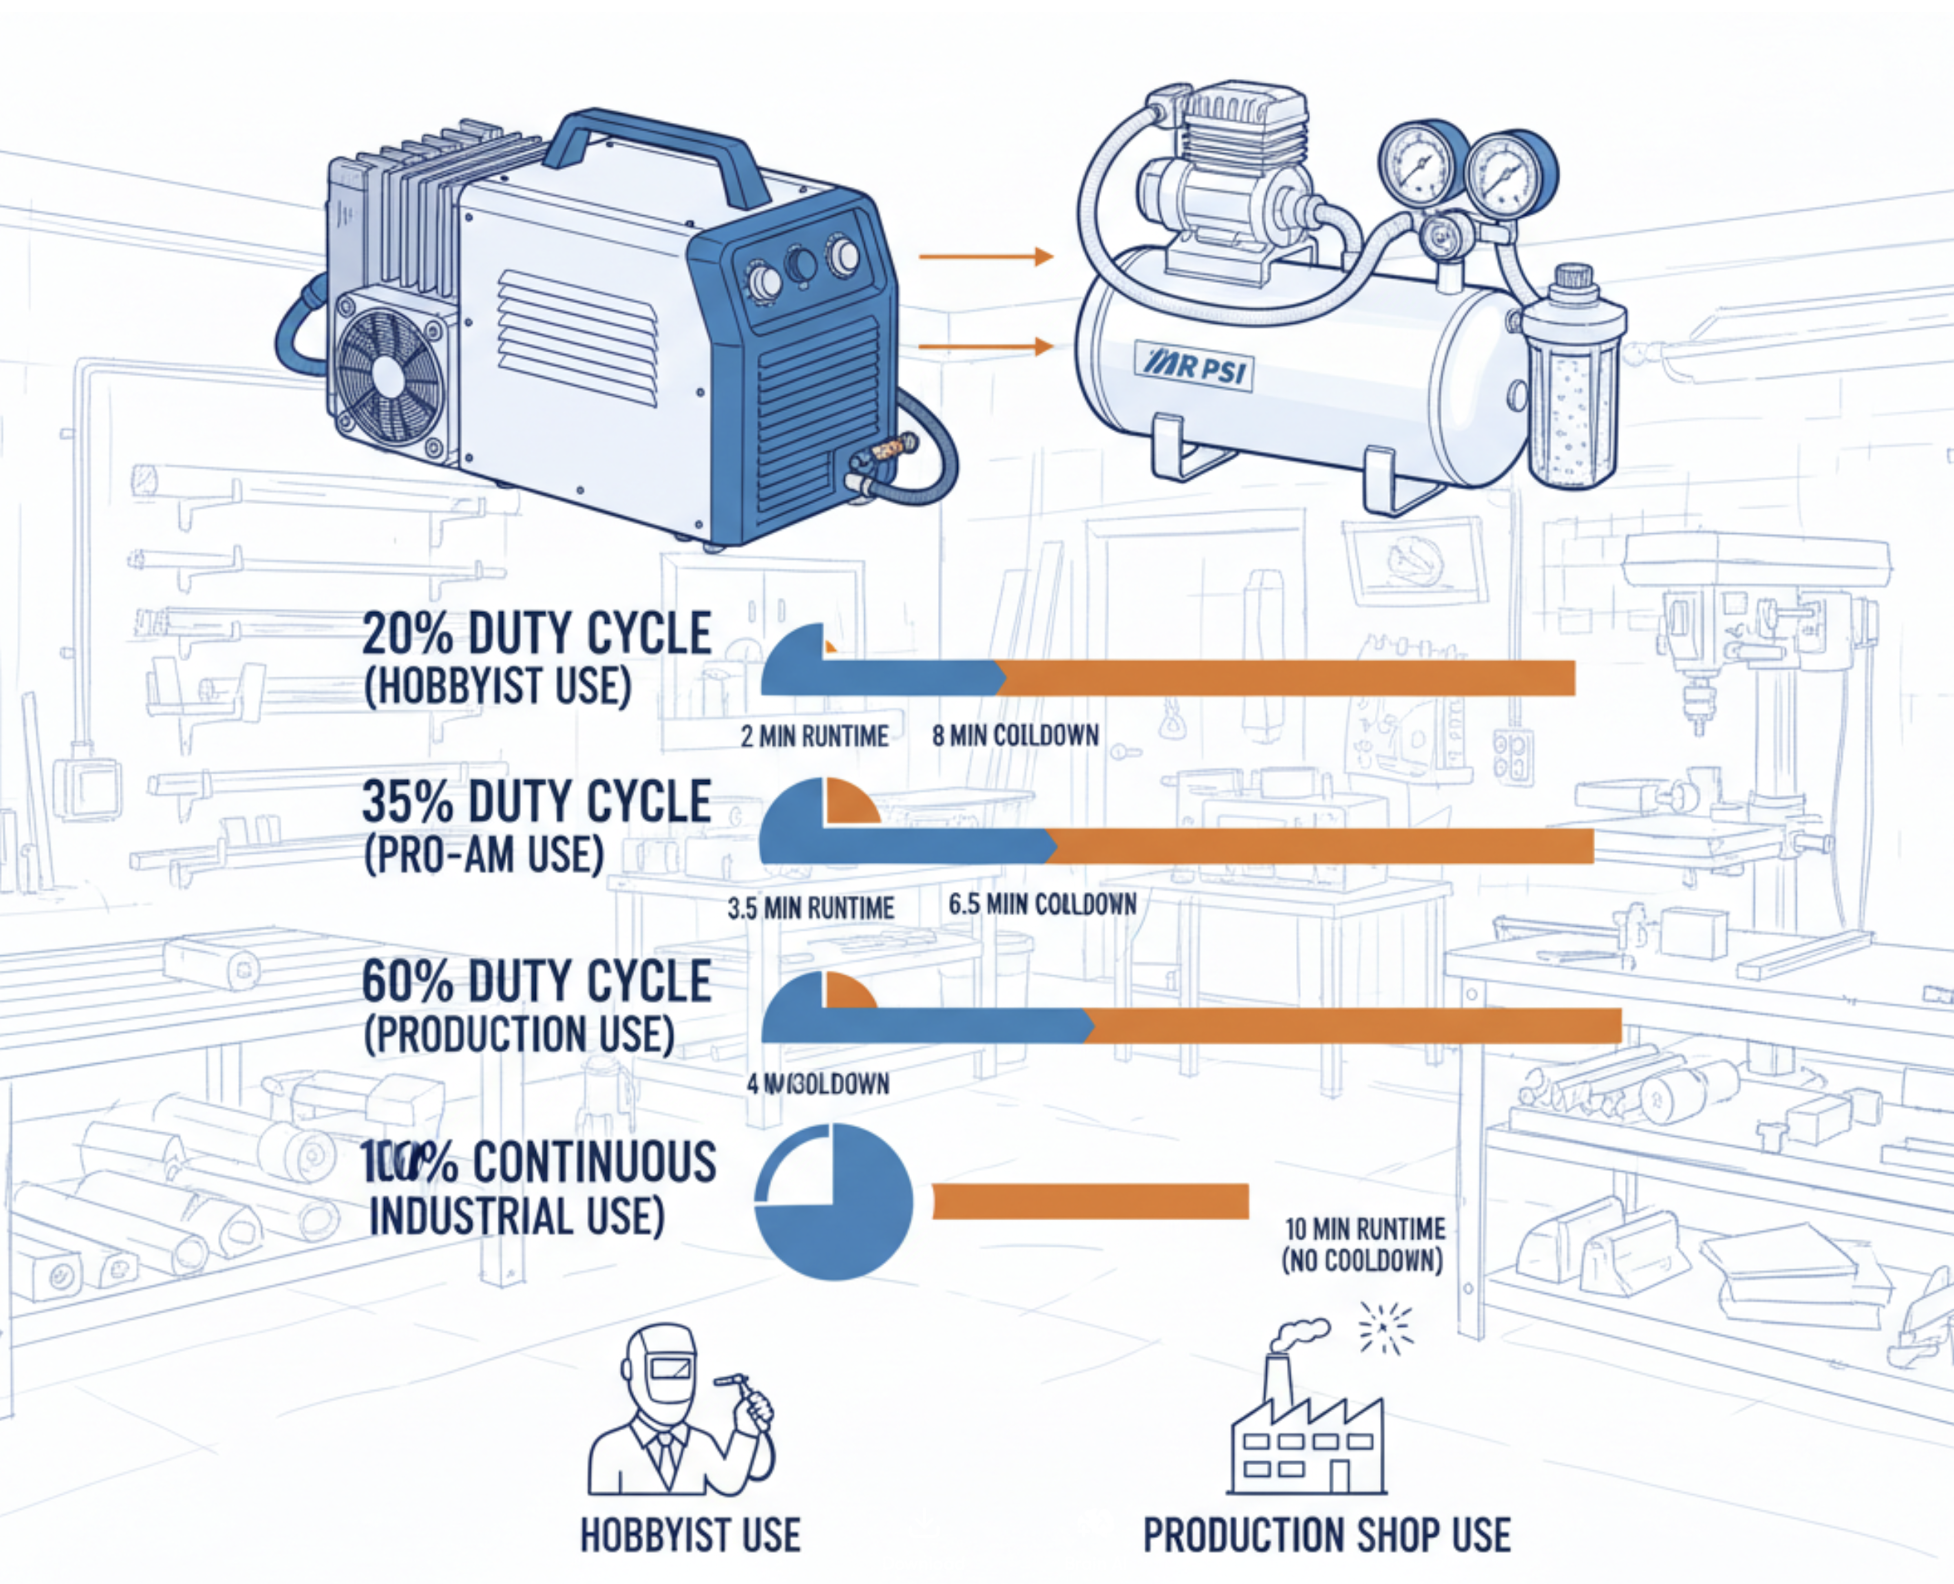
Duty Cycle
Definition: Percentage of 10-minute period the machine can run at rated amperage before requiring cooldown.
Duty Cycle
Runtime @ Max Amps
Cooldown
Use Case
20%
2 min
8 min
Hobbyist, occasional use
35%
3.5 min
6.5 min
Light fabrication, DIY
60%
6 min
4 min
Production shop, frequent use
100%
10 min
0 min
Industrial, continuous operation
Example: 50A cutter with 35% duty cycle can run 3.5 minutes at 50A, then must cool 6.5 minutes. At lower amperage: Duty cycle increases (50A cutter at 30A may have 60-80% duty cycle).
Dual Voltage (120V/240V): – Runs on both voltages with reduced performance on 120V – Example: 50A on 240V, 30A on 120V – Best for: Portable use + shop capability
Cut Quality Factors
Pilot Arc vs. Contact Start
Pilot Arc (High-Frequency Start): – Arc initiates without touching workpiece – Pros: Cuts expanded metal, grating, rusty/painted steel – Cons: Higher cost, can interfere with electronics – Best for: Versatile cutting, field work
Contact Start (Scratch Start): – Requires torch tip contact with workpiece to start arc – Pros: Lower cost, no electronic interference – Cons: Cannot cut expanded metal or start on edge – Best for: Budget cutters, clean flat plate
Inverter vs. Transformer Technology
Inverter-Based: – Weight: 10-40 lbs (portable) – Efficiency: High (lower power consumption) – Duty cycle: Typically higher (35-60%) – Cost: Moderate to high – Best for: Modern shops, portability required
Transformer-Based: – Weight: 80-200 lbs (stationary) – Efficiency: Lower (higher power draw) – Duty cycle: Often 100% (industrial use) – Cost: Higher upfront, lower long-term maintenance – Best for: Heavy industrial, continuous operation
Consumable Costs & Life
Consumable Components
Part
Function
Typical Life
Cost per Set
Electrode
Conducts current to arc
1-3 hours cutting time
$3-$8
Nozzle (tip)
Focuses plasma stream
1-3 hours cutting time
$2-$5
Swirl ring
Stabilizes gas flow
5-10 hours
$1-$3
Shield cup
Protects nozzle
10-20 hours
$2-$5
Consumable life factors: – Amperage setting (higher amps = shorter life) – Air quality (moisture/oil reduces life 50%+) – Arc-on time (duty cycle) – Proper technique (perpendicular torch angle, correct standoff)
Insulated grip: Protects from heat during extended use
Common Mistakes
Undersizing amperage for material thickness 40A cutter on 1/2” steel = slow, rough cuts and rapid consumable wear. Size cutter 20-30% above typical thickness for clean cuts.
Using contaminated air supply Moisture and oil in compressed air destroy consumables in 10-20% of normal life. Always use inline air dryer/filter.
Running at maximum amperage continuously Exceeds duty cycle, triggers thermal shutdown. Run at 70-80% of rated amperage for longer duty cycle and consumable life.
Buying Checklist
✓ Amperage rating 20-30% above typical material thickness
✓ Duty cycle matches usage frequency (35%+ for regular use)
✓ Input voltage compatible with available power (120V or 240V)
✓ Pilot arc start for versatile cutting (expanded metal, rusty steel)
✓ Inverter technology for portability and efficiency
✓ Compressor meets CFM and PSI requirements
✓ Air dryer/filter included or purchased separately
Victor’s ST900FC is a workhorse torch handle for oxy-fuel cutting and heating. It’s the current flow-control version of the classic 100-series design, built for reliability in fabrication shops, maintenance departments, and field repair work. This guide covers specs, performance details, and selection notes for welders and fabricators.
Key Takeaways
Heavy-duty Victor 0381-1621 torch assembly
Part of Victor’s ST900FC line with built-in Flash-Guard® check valves
Compatible with standard Victor cutting attachments (CA1350, CA2460 series, etc.)
Brass body, high-flow valves, rugged construction for shop or field use
Solid choice for oxy-fuel cutting, gouging, and preheat/heating work
What the ST900FC Solves
1. Flashback protection
Built-in Flash-Guard® check valves help meet OSHA/ANSI recommendations for flashback prevention.
Use flashback arrestors or check valves per ANSI Z49.1 and OSHA 1910.253.
Open oxygen valves slowly to avoid pressure shock.
Purge hoses before lighting the torch.
Wear Z87.1-rated eye/face protection.
Use fuel-specific tips — propane tips differ from acetylene tips.
FAQ
Does the ST900FC include a cutting attachment? Yes, because this is a one piece torch. Most boxed assemblies include only the torch handle. Cutting attachments are typically sold separately.
Is it compatible with my existing Victor tips? Yes — when used with the correct Victor cutting attachment. It uses 1 Series tips.
Can I run propane? Yes. Use propane-rated cutting/heating tips and proper hose ratings.
Is this considered a heavy-duty torch? Yes. The ST900FC is in Victor’s heavy-duty line.
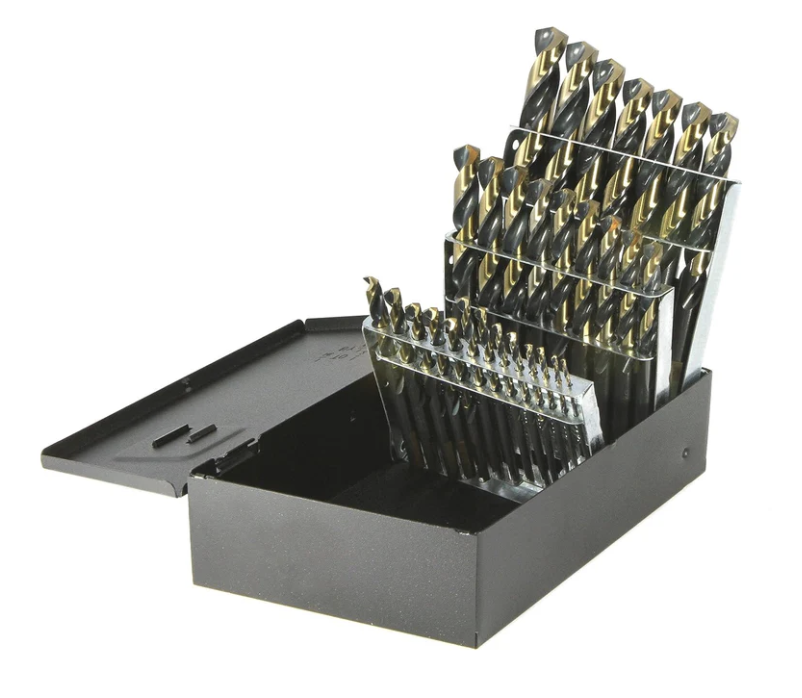
A dependable bit set matters when you’re drilling mild steel, stainless, aluminum, or shop-grade alloys. The Drillco 350N29 is a 29-piece high-speed steel (HSS) mechanics-length set designed for fabrication and repair work where standard length bits tend to walk or flex. This guide breaks down what you’re getting, how it performs, and whether it belongs in a welding/fabrication shop.
Key Takeaways
29-piece mechanics-length set covering 1/16–1/2 in. in 1/64 increments
HSS construction with a 135° split point (per manufacturer spec) reduces walking on steel and stainless
Mechanics length = shorter, stronger, less flex vs. jobber length
Durable steel index case with clear sizing
Strong general-purpose set for welders, fabricators, and maintenance crews
What This Bit Set Solves
Mechanics-length bits solve three common shop issues:
1. Bit walk on steel
The 135° split point helps seat the bit fast. No punching required on lighter gauge material.
2. Excessive flex
Shorter length reduces chatter and breakage when drilling structural steel, brackets, and plate.
3. Inconsistent sizing
Full 1/64 increments fill the gaps that most budget sets skip—important for bolt-hole accuracy.
Performance & Build Notes
Material: High-speed steel (HSS)
Angle: 135° split point (manufacturer specification; improves center-starting)
Length: Mechanics length (shorter than jobber, stronger in handheld drilling)
Case: Metal indexed box with positive stops
Best applications: Mild steel, stainless, aluminum, cast, general shop drilling
Limitations: Not cobalt—under heavy stainless production use, cobalt will outlast it
High-speed steel tools are good for most general purpose applications, offering a combination of hardness and toughness for wear resistance
Gold oxide is a thinner oxide surface treatment than black oxide typically used to identify cobalt steel tools; performance is similar to uncoated tools
These round shank tools have flats ground onto three sides to reduce slippage of the bit when used in drill chucks
When run in a counterclockwise direction (right-hand cut) spiral fluted tools evacuate chips up and out of the cut to reduce clogging
29 screw machine length drill bits ranging in size from 1/16″ to 1/2″ in 1/64″ increments
Last update on 2026-07-14 / Affiliate links / Images from Amazon Product Advertising API
Disclosure: This article contains affiliate links. As an Amazon Associate, I earn from qualifying purchases.
Comparison Table
Model
Key Specs
Best For
Drillco 350N29
29-pc, HSS, 135° split point, 1/16–1/2″
Fabrication, maintenance, general metal drilling
Is the Drillco 350N29 Worth It?
If you’re drilling metal regularly and need reliable sizes, the 350N29 sits in a sweet spot:
Stronger than jobber length
More accurate than 13-pc economy sets
Affordable compared to cobalt machinist sets
For general welding/fabrication work, it’s a solid long-term shop set.
Safety Notes (AWS/ANSI References)
Use ANSI-rated eye protection (ANSI Z87.1).
Secure workpieces with clamps per AWS fabrication guidelines.
Keep drill speed appropriate to HSS: reduce RPM on stainless and thicker plate to prevent overheating.
Use cutting fluid on steel to extend bit life.
FAQ
Does this set include cobalt? No. It’s HSS only. For heavy stainless or repetitive production drilling, consider cobalt.
Are the bits replaceable individually? Drillco sells single bits; availability varies by vendor.
Will these work in a drill press? Yes. Mechanics-length bits are stable and reduce wander.
Do they handle stainless? Yes—within reason. Use slower RPM and cutting oil.
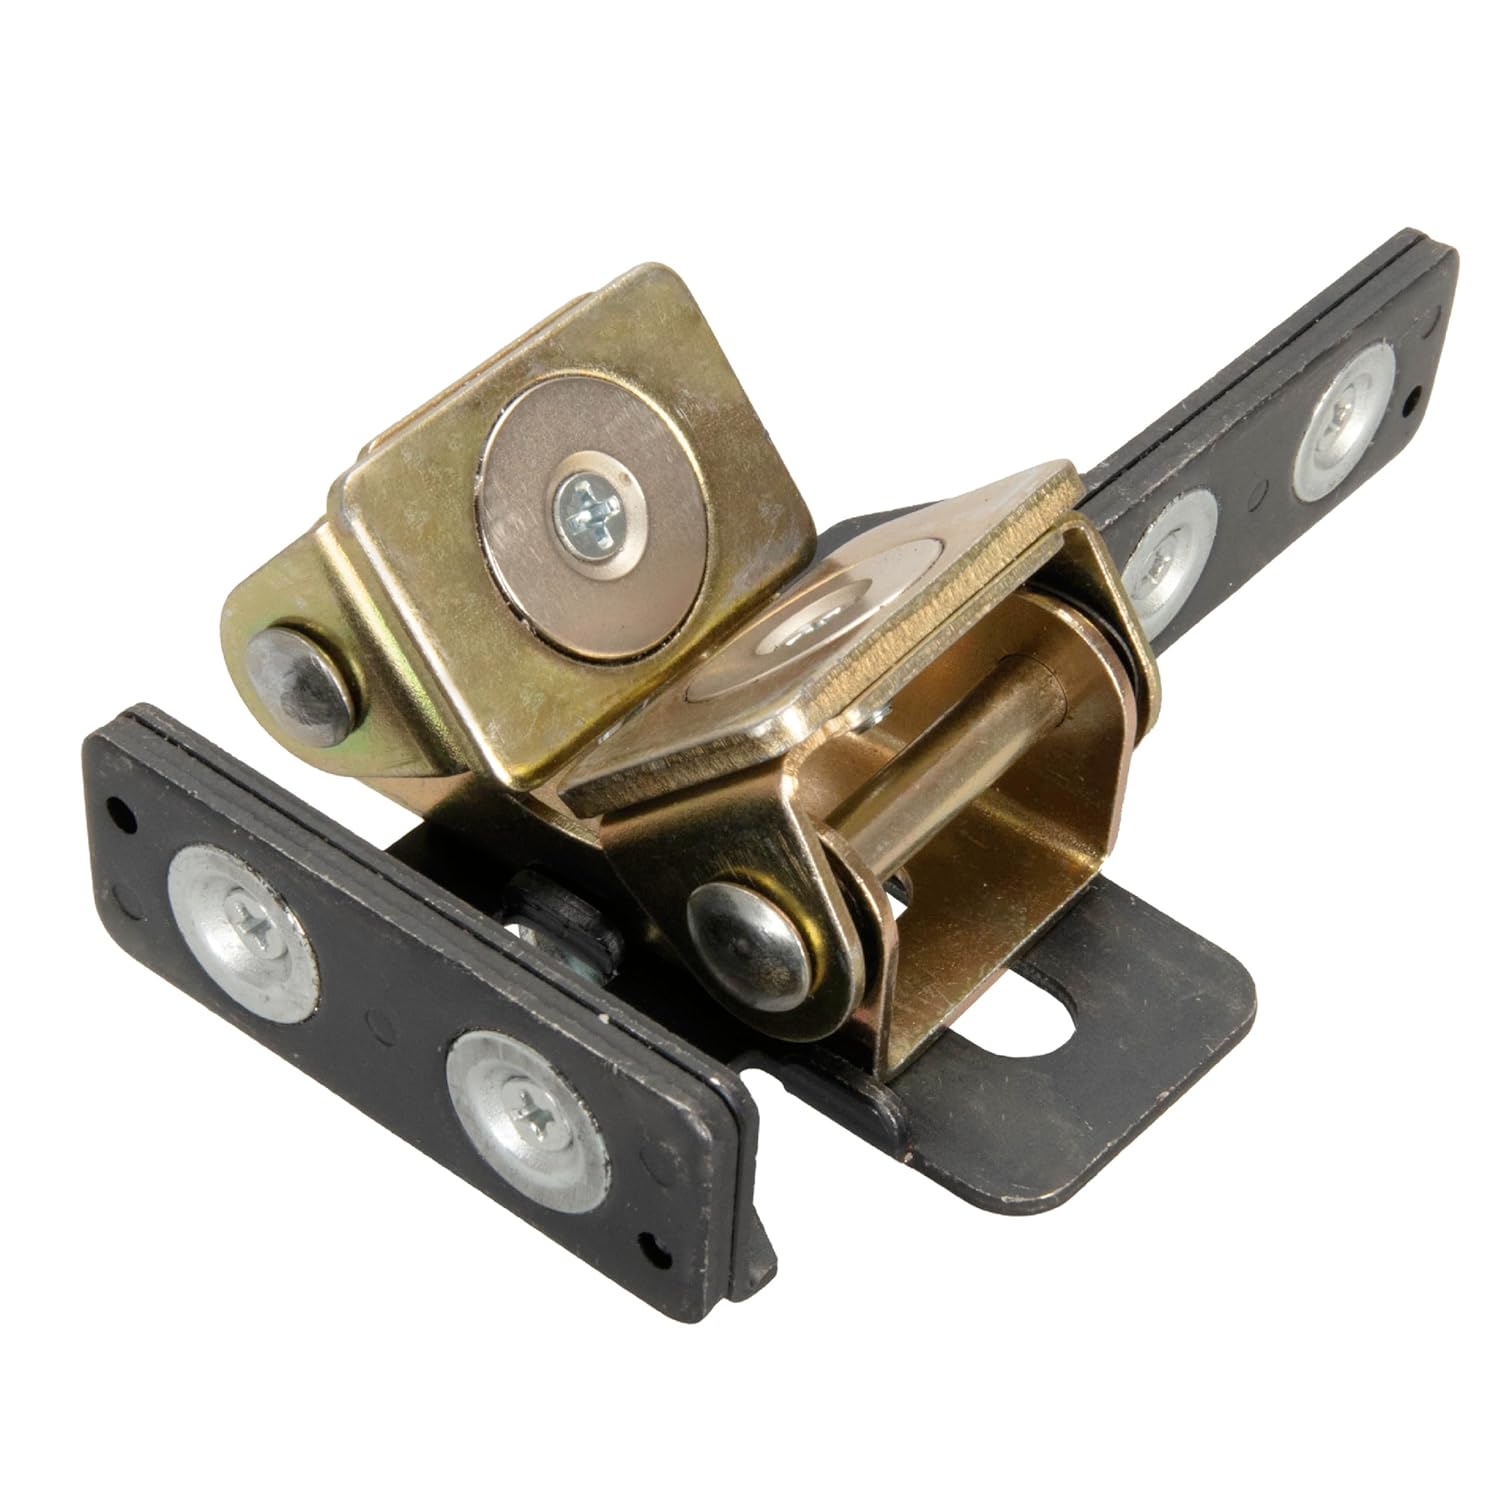
The Strong Hand Tools MET11 Mini MagTab is one of those small, under-$20 fixtures that ends up earning a permanent place on the bench. It’s a compact magnetic clamp designed for holding tabs, flat bar, flanges, and small brackets square during tack welding. For layout, light fab, and repeated parts alignment, the Mini MagTab solves a real problem: securing small pieces accurately without bulky clamps.
Key Takeaways
Holds small brackets, tabs, and flat bar square during fit-up.
Compact design fits places larger magnets can’t.
Adjustable V-shaped face for tubing and irregular parts.
Replaceable pads extend service life.
Ideal for TIG and MIG layout work where speed and accuracy matter.
What the Mini MagTab Solves
Regular welding magnets struggle with:
Small parts
Tight spaces
Consistent 90° alignment
Thin materials that shift under clamp pressure
The MET11 addresses these issues by combining a precision 90° face, a pivoting V-block, and a low-profile body that doesn’t fight you during tack welding. It’s built for repetitive work and small-part fabrication — handrails, brackets, gussets, race-car tabs, control-arm brackets, or anything where placement accuracy matters.
Features & Build
Body: Steel housing with replaceable pads Magnet Type: Permanent magnet Faces: 90° fixed face + adjustable V-face Adjustment: Slotted hardware for micro-alignment Applications: Brackets, tabs, 1/2″–1-1/2″ tube, flat bar, sheet fab Heat Considerations: As with all magnetic fixtures, avoid excessive heat exposure; remove before completing full welds.
Performance in the Shop
The MET11 shines when:
Holding two small parts at 90°
Aligning tabs on round tube
Keeping parts from drifting while tacking
Doing repetitive work where speed matters
The magnet strength is balanced — strong enough to hold parts reliably, but not so aggressive that it “snaps” pieces out of alignment.
Can the Mini MagTab hold heavy parts? It’s designed for small and medium-light parts. For thicker brackets, pair it with a mechanical clamp.
Can it be used on stainless or aluminum? The magnet won’t stick directly to non-ferrous metals, but it can support steel fixtures that hold stainless/aluminum parts in place.
Does the heat from TIG arcs damage it? Prolonged heat will weaken any magnet. Remove the MagTab after tack welding.
Are the pads useful long term? Yes — the replaceable pads extend life and keep the faces accurate.
Sources Checked
Strong Hand Tools product materials
Manufacturer datasheets
Manage Consent
To provide the best experiences, we use technologies like cookies to store and/or access device information. Consenting to these technologies will allow us to process data such as browsing behavior or unique IDs on this site. Not consenting or withdrawing consent, may adversely affect certain features and functions.
Functional
Always active
The technical storage or access is strictly necessary for the legitimate purpose of enabling the use of a specific service explicitly requested by the subscriber or user, or for the sole purpose of carrying out the transmission of a communication over an electronic communications network.
Preferences
The technical storage or access is necessary for the legitimate purpose of storing preferences that are not requested by the subscriber or user.
Statistics
The technical storage or access that is used exclusively for statistical purposes.The technical storage or access that is used exclusively for anonymous statistical purposes. Without a subpoena, voluntary compliance on the part of your Internet Service Provider, or additional records from a third party, information stored or retrieved for this purpose alone cannot usually be used to identify you.
Marketing
The technical storage or access is required to create user profiles to send advertising, or to track the user on a website or across several websites for similar marketing purposes.