Cutting and grinding create high-velocity particles, sparks, and hot metal spatter. Standard safety glasses alone may not be enough for every task. The correct eye and face protection depends on the process, the work area, and whether the operator needs impact protection, splash protection, or full face coverage.
Key Takeaways
Use impact-rated eye protection for every cutting and grinding task.
Match the protection level to the hazard: dust, chips, sparks, spatter, or chemical splash.
Safety glasses do not replace a face shield when the face needs coverage.
Face shields are typically worn over primary eye protection, not by themselves.
Inspect lenses, frames, straps, and shields before each use.
What Hazards Matter in Cutting and Grinding
Common hazards include abrasive particles, wire-wheel debris, grinder sparks, grinding-wheel fragments, hot scale, and metal chips from cutting or drilling. Eye injuries often happen when debris enters from the side, under the frame, or after the lens is damaged.
For grinding, the main concern is direct impact from particles and side entry from dust and chips. For cutting, especially with abrasive wheels or torches, hot sparks and spatter can add a burn hazard to the eye and face.
How to Select Eye and Face Protection
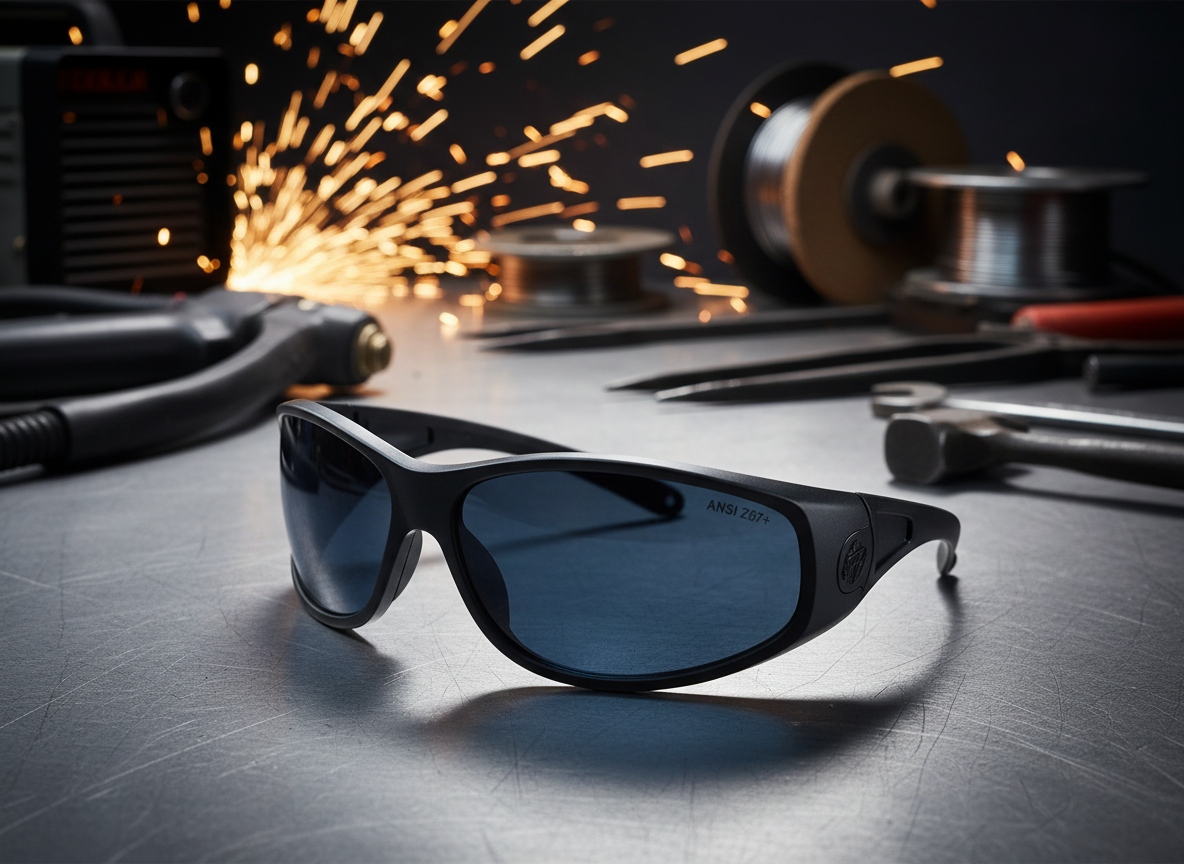
Safety glasses: Use impact-rated glasses for most shop tasks. Wraparound coverage helps reduce side entry.
Goggles: Use when dust or fine particles can get under standard glasses. Sealed styles provide better enclosure.
Face shields: Use for face coverage from sparks, chips, and grinding debris. Wear over primary eye protection.
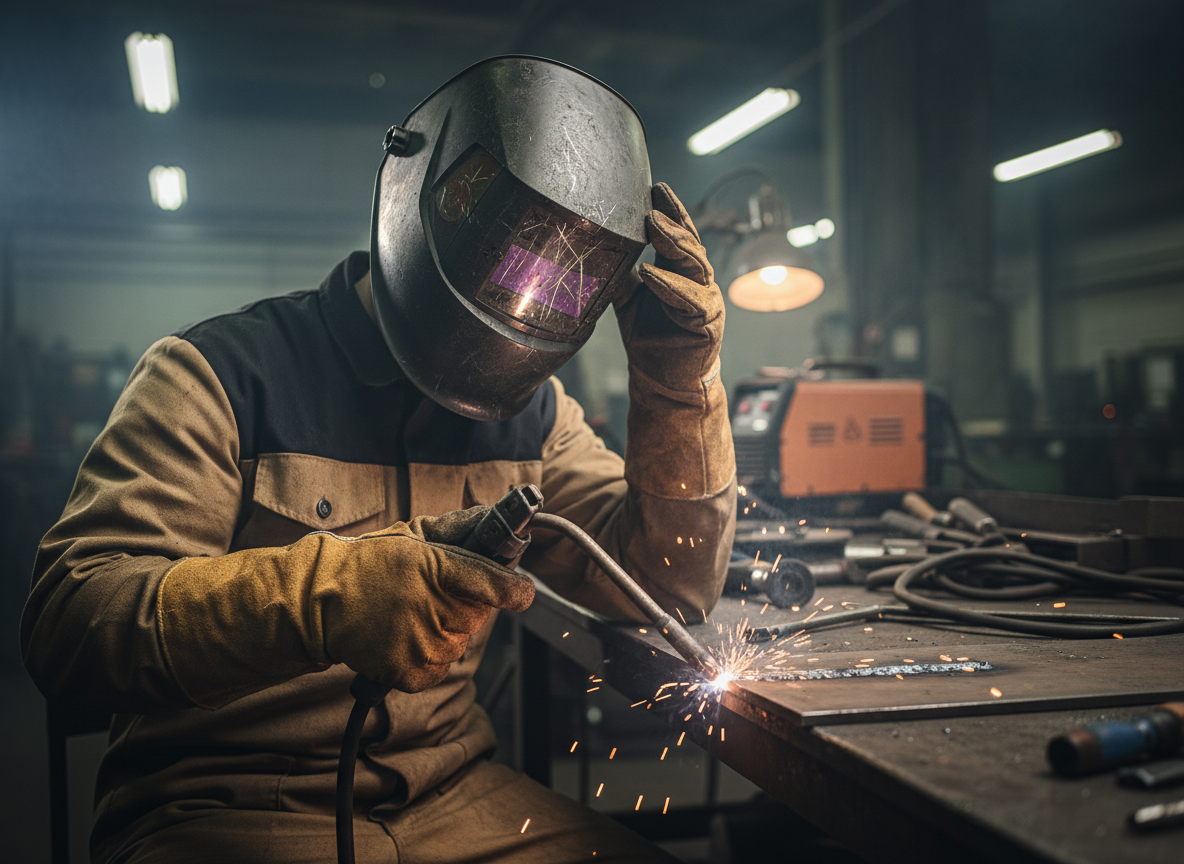
Welding helmets: Use when welding arc exposure is present. A welding helmet is not a substitute for all cutting and grinding hazards.
Frame fit matters. Gaps at the temples, nose bridge, or bottom edge reduce protection. If the operator bends, reaches, or works overhead, a better-fitting style may be needed.
Inspection and Support Checklist
Check lenses for scratches, cracks, pitting, and heat damage.
Check face shields for clouding, impact marks, and broken mounting points.
Check headgear, straps, and adjusters for wear or loss of tension.
Replace damaged items immediately.
Confirm the protection is clean enough for visibility.
Use a closer-fitting wraparound style or switch to goggles. Check for poor fit at the nose bridge or temples.
Problem: Lenses fog during work
Move to anti-fog lenses or ventilation suited to the task. If the area is humid or the worker is moving between temperatures, fog control becomes important. Specific anti-fog performance is Unknown (Verify).
Problem: Face shield protects the face, but the eyes still feel exposed
Use a face shield over impact-rated safety glasses or goggles. A shield alone is not enough for eye protection in most cutting and grinding work.
Problem: Sparks are hitting the cheeks and neck
Add a face shield, a welding helmet when appropriate, and flame-resistant clothing or a neck cover. Make sure the headgear does not create new gaps in protection.
Use that page to review available Jackson PPE options for eye and face protection. Product-specific availability, model numbers, and technical details are Unknown (Verify) unless confirmed on the linked page.
Safety Notes
Do not grind or cut with damaged eye protection.
Do not rely on sunglasses or general-purpose eyewear for shop impact hazards.
Do not wear worn-out face shields with reduced clarity if you need to see the workpiece clearly.
When welding, confirm the correct shade and the correct combination of eye and face PPE for the process.
If the task includes airborne dust, chemical splash, or hot work, review the full hazard set before choosing PPE.
Often yes. Safety glasses protect the eyes; a face shield protects the face. For cutting and grinding, the shield is commonly worn over primary eye protection.
Are safety glasses enough for grinding?
Sometimes, but not always. If chips, dust, or bounce-back can enter from the sides or below, a closer-fitting option or a face shield may be needed.
Can I use welding eye protection for grinding?
Only if it also provides the needed impact protection and coverage for grinding hazards. Welding shade alone does not address every cutting or grinding risk. Verify the specific product requirements.
How often should eye protection be replaced?
Replace it when lenses are scratched enough to reduce visibility, when frames are cracked, or when fit is no longer secure. Replacement interval is Unknown (Verify) because it depends on use and damage.
A clear welding helmet cover lens is mainly a sacrificial protection plate. It protects the auto-darkening filter, fixed shade plate, and viewing area from spatter, grinding dust, scratches, smoke film, and impact wear. The welding filter or auto-darkening filter is the part that must provide the required welding shade and UV/IR protection for arc exposure.
This matters because a clean cover lens can make the helmet look safer than it really is. A clear cover plate is not a welding shade. Do not weld with only a clear cover lens, and do not assume a scratched or missing cover lens is harmless. If the auto-darkening cartridge is damaged, missing, incorrectly installed, or not marked for welding protection, the helmet should be removed from service.
The ADF or passive welding filter is the primary part responsible for welding shade and UV/IR protection.
The clear outside cover lens mainly protects the filter from spatter, dust, scratches, and impact wear.
Some clear cover lenses may meet ANSI Z87.1 impact requirements, but that does not make them welding shade filters.
Do not weld with a missing, cracked, heat-warped, or heavily scratched cover lens because it can expose the ADF to damage.
Do not weld with only a clear cover lens. Use the correct filter shade for the process and amperage.
Problem / Context
The common question is whether the clear lens on the outside of a welding helmet blocks UV, or whether the auto-darkening filter does that job. The practical answer is that the welding filter must be treated as the critical UV/IR and shade-control component. The clear cover lens is a replaceable barrier that helps preserve the filter, but it is not a substitute for the filter.
Most helmet designs use several layers: the helmet shell, the outside clear cover lens, the ADF or fixed shade filter, and often an inside cover lens. Each part has a different job. Confusing these layers can lead to unsafe shortcuts, especially when a cover lens is cracked or the ADF looks expensive to replace.
Root Causes of Confusion
Clear lenses may still have safety markings: A clear replacement cover lens may be sold as ANSI Z87.1 compliant for impact protection. That does not mean it has the correct optical density for welding arc radiation.
ADF lenses protect in light and dark states: Manufacturer manuals commonly state that the auto-darkening cartridge provides UV/IR protection in both light and dark states. The darkening function controls visible brightness and shade comfort, but the UV/IR filter function should not depend only on the lens switching dark.
The cover lens sits closest to the arc: Because the clear plate faces sparks and spatter first, welders may assume it is the main safety lens. Its real job is to protect the more expensive filter behind it.
Damaged cover lenses can hide filter problems: A cloudy, pitted, or heat-warped cover lens reduces visibility and can make welders raise their hood, lean into bad positions, or miss a damaged ADF. See the ArcOne S240-10 auto-darkening filter support guide for fit and visibility checks.
Some helmets cannot be used without cover lenses: Several helmet manuals warn against using the helmet without the inside and outside cover lenses properly installed. Missing cover lenses can allow spatter, heat, and debris to damage the filter cartridge.
Solution
Confirm the helmet has a proper ADF or passive welding filter installed. A clear cover lens alone is not enough.
Check the helmet and filter markings for ANSI Z87.1 and manufacturer identification.
Confirm the shade range or fixed shade number matches the welding process and amperage.
Inspect the outside cover lens for cracks, spatter pits, smoke film, deep scratches, or heat warping.
Inspect the inside cover lens if the helmet uses one. Replace it if it is cracked, dirty, pitted, or loose.
Use only replacement cover lenses specified by the helmet manufacturer when possible.
Replace the cover lens before visibility drops enough to affect puddle control or sensor performance.
Remove the helmet from service if the ADF cartridge is cracked, loose, delaminated, water-damaged, or not darkening correctly.
Wear safety glasses or goggles under the helmet where grinding, chipping, or flying particle hazards exist.
Specs / Verification Notes
Helmet Layer
Main Job
Can It Replace the ADF?
Verification Note
Outside clear cover lens
Protects the welding filter from spatter, dust, scratches, and impact wear
No
Size, material, and helmet fit: Unknown (Verify)
Auto-darkening filter
Provides welding shade and UV/IR protection according to the helmet design
Required for ADF helmets
Confirm shade range and ANSI marking
Passive filter plate
Provides fixed welding shade and radiation filtering
Required for passive helmets
Confirm shade number for process and amperage
Inside cover lens
Protects the inside face of the filter from dust, handling damage, and debris
No
Helmet-specific fit: Unknown (Verify)
Safety glasses under hood
Protects against flying particles when required
No
Confirm ANSI Z87.1 marking
Product Section
Replacement cover lenses are maintenance parts, not shade filters. The example below is a 2 in x 4-1/4 in clear cover lens. Confirm helmet fit, lens size, manufacturer approval, and ANSI marking before use. Compatibility with any specific helmet is Unknown (Verify).
Passive versus auto-darkening confusion: Passive helmets and ADF helmets both require proper filter protection, but they work differently. Compare the practical differences in auto-darkening vs passive welding helmets.
Shade number mismatch: A clear cover lens does not determine whether shade 9, 10, 11, 12, or 13 is correct. Use the process, amperage, and manufacturer chart to select shade. The helmet lens speed, shade range, and standards guide gives broader selection context.
Safety Notes
Arc welding emits visible light, ultraviolet radiation, and infrared radiation. Use a welding helmet with the correct filter lens shade for the process and current. OSHA guidance also notes that workers using welding helmets may need safety glasses with side shields or goggles where flying particle hazards exist.
Do not treat a clear cover plate as UV/IR proof for welding exposure unless the complete helmet, filter, and replacement part are being used exactly as specified by the manufacturer. Even if a clear cover lens has some UV-blocking material property, it is not a substitute for a welding filter shade.
Stop using the helmet if the filter cartridge is cracked, loose, heat damaged, water damaged, or visibly compromised. Manufacturer warnings commonly state that UV/IR protection may be compromised when the product is damaged.
FAQ
Does the clear outside cover lens block UV?
Do not rely on it as the welding UV/IR protection layer. The cover lens is mainly a protective plate. The ADF or passive welding filter is the critical radiation-filtering component.
Does an auto-darkening helmet protect from UV before it darkens?
Manufacturer manuals for auto-darkening helmets commonly state that the ADF protects against UV/IR in both light and dark states. The darkening function controls visible light shade, but the helmet still must be undamaged, properly assembled, and correctly rated.
Can welding flash happen if the ADF fails to darken?
Yes. Even when UV/IR filtering is present, a lens that fails to darken can expose the user to excessive visible light and unsafe viewing conditions. Stop welding and troubleshoot the helmet.
Can a clear cover lens be used for grinding?
Only if the complete helmet setup is rated and configured for grinding or impact hazards. Grinding mode does not make the helmet a welding shade, and welding mode does not replace safety glasses where flying particles are present.
How often should cover lenses be replaced?
Replace them when cracked, soiled, pitted, deeply scratched, heat-warped, loose, or visibility is reduced. Replacement interval depends on welding process, spatter level, grinding exposure, and shop conditions.
Can aftermarket cover lenses be used?
Only after verifying size, fit, material, safety marking, and helmet manufacturer guidance. OEM lenses are preferred when the helmet manual specifies exact replacement parts.
Next Step
Inspect the helmet in layers: outside cover lens, ADF or passive filter, inside cover lens, shell, headgear, and safety glasses. Replace damaged cover lenses, verify the correct filter shade, and remove the hood from service if the ADF or passive filter is cracked, loose, unmarked, or not working correctly.
Sources Checked
OSHA Eye Protection against Radiant Energy during Welding and Cutting fact sheet: filter lens shade guidance and safety glasses or goggles for flying particle hazards.
Lincoln Electric auto-darkening helmet manuals: UV/IR protection in dark and light states, warnings about damaged products, and use of specified cover lenses.
3M Speedglas welding PPE product guide: permanent UV/IR protection references for Speedglas ADF products.
Forney 56800 cover lens manufacturer listing: 2 in x 4-1/4 in clear plastic cover lens, impact and spatter protection, ANSI Z87.1 reference, and fit notes.
Weld Support Parts: Auto-Darkening Welding Helmet Buying Guide 2025.
Weld Support Parts: Welding Safety Glasses Guide 2025.
Weld Support Parts: Auto-Darkening Welding Helmet Not Working: Causes and Fixes.
Weld Support Parts: ArcOne S240-10 Auto-Darkening Welding Filter Support Guide.
Weld Support Parts: Auto-Darkening vs Passive Welding Helmets.
An auto-darkening helmet that behaves normally on MIG or stick but flickers on aluminum TIG is usually not failing in the same way as a helmet that will not darken at all. Aluminum TIG exposes weak points in sensor detection, sensitivity settings, low-current arc recognition, torch angle, reflected light, and delay settings. The arc can be stable at the weld, but the helmet may not be seeing enough consistent arc signal to stay dark.
Aluminum TIG flicker is commonly caused by low TIG arc signal, blocked sensors, low sensitivity, short delay, or reflective arc angles.
MIG and stick usually create brighter, broader, easier-to-detect arcs, so the same helmet may seem fine on those processes.
AC TIG, tight torch angles, cup position, filler hand position, and workpiece geometry can partly shield the arc from the helmet sensors.
Increase sensitivity, increase delay, clean the cover lens, replace weak batteries, and confirm that the helmet is rated for the TIG amperage used.
Do not keep welding with a helmet that flickers, flashes, or fails a pre-use darkening check.
Problem / Context
The symptom is specific: the helmet darkens normally for MIG or stick welding, but during aluminum TIG it rapidly switches between dark and light, pulses, or drops shade during starts, crater fill, or low-amperage sections. This is different from a dead helmet. For total failure, use the broader checklist in Auto-Darkening Welding Helmet Not Working: Causes and Fixes.
Aluminum TIG is a harder detection case because the welder may run low current, use a tight cup angle, weld around corners, or move the torch in a way that hides part of the arc from the helmet sensors. MIG and stick normally throw more visible arc energy and spatter glow into the front of the hood, so a marginal sensor setup may still work there.
Root Causes
Low sensitivity setting: Many helmets have sensitivity ranges intended for different welding conditions. Some manufacturer instructions list higher sensitivity positions for stable TIG arcs, low-current TIG, inverter TIG, or cases where part of the arc is obscured. If the helmet is still on a lower general-purpose setting, it may detect MIG and stick but drop out on aluminum TIG.
Short delay setting: If the delay is set too short, the lens may return to light state during brief arc intensity changes, pulsing, repositioning, or crater fill. This can feel like flicker even when the helmet is detecting the arc correctly at the start.
Blocked arc sensors: The torch cup, filler rod hand, bench edge, pipe joint, corner joint, or the welder’s head angle can block the arc from one or more front sensors. This matters more in TIG because the arc is smaller and more concentrated than a typical MIG or stick arc.
Dirty or damaged cover lens: Smoke film, grinding dust, aluminum oxide dust, fingerprints, and spatter haze can reduce what the sensors see. A hazy lens can also make the puddle look washed out. If visibility is the main issue, see auto-darkening filter lens fit and visibility checks before assuming the whole helmet is bad.
Weak battery or solar-assist limitation: Some helmets use replaceable batteries, some use solar assist, and some use sealed cells. Weak power can make response inconsistent, especially when welding starts and stops repeatedly.
Helmet not suited for low-amp TIG: Some low-cost or older auto-darkening filters work acceptably on MIG and stick but are less reliable at low TIG amperage. Minimum TIG amp rating is often unclear on retailer listings. Treat missing low-amp TIG data as Unknown (Verify).
Grinding mode or light-state lock: A helmet left in grind mode or light-state lock may not darken. A helmet partly stuck between modes can also behave inconsistently. Always confirm weld mode before striking an arc.
Solution
Stop welding and inspect the helmet before continuing. Do not keep welding through repeated flicker.
Confirm the helmet is in weld mode, not grind mode, cut mode, or light-state lock.
Clean or replace the outer cover lens. Clean the sensor windows according to the helmet manual.
Replace the batteries if the helmet uses replaceable cells. Battery type: Unknown (Verify from helmet manual).
Increase sensitivity one step at a time until the helmet stays dark during aluminum TIG starts and steady welding.
Increase delay if the lens drops out during pulsing, crater fill, or brief arc-length changes.
Reposition the hood and torch so the front sensors have a direct view of the arc.
Test at the actual TIG amperage used, not only on MIG or stick.
If flicker remains, compare the helmet’s TIG amp rating and sensor count against manufacturer documentation. Missing rating: Unknown (Verify).
Use a passive shade lens or a TIG-capable replacement helmet until the auto-darkening issue is resolved.
Specs / Verification Notes
Check Point
Why It Matters on Aluminum TIG
Status
Minimum TIG amperage rating
Confirms whether the ADF is designed to detect low-current TIG arcs
Unknown (Verify)
Number of arc sensors
More sensor coverage can reduce dropout when one sensor is blocked
Unknown (Verify)
Sensitivity control
Needed for low-current TIG and partially obscured arcs
Verify helmet has adjustable sensitivity
Delay control
Helps prevent light-state return during arc pulsing or crater fill
Verify helmet has adjustable delay
Battery type
Weak batteries can cause inconsistent darkening
Unknown (Verify)
ANSI Z87.1 marking
Confirms eye and face protection compliance marking
Verify on helmet and manual
Product Section
If the helmet uses replaceable CR2032 cells, fresh batteries are a low-cost maintenance step before replacing the full hood. Battery fit varies by helmet model, so confirm the required battery type in the manufacturer manual before ordering. Battery compatibility: Unknown (Verify).
Rome Tech CR2032 battery for Welding Helmet compatible with Welding Helmet Viking / G5 9000 9100 FX x xx xxi 100 Series 3m SL100 9000 9002 9100. Please, check your Welding Helmet needs battery CR2032 before purchasing!
RTB CR2032 batteries are designed to last long. Enjoy long CR2032 lithium 3V coin battery life without worry. Use this time with pleasure.
CR2032 lithium 3V coin battery is reliable and provides consistent power to your Welding Helmet. This means you can trust CR 2032 battery for Welding Helmet to work when you need it most, ensuring you always have working Welding Helmet.
CR2032 lithium battery is designed to withstand extreme temperatures, whether hot or cold. Battery CR2032 3V lithium cell robust construction makes it resistant to vibration and impact, ensuring it can withstand the rigours of daily use.
Rome Tech multifunctional CR 2032 3V battery for Welding Helmet can be used for various electronic devices such as watches, fitness trackers, calculators, digital cameras, remote controls, and many more.
Last update on 2026-07-14 / Affiliate links / Images from Amazon Product Advertising API
Comparison Table
Process
Helmet Behavior
Likely Reason
Best First Fix
Aluminum TIG
Flickers or drops shade
Low-current arc, blocked sensor, AC arc behavior, short delay
Raise sensitivity and delay; clean sensors
MIG
Usually stable
Brighter, broader arc signal with easier sensor detection
Use as comparison test only
Stick
Usually stable
Strong arc light and electrode angle often expose sensors clearly
Wrong helmet type for the work: Some shops keep a passive hood as a backup for awkward TIG joints or outdoor stick welding. The auto-darkening vs passive welding helmet comparison explains where each type fits.
Fixed-shade filter mismatch: A shade 10 filter may be useful in some compact hood setups, but it is not automatically correct for every TIG amperage or aluminum job. Check the ArcOne S240-10 auto-darkening filter support guide for fit and shade cautions.
Low-amp TIG helmet selection: If the current helmet lacks a published TIG amp rating or has poor sensor coverage, compare it against helmets documented for TIG work in the TIG auto-darkening helmet buyer guide.
Safety Notes
Arc radiation can injure eyes and skin. A welding helmet must use the correct filter shade for the welding process and current. OSHA guidance states that protective eye and face devices must comply with ANSI Z87.1, and side protection or safety glasses may also be required where flying particles are present.
Do not use a flickering auto-darkening helmet as a normal condition. If sensitivity and delay adjustments do not produce reliable darkening, remove the helmet from service until the battery, cartridge, cover lens, sensors, and safety markings are verified.
Auto-darkening helmets do not provide respiratory protection by themselves. Aluminum TIG can still involve cleaning chemicals, ozone, shielding gas displacement, and fume exposure depending on the shop setup. Use ventilation and respiratory protection according to the job hazard assessment.
FAQ
Why does my helmet flicker only on aluminum TIG?
Aluminum TIG can produce a smaller or more directional arc signal at the helmet sensors, especially at low amperage or with the cup blocking the arc. MIG and stick are usually easier for the sensors to detect.
Should sensitivity be higher for TIG?
Often yes. Many helmets require higher sensitivity for low-current TIG, inverter TIG, or arcs that are partly blocked from sensor view. Increase sensitivity gradually and confirm that the helmet still lightens correctly after welding.
Can AC balance or pulse settings cause helmet flicker?
They can contribute to the symptom if arc intensity changes enough for the helmet to drop below its detection threshold. The practical fix is usually helmet sensitivity, delay, sensor exposure, and confirming the helmet’s TIG capability.
Does flicker mean the helmet is unsafe?
Repeated flicker means the helmet is not performing reliably for that task. Stop and troubleshoot before continuing. If it cannot be corrected, use a properly shaded passive helmet or a TIG-capable auto-darkening helmet.
Will replacing the cover lens help?
Yes, if the cover lens is dirty, scratched, smoky, or spatter-damaged. A poor cover lens can reduce both visibility and sensor performance.
Can the same helmet be used for TIG, MIG, and stick?
Yes, but only if the helmet has the correct shade range, reliable sensor performance, and manufacturer support for the TIG amperage used. Multi-process claims should be verified against the manual, not only retailer copy.
Next Step
Before replacing the helmet, test it in this order: weld mode, clean lens, fresh battery, higher sensitivity, longer delay, direct sensor view, and actual aluminum TIG amperage. If the hood still flickers while MIG and stick remain stable, the helmet may not be suitable for that TIG application. Use the helmet lens speed, shade range, and standards guide to compare replacement requirements.
Sources Checked
3M Speedglas 9100 Series user instructions: sensitivity positions for stable TIG, low-current TIG, inverter TIG, obscured TIG arcs, light-state lock, dark-state lock, and delay behavior.
OSHA Eye Protection against Radiant Energy during Welding and Cutting in Shipyard Employment fact sheet: ANSI Z87.1 compliance, side protection, filter lens shade guidance, and ANSI/AWS shade references.
Weld Support Parts: Auto-Darkening Welding Helmet Buying Guide 2025.
Weld Support Parts: Best Auto-Darkening Welding Helmet for TIG.
Weld Support Parts: Auto-Darkening vs Passive Welding Helmets.
Weld Support Parts: Auto-Darkening Welding Helmet Not Working: Causes and Fixes.
Weld Support Parts: ArcOne S240-10 Auto-Darkening Welding Filter Support Guide.
Amazon search result checked for ASIN B0D7J214QR. Battery compatibility remains Unknown (Verify).
🔦【Multi Angled & Wide Adjustment】This cable railing kit works for 3/16″ wire rope in multi angled stairways or horizontal sections cable railing systems. The multi adjustable angle feature enables the turnbuckle to rotate from 0 to180 degrees, closed-body of the turnbuckle adjust freely length from the min 7.2″ to max 10.1 inch”. This cable railing hardware kit package can make 20 cable runs.
🔦【T316 Marine Grade Stainless Steel】This 3/16″ Cable Railing Hardware Kit made from T316 marine grade stainless steel, which means it’s excellent resistance to rust, corrosion with long-lasting protection. It can handle extreme weather conditions, even in coastal areas where there’s a lot of humidity and salty air. CKE Swage Toggle Turnbuckle for Wood Post is ideal for indoor and outdoor black deck stair cable railing kit system.
🔦【Size】Fit for 3/16 inch stainless steel cable, apply for both wood posts. Turnbuckle: 7.2″ Deck Toggle End: 3″. We suggest the post spacing about 3-4 ft between wood post ends, and the cable spacing about 3″ to 4″ for each post.
🔦【Applications】This 3/16″ Swage Toggle Turnbuckle Cable Railing Hardware Kit with wide adjustable range with cleanly looks solve the problem for tighten and adjust the tension of attached cable in multi angled stairways and ramps also for horizontal section cable railing systems for straight, stair or angled sections when using timber posts. This cable railing kit is installed simply by tightening the screws, please refer the picture of 3 to install.
🔦【Package List & 100% Satisfaction Guarantee】20 Set 180 Degree Adjustable Angle Cable Railing Kit (Kti Includes: 20 Pcs Swage Toggle Turnbuckles, 20 Pcs Deck Toggle Terminal, 80 Pcs screws, 1 Pcs CKE Patent Design Spanner Multi Tool). This package can make 20 cable runs. ⭐Buy with confidence: If you’re not satisfied with this item at anytime within two years after purchased, we’ll provide a refund or replacement.
Last update on 2026-07-14 / Affiliate links / Images from Amazon Product Advertising API
Silicone facepieces seal better than rubber and last longer
Half-face respirators are lighter and more comfortable than full-face for all-day wear
Size matters—small, medium, large; wrong size = seal failure
Replace filters every 40 hours of use or when hard to breathe through
Comparison Table
Model
Type
Size Range
Filter Type
Best For
Price Range
3M 6502QL
Half-face, reusable
Small/Medium/Large
Bayonet P100
Daily welding, MIG/TIG
$35–$50
Honeywell 5500
Half-face, reusable
Small/Medium/Large
Bayonet P100
General welding, grinding
$30–$45
3M 6391
Half-face, reusable
Large only
Bayonet P100
Larger faces, high-volume use
$40–$55
3M 2097 Filters
Replacement filters
Universal fit
P100 + organic vapor relief
Filter replacement
$8–$12 per pair
Product Sections
3M 6502QL Rugged Comfort Quick Latch Respirator
The 3M 6502QL is the gold standard for welding shops. Quick Latch design means you can snap cartridges on and off without twisting, saving time between jobs. Silicone facepiece seals tight and won’t degrade like rubber. Cool Flow exhalation valve reduces fogging and heat buildup.
Key Specs:
Facepiece: Silicone, soft and durable
Filter connection: Bayonet (quick-click)
Sizes: Small, Medium, Large
Exhalation valve: Yes (reduces heat/moisture)
Reusable: Yes (lasts 5+ years with care)
NIOSH certified: Yes (ANSI Z87.1)
Best for: Daily MIG/TIG welding, confined spaces, high-fume environments.
🔦【Multi Angled & Wide Adjustment】This cable railing kit works for 3/16″ wire rope in multi angled stairways or horizontal sections cable railing systems. The multi adjustable angle feature enables the turnbuckle to rotate from 0 to180 degrees, closed-body of the turnbuckle adjust freely length from the min 7.2″ to max 10.1 inch”. This cable railing hardware kit package can make 20 cable runs.
🔦【T316 Marine Grade Stainless Steel】This 3/16″ Cable Railing Hardware Kit made from T316 marine grade stainless steel, which means it’s excellent resistance to rust, corrosion with long-lasting protection. It can handle extreme weather conditions, even in coastal areas where there’s a lot of humidity and salty air. CKE Swage Toggle Turnbuckle for Wood Post is ideal for indoor and outdoor black deck stair cable railing kit system.
🔦【Size】Fit for 3/16 inch stainless steel cable, apply for both wood posts. Turnbuckle: 7.2″ Deck Toggle End: 3″. We suggest the post spacing about 3-4 ft between wood post ends, and the cable spacing about 3″ to 4″ for each post.
🔦【Applications】This 3/16″ Swage Toggle Turnbuckle Cable Railing Hardware Kit with wide adjustable range with cleanly looks solve the problem for tighten and adjust the tension of attached cable in multi angled stairways and ramps also for horizontal section cable railing systems for straight, stair or angled sections when using timber posts. This cable railing kit is installed simply by tightening the screws, please refer the picture of 3 to install.
🔦【Package List & 100% Satisfaction Guarantee】20 Set 180 Degree Adjustable Angle Cable Railing Kit (Kti Includes: 20 Pcs Swage Toggle Turnbuckles, 20 Pcs Deck Toggle Terminal, 80 Pcs screws, 1 Pcs CKE Patent Design Spanner Multi Tool). This package can make 20 cable runs. ⭐Buy with confidence: If you’re not satisfied with this item at anytime within two years after purchased, we’ll provide a refund or replacement.
Last update on 2026-07-14 / Affiliate links / Images from Amazon Product Advertising API
Honeywell North 5500 Series P100 Half Mask
The Honeywell 5500 is the budget-friendly alternative that doesn’t sacrifice protection. Direct cartridge-to-face seal (no valve) makes it simple and reliable. Soft elastomer facepiece is comfortable for 8-hour shifts. Compatible with a wide range of filter types.
Key Specs:
Facepiece: Elastomer (soft, durable)
Filter connection: Direct bayonet
Sizes: Small, Medium, Large
Exhalation valve: No (simpler design)
Reusable: Yes (lasts 3–5 years)
NIOSH certified: Yes
Best for: Budget-conscious shops, occasional welding, grinding and sanding.
READY TO WEAR CONVENIENCE: Includes 2 multi-contaminant P100 cartridge/filter combos for excellent protection against gases, vapors and particulates; economical safe breathing solution that does not compromise on features
COST-EFFECTIVE REUSABILITY: Cartridges and filters are easily replaced so the facepiece can be reused; compatible with all of our N-Series cartridge types for other uses around the home; latex-free mask is non-allergenic, tough and long-lasting
SECURE FIT: Contoured face seal with variable thickness for optimal seal in all facial areas; fits most face shapes & sizes; threaded cartridge connectors prevent accidental disconnection; low-profile cartridge allows increased field of vision
LONGWEARING COMFORT: Strategically placed exhalation valve keeps mask cool and comfortable; strong support around the chin area and good flexibility on the nose bridge; upper strap features minimum give for strong support through extended wear on the job
BACKPACK ADAPTOR OPTION: NIOSH-Approved for use with backpack adaptor for welding and painting applications (adaptor sold separately); sealed packaging ensures a tamper-free 100% hygienic product
Last update on 2026-07-14 / Affiliate links / Images from Amazon Product Advertising API
3M 6391 Half Facepiece Respirator (Large)
The 3M 6391 is the large-size version of the 6502, designed for welders with bigger faces or those who need maximum comfort. Same silicone quality and Cool Flow valve as the 6502. Wider straps distribute pressure evenly.
Key Specs:
Facepiece: Silicone, large fit
Filter connection: Bayonet
Sizes: Large only
Exhalation valve: Yes (Cool Flow)
Reusable: Yes (lasts 5+ years)
NIOSH certified: Yes
Best for: Large-face welders, all-day high-volume welding, TIG work.
Amazon:
No products found.
3M 2097 P100 Particulate Filters (Replacement)
Fresh filters are critical. The 3M 2097 includes organic vapor relief, which helps with the smell of welding fumes. Magenta color makes it easy to spot when they’re saturated (turn dark brown). Compatible with 3M 6500 series respirators and most half-face masks.
READY TO WEAR CONVENIENCE: Includes 2 multi-contaminant P100 cartridge/filter combos for excellent protection against gases, vapors and particulates; economical safe breathing solution that does not compromise on features
COST-EFFECTIVE REUSABILITY: Cartridges and filters are easily replaced so the facepiece can be reused; compatible with all of our N-Series cartridge types for other uses around the home; latex-free mask is non-allergenic, tough and long-lasting
SECURE FIT: Contoured face seal with variable thickness for optimal seal in all facial areas; fits most face shapes & sizes; threaded cartridge connectors prevent accidental disconnection; low-profile cartridge allows increased field of vision
LONGWEARING COMFORT: Strategically placed exhalation valve keeps mask cool and comfortable; strong support around the chin area and good flexibility on the nose bridge; upper strap features minimum give for strong support through extended wear on the job
BACKPACK ADAPTOR OPTION: NIOSH-Approved for use with backpack adaptor for welding and painting applications (adaptor sold separately); sealed packaging ensures a tamper-free 100% hygienic product
Last update on 2026-07-14 / Affiliate links / Images from Amazon Product Advertising API
How to Choose the Right Respirator
1. Get the Right Size Try on small, medium, and large. The mask should feel snug but not painful. You should feel gentle suction when you inhale. If it shifts or gaps appear, try the next size.
2. Check Your Filter Type Most modern half-face respirators use bayonet cartridges (click-on). Older models use threaded cartridges (screw-on). Know which one you have before buying filters.
3. Consider Comfort Silicone facepieces (3M 6502, 6391) are more comfortable for all-day wear. Elastomer (Honeywell 5500) is cheaper but less comfortable. Cool Flow valves reduce heat buildup.
4. Plan for Filter Replacement P100 filters last 40 hours of use. If you weld 8 hours a day, 5 days a week, you’ll need new filters every 1–2 weeks. Budget accordingly.
5. Check Compatibility Not all filters fit all masks. 3M 6500 series uses bayonet cartridges. Honeywell 5500 uses direct bayonet. Verify before buying.
FAQ
Q: Can I use an N95 for welding? A: No. N95 masks are for dust and pollen, not welding fumes. Welding fumes contain toxic metals (manganese, chromium, nickel). You need a P100 respirator.
Q: How long do P100 filters last? A: 40 hours of use or until they become hard to breathe through. If your filters are dark brown, replace them. Don’t guess—replace them.
Q: Can I reuse a P100 filter? A: No. Once saturated, they lose efficiency. Throw them away and install fresh filters.
Q: What if I have a beard? A: Shave the area where the mask contacts your face. Even 1/8 inch of beard hair breaks the seal. A leaking mask doesn’t protect you.
Q: Do I need a fit test? A: OSHA recommends annual fit testing in high-risk environments. For shop use, do a quick seal check: cover the cartridges, inhale hard, and feel for leaks around the edges.
Safety Notes
Welding fumes contain manganese, chromium, nickel, and other toxic metals. Chronic exposure causes neurological damage, respiratory disease, and kidney problems. ANSI Z87.1 requires proper respiratory protection in confined spaces or high-fume environments. A proper seal is critical—a leaking mask gives false confidence and exposes you to harmful particulates.
Always wear a properly sealed P100 respirator when welding in enclosed or poorly ventilated spaces.
You’re wearing a P100 respirator. You’ve got fresh filters. But you can still smell the fumes.
That’s not normal—and it means your mask isn’t protecting you.
Here’s why it happens and how to fix it.
Symptoms You Have a Seal Problem
Fume smell inside the mask during welding
Visible fumes leaking around the mask edges
Filters turn dark/brown faster than expected
Lip tingling or throat irritation despite wearing the mask
Fogging inside the mask (moisture escaping, not just condensation)
Root Cause: Poor Mask Seal
A P100 filter only works if air passes through the filter, not around it.
If you smell fumes, one of these is happening:
1. Facial Hair Breaks the Seal Beards, stubble, and sideburns create gaps between your face and the silicone facepiece. Even 1/8 inch of beard hair defeats the seal. Air (and fumes) bypass the filter entirely.
2. Wrong Size Mask Half-face respirators come in small, medium, and large. A loose mask won’t seal; a too-tight mask causes discomfort and users remove it. Either way, you get leakage.
3. Damaged Facepiece Cracked silicone, worn straps, or a loose exhalation valve let unfiltered air in. Silicone degrades over time, especially if stored in sunlight or heat.
4. Filters Not Seated Properly Cartridges must click or screw in fully. Partial insertion leaves gaps. Dirty filter threads prevent a tight seal.
5. Exhalation Valve Failure The one-way valve lets breath out but keeps fumes out. If it’s stuck open or damaged, fumes flow straight in.
Per NIOSH and ANSI Z87.1, a proper seal is non-negotiable for respiratory protection.
The Fix: 5 Steps to Stop Fume Leakage
1. Shave Your Face Trim or shave facial hair where the mask contacts your skin. This is the #1 reason for seal failure. Check the mask fit line—anything touching that area must go.
2. Verify Your Size Try on multiple sizes. The mask should feel snug but not painful. You should feel gentle suction when you inhale. If it shifts or gaps appear, try the next size up or down.
3. Check Filter Seating Remove and reinstall cartridges. They should click (bayonet) or screw (threaded) until snug. Don’t force—just firm pressure. Wipe threads clean if they’re dusty.
4. Inspect the Facepiece Look for cracks, tears, or discoloration in the silicone. Check the exhalation valve for cracks or debris. If damaged, replace the facepiece (most respirators have replaceable parts).
5. Replace Old Filters P100 filters last 40 hours of use or until they become hard to breathe through. If your filters are dark brown or you’ve been using them for weeks, replace them. Clogged filters don’t seal well and reduce airflow.
Real-World Tip
Experienced welders do a fit test before every shift: put on the mask, cover the filter cartridges with your hands, and inhale hard. If you feel air being sucked in around the edges, the seal is broken. If it holds vacuum, you’re good.
This takes 5 seconds and catches seal problems before you start welding.
Welding fumes contain manganese, chromium, nickel, and other toxic metals. ANSI Z87.1 requires proper respiratory protection in confined spaces or high-fume environments. A proper seal is critical—a leaking mask gives false confidence and exposes you to harmful particulates.
Your helmet lens is probably dirty, scratched, or damaged—and it’s costing you quality welds.
If you’re squinting through your helmet or struggling to see the puddle clearly, the problem isn’t your eyesight. It’s your lens. Dirty, scratched, or worn lenses block light and create a hazy view that makes precision impossible. The good news: this is an easy fix.
Symptoms of a Bad Helmet Lens
Hazy or cloudy view even in good light
Scratches or scuffs visible on the lens surface
Difficulty seeing the weld pool or joint
Lens feels sticky or has residue buildup
Darkening is uneven or inconsistent across the lens
You’re lifting your helmet more often to see clearly
Why This Happens
Welding helmets take a beating. Spatter, grinding dust, and UV exposure degrade the lens over time. The outer clear lens (the protective layer) scratches easily from handling and contact with metal. The inner auto-darkening filter (if you have one) can accumulate dust and residue, especially in high-spatter processes like MIG.
Even small scratches refract light and reduce contrast, making it harder to follow your bead. Residue from flux, spatter, or shop dust acts like a filter, dimming your view and forcing you to compensate by tilting your head or adjusting your shade—both bad habits that slow you down.
AWS D1.1 welding standards don’t specify lens cleanliness, but they do require clear, undamaged optics for safe, quality welds. A damaged lens compromises both.
The Fix (Step-by-Step)
Step 1: Clean the lens thoroughlyStart with the outer clear lens. Use a soft, lint-free cloth and warm water with a drop of mild soap. Wipe gently—don’t scrub. Dry completely. For the inner auto-darkening filter, use a dry cloth only (water can damage the LCD).
Step 2: Inspect for damageHold the lens up to light. Look for scratches, cracks, or discoloration. If you see deep scratches or cracks, the lens needs replacement. Small surface scratches won’t affect visibility much, but they’ll get worse.
Step 3: Replace if necessaryIf cleaning doesn’t help, order replacement lenses. Most helmets use standard sizes: outer clear lenses (usually 4.5″ x 5.25″ or similar) and inner filters (if auto-darkening). Check your helmet model or measure the lens.
Step 4: Install the new lensMost helmets have a simple snap-in or screw-on design. Remove the old lens, snap or screw in the new one. Takes 30 seconds.
Step 5: Test before weldingStrike a test arc or wave the helmet at a light source. The lens should darken instantly and evenly. If it doesn’t, check the battery (for auto-darkening) or reinstall the lens.
Real-World Tip
Experienced welders replace outer clear lenses every 2–3 months in high-spatter environments (MIG, flux-core). It’s cheap insurance. Keep a spare pack of lenses in your toolbox. When visibility drops, swap them out immediately instead of fighting through a bad lens. You’ll weld faster and straighter.
Safety Note
ANSI Z87.1 requires helmets to have impact-resistant lenses and proper UV/IR protection. A cracked or heavily scratched lens fails this standard and puts your eyes at risk. Replace damaged lenses before your next weld.
Welding safety glasses protect against UV radiation, infrared light, and impact hazards during grinding and fabrication. Choosing the right glasses depends on process type, shade number, and ANSI Z87.1 certification—not just lens color.
ANSI Z87.1 Certification Requirements
Impact Protection Levels
Basic Impact (Z87) – Protects against low-velocity impact (1” steel ball at 150 ft/sec) – Suitable for: General shop work, light grinding, non-welding tasks
High Impact (Z87+) – Protects against high-velocity impact (1/4” steel ball at 150 ft/sec) – Required for: Welding, grinding, chipping, cutting – Marking: “Z87+” stamped on frame and lens
Side Shield Requirement: – All welding safety glasses must have side shields or wraparound design – Prevents spatter and debris from entering around lens edges
Shade Number Selection by Process
Process
Amperage Range
Shade Number
Lens Type
Oxy-fuel cutting
N/A
#3-#6
Fixed shade
TIG (GTAW)
10-50A
#8-#10
Fixed or auto-darkening
TIG (GTAW)
50-150A
#10-#12
Fixed or auto-darkening
MIG (GMAW)
60-160A
#10-#12
Fixed or auto-darkening
MIG (GMAW)
160-250A
#12-#14
Fixed or auto-darkening
Stick (SMAW)
60-160A
#10-#12
Fixed shade
Stick (SMAW)
160-250A
#12-#14
Fixed shade
Plasma cutting
20-40A
#4-#5
Fixed shade
Plasma cutting
40-80A
#5-#8
Fixed shade
Note: Safety glasses are supplemental protection worn under welding helmets or for indirect arc exposure (helper/observer).
Lens Types & Technologies
Fixed Shade Lenses
Pros: No batteries, consistent darkness, low cost
Cons: Single shade only, must swap lenses for different processes
Best for: Dedicated single-process work, backup glasses
Cost: $10-$30
Auto-Darkening Lenses
Pros: Adjustable shade range, no lens swapping
Cons: Battery replacement, higher cost
Shade range: Typically #5-#13
Reaction time: 0.0001-0.00004 seconds
Best for: Multi-process shops, frequent shade changes
Cost: $50-$150
Passive IR/UV Protection (Clear Lenses)
Function: Blocks UV and infrared without visible light darkening
Use case: Grinding, fabrication, indirect arc exposure (helper/observer)
Shade equivalent: #1.5-#2
Best for: Non-welding tasks requiring impact protection
UV & IR Protection Standards
UV Protection (200-400nm wavelength): – All welding lenses must block 99.9%+ UV radiation – Permanent damage occurs from unprotected UV exposure (arc eye/welder’s flash)
Infrared Protection (780nm-1mm wavelength): – Blocks heat radiation from welding arc – Prevents retinal damage and cataracts from prolonged exposure
Purpose: Reduces glare from reflective surfaces (polished stainless, aluminum)
Best for: TIG welding on reflective materials
Limitation: Not necessary for carbon steel or general fabrication
Frame Styles & Fit
Wraparound Design
Coverage: Maximum side and peripheral protection
Best for: Grinding, cutting, high-spatter welding
Fit: Snug to face, minimal gap around edges
Over-the-Glass (OTG) Design
Purpose: Fits over prescription eyeglasses
Best for: Welders who wear corrective lenses
Limitation: Bulkier, may not fit all prescription frame sizes
Prescription Welding Glasses
Purpose: Combines corrective lenses with welding shade
Best for: Full-time welders who need vision correction
Cost: $150-$400 (requires optometrist fitting)
When to Wear Safety Glasses vs. Helmet
Safety Glasses (Supplemental Protection)
Grinding, cutting, or fabrication (no arc)
Indirect arc exposure (helper/observer 10+ feet from arc)
Under welding helmet as secondary protection
Oxy-fuel cutting or brazing (low UV output)
Welding Helmet (Primary Protection)
Direct arc exposure (TIG, MIG, stick, flux-core)
Primary welder performing arc welding
Required for all arc welding processes per OSHA 1910.252
OSHA Requirement: Safety glasses must be worn under welding helmets in environments with grinding, chipping, or multiple welding stations.
Common Mistakes
Using non-certified safety glasses for welding Fashion sunglasses or non-Z87+ glasses don’t block UV/IR radiation. Result: arc eye (photokeratitis) and permanent retinal damage. Always verify Z87+ marking.
Wrong shade number for amperage Shade #3 glasses for 150A MIG = retinal burn risk. Shade #12 for oxy-fuel cutting = can’t see work. Match shade to process and amperage.
Skipping safety glasses under helmet Grinding debris or spatter can enter under helmet. OSHA requires safety glasses as secondary protection in multi-hazard environments.
Buying Checklist
✓ ANSI Z87+ certification marked on frame and lens
✓ Shade number matches process and amperage range
✓ UV/IR protection rated for welding (99.9%+ UV block)
✓ Side shields or wraparound design for peripheral protection
✓ Anti-fog coating if working in humid environments
✓ Anti-scratch coating for grinding/fabrication work
✓ Comfortable fit (no pressure points, secure without slipping)
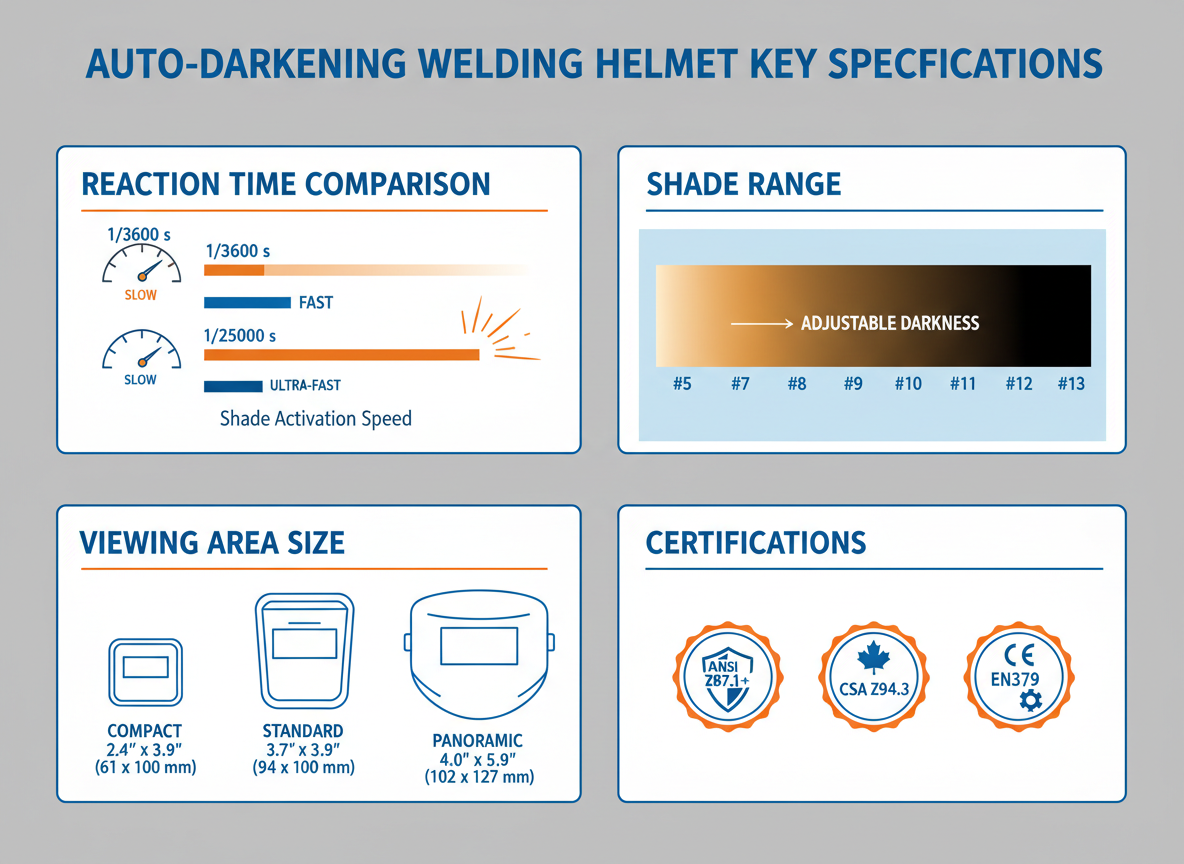
Auto-darkening helmets protect your eyes by switching from light to dark state when arc strikes. Choosing the right one depends on lens speed, shade range, viewing area, and certification—not brand hype.
Key Specifications
Reaction Time (Switching Speed)
Level
Speed
Decimal
Entry-level
1/3600 second
0.00028s
Mid-range
1/10000 second
0.0001s
Professional
1/25000 second
0.00004s
TIG welding requires faster response (1/20000s minimum) due to low-amperage arc initiation. MIG and stick work fine with 1/10000s.
Shade Range
Standard range: #9–#13
TIG-specific: #5–#13 (low-amp visibility)
Grinding mode: #3–#4 (light state)
AWS D1.1 requires minimum shade #10 for 60–160A stick welding, #11 for 160–250A, #12 for 250–550A.
Viewing Area
Size
Dimensions
Area
Compact
3.5” × 1.65”
6 sq in
Standard
3.93” × 2.36”
9.3 sq in
Wide-view
3.93” × 2.87”
11.3 sq in
Panoramic
4.25” × 3.25”
13.8 sq in
Larger viewing area improves peripheral awareness in tight spaces and multi-pass work.
Optical Clarity Rating (1/1/1/1 to 1/1/1/3)
Four numbers indicate: optical class / light diffusion / variations in luminous transmittance / angle dependence.
1/1/1/1 = highest clarity (minimal distortion)
1/1/1/2 = professional grade
1/1/1/3 = acceptable for general fabrication
Certification Requirements
ANSI Z87.1+ (High-Impact Rated) Required for all industrial welding environments. Plus symbol (+) indicates high-velocity impact protection.
CSA Z94.3 Canadian standard equivalent to ANSI Z87.1+.
EN379 European standard covering optical class, switching time, and UV/IR protection.
Process-Specific Requirements
TIG (GTAW)
Reaction time: 1/20000s or faster
Shade range: #5–#13 (low-amp start visibility)
Sensitivity adjustment: Essential for low-amperage starts
Intro The ArcOne Vision X81VX is a professional-grade auto-darkening welding helmet designed for fabricators who spend long hours under the hood. It delivers wide viewing, fast switching, and rugged comfort that meets ANSI Z87.1 and CSA Z94.3 safety standards. Here’s how it stacks up for industrial and pipe work.
Key Takeaways
Large View: 3.85 × 2.44 in (98 × 62 mm) viewing area for precise weld puddle control.
4 Arc Sensors: Reliable switching < 1/25,000 s for SMAW, GTAW, GMAW, and Plasma.
Variable Shade: DIN 9 – 13 with grind mode and sensitivity/delay adjustments.
Durability: Meets ANSI Z87.1 + CSA Z94.3; ideal for shop and field environments.
Performance and Build
ArcOne engineered the X81VX for welders who need both optical clarity and long-term comfort. The XTREME series uses a lightweight polycarbonate shell that resists spatter and impact while keeping total weight manageable for multi-hour jobs. With true color filters and a fast reaction speed, arc starts and transitions are crisp, reducing eye strain throughout a shift.
Applications
Structural steel and pipe fabrication
TIG and MIG precision work
Industrial maintenance and repair
Long-duration shop projects requiring wide view and comfort
Comparison Table
Model
Key Specs
Best For
ArcWeld Store
Amazon
ArcOne Vision X81VX (Black XTREME)
3.85 × 2.44 in view • Shade 9–13 • 4 Sensors • ANSI Z87.1 • True Color
Pro-level MIG/TIG and pipe welding where clarity and comfort matter
Always verify that auto-darkening helmets meet ANSI Z87.1 and CSA Z94.3 for eye and face protection. Inspect lenses and batteries regularly, and store the helmet in a cool, dry place to protect sensors and optics. Replace lens covers as needed to maintain clarity.
FAQ
Q: Can the X81VX be used for low-amp TIG work? A: Yes. Its sensitivity control detects arcs as low as 5 amps, suitable for GTAW applications.
Q: Does it support grind mode? A: Yes. Switch to grind mode for surface prep without filter darkening.
Q: What is the power source? A: Solar assisted with replaceable lithium batteries.
Q: Is the helmet compatible with cheater lenses? A: Yes – standard clip-in magnifiers fit inside the frame.
Disclosure: We may earn a small commission at no extra cost to you.)
Manage Consent
To provide the best experiences, we use technologies like cookies to store and/or access device information. Consenting to these technologies will allow us to process data such as browsing behavior or unique IDs on this site. Not consenting or withdrawing consent, may adversely affect certain features and functions.
Functional
Always active
The technical storage or access is strictly necessary for the legitimate purpose of enabling the use of a specific service explicitly requested by the subscriber or user, or for the sole purpose of carrying out the transmission of a communication over an electronic communications network.
Preferences
The technical storage or access is necessary for the legitimate purpose of storing preferences that are not requested by the subscriber or user.
Statistics
The technical storage or access that is used exclusively for statistical purposes.The technical storage or access that is used exclusively for anonymous statistical purposes. Without a subpoena, voluntary compliance on the part of your Internet Service Provider, or additional records from a third party, information stored or retrieved for this purpose alone cannot usually be used to identify you.
Marketing
The technical storage or access is required to create user profiles to send advertising, or to track the user on a website or across several websites for similar marketing purposes.