Category: Oxy-Fuel Cutting Support

  • Oxy-Fuel Flame Pops or Backfires

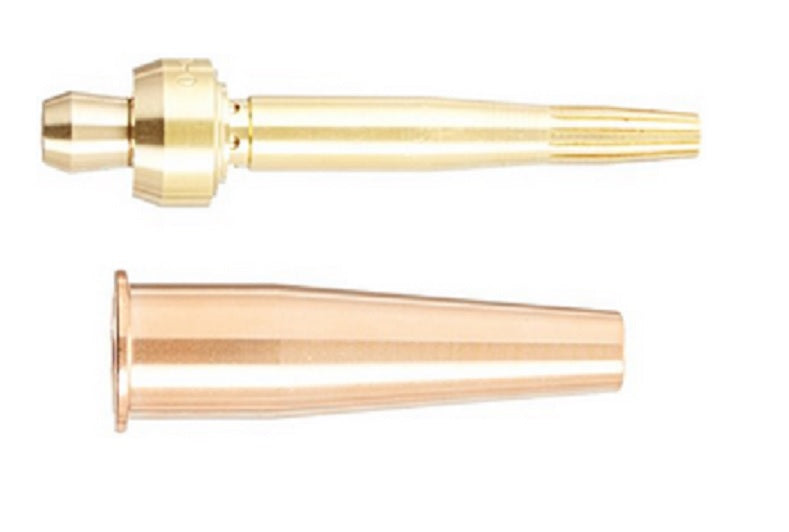
    ATTC 6290-1NX, Harris Style Cutting Tip for Alternate fuel gas, #1 Size Tip, Pack of (1)
    “>ATTC 6290-1NX, Harris Style Cutting Tip for Alternate fuel gas, #1 Size Tip, Pack of (1)

    Oxy-fuel torch popping usually points to a setup, cleaning, or gas-flow problem. In some cases the issue is a backfire at the tip. In worse cases it can move into a flashback event. Do not keep firing the torch until the cause is found.

    Key Takeaways

    • Popping is often caused by low gas flow, dirty tip orifice, loose connections, or poor lighting procedure.
    • Backfire usually starts at the tip and may be repeated if the torch is not cleaned or adjusted correctly.
    • Check for leaks, correct pressures, clean passages, and proper valve sequence before returning to service.
    • If the torch shows signs of overheating, sustained squeal, or flame travel into the tip, stop and inspect immediately.

    What Oxy-Fuel Torch Popping Means

    When an oxy fuel torch popping condition starts, the flame may snap, sputter, or go out and relight at the tip. That is different from a smooth flame. It usually means the gas mix, flow, or tip condition is not stable enough to keep the flame seated at the tip face.

    Common triggers include:

    • Clogged or partially blocked tip passages
    • Loose tip nut or torch head connection
    • Incorrect gas pressure or low cylinder supply
    • Dirty seat surfaces or damaged tip
    • Improper lighting or shutdown sequence
    • Heat buildup at the tip from prolonged use

    Troubleshooting Steps

    1) Stop and inspect the torch

    If the torch is popping repeatedly, shut it down safely. Let the tip cool if needed. Check for discoloration, soot, damaged seats, or signs of overheating. If the torch body or tip is hot enough to affect handling, wait before disassembly.

    2) Check cylinder supply and regulator settings

    Low supply pressure can create unstable flow. Verify cylinder contents and regulator function. Confirm the setting matches the torch and tip requirements. Exact values are unknown (verify) because they depend on torch model, gas type, tip size, and application.

    3) Inspect for leaks

    Leaks can pull the flame off the tip or create unstable ignition. Check hoses, fittings, valves, tip seats, and connections with an approved leak-check method. Repair any leak before relighting.

    4) Clean the tip correctly

    Tip orifice blockage is a common cause of popping. Clean only with proper tip cleaners or approved methods. Do not enlarge the orifice with wire, drill bits, or hard tools. That can ruin the tip geometry and make the condition worse.

    5) Verify the tip matches the fuel and task

    Use a tip intended for the gas and process. A mismatched tip can cause poor flame stability, hard starting, or popping. For the allowed part below, compatibility beyond the stated product description is unknown (verify).

    6) Check the lighting sequence

    Follow the torch manufacturer’s lighting procedure. In general, the fuel gas is lit first, then oxygen is added as needed to adjust the flame. If the sequence is wrong, the torch may pop or backfire on start-up.

    7) Look for damaged torch components

    If cleaning and setup checks do not fix the issue, inspect the torch head, valves, seats, and mixers for damage. Internal wear can create unstable gas mixing and repeated backfire. Replace damaged parts rather than forcing service.

    Support Checks That Reduce Repeated Backfire

    • Keep tip faces clean and free of slag buildup.
    • Shut down gas in the correct sequence after each use.
    • Do not store a torch with loose fittings or partially closed valves.
    • Use clean, dry gas supply equipment.
    • Inspect flashback arrestors and check valves if installed. Type and condition are unknown (verify).

    Parts Section

    When the tip is worn, damaged, or not cleaning up, replacement may be the correct fix.

    • ATTC 6290-1NX, Harris Style Cutting Tip for Alternate fuel gas, #1 Size Tip, Pack of (1)

    This part is listed as a cutting tip with a short description of “Cutting Tip 2Pc LG.” It is manufactured in the United States and manufactured by American Torch Tip. Use the product listing and your torch documentation to verify fit, gas type, and application before use. Exact compatibility is unknown (verify).

    ATTC 6290-1NX, Harris Style Cutting Tip for Alternate fuel gas, #1 Size Tip, Pack of (1)

    ATTC 6290-1NX, Harris Style Cutting Tip for Alternate fuel gas, #1 Size Tip, Pack of (1)

    The product type is Cutting Tip 2Pc LG. It is manufactured in United States. It is manufactured by American Torch Tip.

    View at Arc Weld Store

    Safety Notes

    • Do not relight a torch that has just backfired without checking the cause.
    • If flame travel occurs into the tip or torch body, stop work and inspect before reuse.
    • Keep hands, face, and body clear of the tip during ignition and adjustment.
    • Use eye protection and follow site hot-work procedures.
    • If you smell fuel gas or cannot control the flame, shut down the system and isolate the supply.

    FAQ

    Why does my oxy-fuel torch pop when I light it?

    Most often the tip is dirty, the gas flow is unstable, or the lighting sequence is wrong. Leaks and wrong pressure settings can also cause it.

    Is popping the same as backfire?

    No. Popping is a symptom. Backfire means the flame burns back at or into the tip. If the sound is sharp and repeated, treat it as a warning and inspect the torch.

    Can I keep using the torch if it only pops once?

    Only after checking the tip, flow, fittings, and lighting procedure. Repeated popping means the problem is still present.

    Will a new tip always fix backfire?

    No. A new tip helps only if the old tip is worn, damaged, or blocked. Pressure, leaks, torch damage, and procedure still need to be checked.

    Sources Checked

    Related Weld Support Guides

  • Torch Tip Popping During Cutting

    Torch Tip Popping During Cutting

    A torch tip that pops, snaps, or backfires during oxy-fuel cutting usually indicates blocked tip passages, incorrect gas pressure, overheating, loose tip seating, damaged torch components, or improper cutting technique. Repeated popping should never be ignored because it can progress into sustained backfire or flashback conditions that damage regulators, hoses, flashback arrestors, and torch assemblies.

    Common Symptoms

    • Sharp popping sound during cutting.
    • Torch flame extinguishes suddenly.
    • Flame repeatedly snaps back into the tip.
    • Uneven or unstable preheat flames.
    • Torch becomes excessively hot during cutting.
    • Cut quality deteriorates during operation.

    Likely Causes

    • Blocked tip passages: Slag or debris partially restricts oxygen or preheat flow.
    • Incorrect gas pressure: Oxygen or fuel gas pressure imbalance destabilizes the flame.
    • Overheating: Excessive tip temperature can trigger repeated backfires.
    • Loose cutting tip: Improper seating allows gas leakage and unstable flame patterns.
    • Damaged tip or torch seat: Worn sealing surfaces affect gas distribution.
    • Incorrect cutting distance: Running the tip too close to the workpiece overheats the torch rapidly.
    • Contaminated flashback arrestors or hoses: Restricted flow changes gas balance during operation.

    Inspection Steps

    1. Shut down the torch and allow all components to cool.
    2. Inspect the tip orifices for slag blockage or damage.
    3. Verify oxygen and fuel-gas pressures match the tip requirements.
    4. Inspect torch seats and tip threads for wear or contamination.
    5. Check flashback arrestors and hoses for restrictions.
    6. Inspect regulator operation for pressure instability.
    7. Confirm the torch is not overheating from improper cutting distance or prolonged use.

    Visual Wear Indicators

    • Distorted or enlarged tip orifices.
    • Heavy discoloration from overheating.
    • Carbon buildup or slag around preheat ports.
    • Uneven flame shape.
    • Damaged tip seating surfaces.

    Common Wrong-Part Mistakes

    • Using propane tips with acetylene settings or vice versa.
    • Installing incorrect tip sizes for material thickness.
    • Using damaged flashback arrestors.
    • Cleaning tips with oversized cleaners that enlarge the orifices.

    Field Fix vs Proper Fix

    Field fix: Clean the tip carefully, verify gas pressures, and allow overheated components to cool. Proper fix: Replace damaged tips, service regulators and arrestors, repair worn torch seats, and verify the complete oxy-fuel system matches the cutting application.

    Ignored Failure Consequences

    Ignoring torch tip popping can increase flashback risk, damage regulators and hoses, overheat torch heads, reduce cut quality, and create serious fuel-gas safety hazards.

    Safety Notes

    If sustained backfire or flashback occurs, shut down the torch immediately and inspect the entire gas system before reuse. Never continue cutting with unstable flames or repeated popping conditions.

    Sources Checked

    • Lincoln accessories catalog
    • Uploaded welding safety references
    • Existing oxy-fuel troubleshooting references
  • Acetylene Regulator Freezing Troubleshooting

    Acetylene Regulator Freezing Troubleshooting

    An acetylene regulator that freezes or develops frost during use is usually caused by excessive gas withdrawal rates, rapid pressure drop, moisture contamination, restricted gas flow, or operating too close to the cylinder withdrawal limit. Freezing regulators can cause unstable flame behavior, reduced cutting performance, regulator damage, and unsafe fuel-gas delivery conditions.

    Common Symptoms

    • Frost or ice forming on the regulator body.
    • Flame weakens during long cuts or heating cycles.
    • Pressure fluctuates while cutting.
    • Torch pops or backfires intermittently.
    • Regulator output drops unexpectedly.
    • Fuel flow decreases as the regulator gets colder.

    Likely Causes

    • Excessive withdrawal rate: Pulling acetylene too quickly from the cylinder causes rapid cooling and regulator icing.
    • Moisture contamination: Water vapor inside the gas system can freeze during pressure drop.
    • Restricted hoses or flashback arrestors: Flow restrictions increase pressure differential and cooling effects.
    • Undersized cylinders: Small acetylene cylinders may not support heavy cutting or heating demand continuously.
    • Damaged regulator internals: Worn seats or diaphragms can create unstable flow behavior.
    • Cold ambient conditions: Low temperatures increase icing risk during high-demand operation.

    Inspection Steps

    1. Shut down the torch and allow the regulator to warm naturally.
    2. Inspect the regulator body for frost patterns or condensation.
    3. Check hose routing for kinks or restrictions.
    4. Inspect flashback arrestors and check valves for contamination.
    5. Verify cylinder size is adequate for the cutting or heating load.
    6. Check regulator outlet pressure stability during operation.
    7. Inspect for signs of oil, grease, or contamination in the gas system.

    Compatibility Notes

    • Acetylene withdrawal rate should remain within safe cylinder limits.
    • Large heating tips may require manifolded cylinders instead of single-cylinder setups.
    • Fuel-gas hose grade must match acetylene service requirements.
    • Flashback arrestors and check valves must match the torch system flow capacity.

    Common Wrong-Part Mistakes

    • Using undersized regulators for heavy heating applications.
    • Installing restrictive or contaminated flashback arrestors.
    • Using damaged hoses with internal collapse.
    • Attempting to thaw regulators with open flame or direct heat.

    Field Fix vs Proper Fix

    Field fix: Reduce gas demand temporarily, allow the regulator to warm naturally, and inspect for flow restrictions. Proper fix: Increase cylinder capacity, service contaminated components, replace damaged regulators, and ensure the complete fuel-gas system matches the required flow demand.

    Ignored Failure Consequences

    Ignoring regulator freezing can cause unstable torch operation, reduced cutting quality, flashback conditions, regulator damage, hose stress, and unsafe fuel-gas delivery during cutting or heating operations.

    Safety Notes

    Never heat frozen acetylene regulators with torches, heaters, or open flame. Keep oil and grease away from oxygen and fuel-gas equipment. Always bleed the system before servicing hoses, arrestors, or regulators.

    Sources Checked

    • Lincoln accessories and welding support catalogs
    • Uploaded welding safety references
    • Existing oxy-fuel troubleshooting content
  • Cutting Tip Slag Blockage Symptoms

    Cutting Tip Slag Blockage Symptoms

    A cutting tip partially blocked by slag or debris can disrupt oxygen flow instantly and create poor cut quality, unstable preheat flames, excessive drag lines, heavy slag buildup, and difficult pierces. Oxy-fuel cutting tips rely on balanced preheat and cutting oxygen flow. Even small restrictions inside the oxygen or preheat passages can change flame shape and cutting performance dramatically.

    Common Symptoms

    • Heavy slag hanging on the bottom of cuts.
    • Uneven or wandering cut lines.
    • Preheat flames look uneven or distorted.
    • Torch pops or backfires during cutting.
    • Difficulty piercing thicker material.
    • Excessive drag lines or rough cut surfaces.
    • Cutting oxygen stream appears weak or scattered.

    Likely Causes

    • Slag contamination: Molten metal splash can partially block oxygen or preheat ports.
    • Improper tip cleaning: Oversized tip cleaners can damage or enlarge precision orifices.
    • Backfire contamination: Repeated backfires can force debris into the tip passages.
    • Overheating: Excessive heat can distort the tip face or internal passages.
    • Poor gas filtration: Dirty regulators or hoses may introduce contamination into the torch system.
    • Physical damage: Dropped torches or impact damage can deform the tip orifices.

    Inspection Steps

    1. Shut off gas supply and allow the torch to cool fully.
    2. Inspect the cutting oxygen orifice and preheat holes under good lighting.
    3. Check for slag buildup, discoloration, or damaged tip edges.
    4. Use the correct size tip cleaner only.
    5. Inspect hoses, flashback arrestors, and regulators for contamination.
    6. Verify proper gas pressure settings after reinstalling the tip.

    Visual Wear Indicators

    • Rounded or enlarged oxygen orifice.
    • Distorted preheat flame pattern.
    • Heat discoloration near the tip face.
    • Uneven slag accumulation around the ports.
    • Pitted or damaged tip seating surfaces.

    Common Wrong-Part Mistakes

    • Using incorrect tip sizes for the material thickness.
    • Mixing propane and acetylene tip styles incorrectly.
    • Using oversized tip cleaners that damage the orifices.
    • Ignoring worn torch seats when replacing tips only.

    Field Fix vs Proper Fix

    Field fix: Clean the tip carefully using the correct cleaners and confirm proper gas pressures. Proper fix: Replace damaged tips, service contaminated torch systems, repair worn seats, and verify gas compatibility with the installed tip design.

    Ignored Failure Consequences

    Continuing to cut with a blocked tip can increase backfire risk, overheat the torch head, damage regulators, waste gas, reduce cut quality, and create unsafe cutting conditions.

    Safety Notes

    Never clean oxy-fuel tips with drill bits or hardened steel objects. Incorrect cleaning can permanently damage the orifices. Always shut off gas supply and bleed the system before servicing cutting equipment.

    Sources Checked

    • Lincoln Electric accessories catalog
    • Uploaded welding safety catalogs
    • Existing oxy-fuel troubleshooting references
  • Cutting Torch Oxygen Lever Sticking Causes

    Cutting Torch Oxygen Lever Sticking Causes

    A cutting torch oxygen lever that sticks, binds, or fails to return smoothly is usually caused by internal contamination, damaged valve components, dried lubrication, heat distortion, worn springs, or regulator contamination entering the torch body. A sticking oxygen lever can affect cutting oxygen flow instantly, causing poor cuts, unstable flame behavior, operator fatigue, and unsafe torch handling conditions.

    Common Symptoms

    • Oxygen lever feels stiff or hard to depress.
    • Lever does not return smoothly after cutting.
    • Cutting oxygen flow surges or hesitates.
    • Torch cut quality changes during operation.
    • Lever binds more as the torch heats up.
    • Operator must manually pull the lever back up.

    Likely Causes

    • Internal contamination: Dirt, metal particles, or degraded seals inside the oxygen valve assembly can cause sticking.
    • Heat distortion: Excessive torch overheating may warp internal components or dry out lubrication.
    • Damaged return spring: Weak or damaged springs prevent smooth lever return.
    • Improper lubrication: Oxygen-compatible components require proper handling. Incorrect lubricants can create dangerous contamination risks.
    • Regulator contamination: Moisture, oil, or debris entering the oxygen system can damage torch internals.
    • Physical damage: Dropped torches or bent lever assemblies may bind mechanically.

    Inspection Steps

    1. Shut off gas supply and bleed the system fully before inspection.
    2. Inspect the oxygen lever pivot for visible damage or contamination.
    3. Check for heat discoloration around the torch head and valve body.
    4. Verify regulator and hose connections are clean and dry.
    5. Inspect oxygen hoses for internal deterioration or contamination.
    6. Test lever movement cold and after brief heating cycles.

    Common Wrong-Part Mistakes

    • Installing incorrect valve kits or seal materials.
    • Using non-approved lubricants in oxygen systems.
    • Replacing regulators when the torch valve assembly is the actual problem.
    • Ignoring contaminated hoses or flashback arrestors.

    Field Fix vs Proper Fix

    Field fix: Clean external pivot points carefully and verify the torch is not overheating during use. Proper fix: Rebuild or replace damaged oxygen valve components, remove contaminated hoses or regulators, and service the torch using oxygen-compatible repair procedures only.

    Ignored Failure Consequences

    Ignoring a sticking oxygen lever can lead to unstable cuts, torch overheating, flashback risks, oxygen leaks, operator fatigue, and accelerated internal valve damage.

    Safety Notes

    Never use petroleum-based lubricants on oxygen system components. Oxygen contamination can create severe fire and explosion hazards. Always bleed pressure from regulators and hoses before servicing oxy-fuel equipment.

    Sources Checked

    • Lincoln Electric accessories and welding support catalogs
    • General oxy-fuel torch maintenance references
    • Uploaded welding safety catalogs
  • Oxy-Fuel Hose Leak Inspection Guide

    Oxy-Fuel Hose Leak Inspection Guide

    An oxy-fuel hose leak should be treated as an immediate safety problem, not a minor nuisance. Leaks most often show up at hose fittings, regulator connections, torch inlets, cracked hose jackets, worn check valves, flashback arrestors, or damaged crimp ends. If oxygen or fuel gas is leaking, shut the cylinders off, bleed pressure from the system, ventilate the area, and inspect before relighting the torch.

    Common Symptoms

    • Hissing sound near regulator, hose, torch, or fittings.
    • Fuel-gas odor around the work area.
    • Flame changes when the hose is moved.
    • Regulator pressure drops while the torch valves are closed.
    • Bubbles appear during approved leak-solution testing.
    • Hose jacket is cracked, burned, cut, soft, swollen, or oil-contaminated.

    Likely Leak Points

    • Cylinder valve to regulator: Damaged seats, loose regulator nuts, dirt, or wrong connections can leak at the cylinder outlet.
    • Regulator outlet fittings: Loose hose nuts, worn sealing faces, or cross-threaded fittings can leak under pressure.
    • Hose crimp ends: Repeated bending near the ferrule can crack the hose internally.
    • Flashback arrestors and check valves: Damaged threads or worn seals can leak at either side of the device.
    • Torch inlet connections: Loose nuts or damaged threads can leak where hoses attach to the torch handle.
    • Hose body: Burns, cuts, abrasion, dry cracking, or chemical contamination can create pinhole leaks.

    Inspection Steps

    1. Close both cylinder valves.
    2. Open torch valves briefly to bleed system pressure, then close the torch valves.
    3. Back out regulator adjusting screws before repressurizing.
    4. Visually inspect the full hose length for burns, cuts, kinks, swelling, oil, grease, and abrasion.
    5. Check all fitting threads, nuts, crimp sleeves, flashback arrestors, and torch inlets.
    6. Repressurize one gas side at a time.
    7. Apply approved leak detection solution to fittings and suspect hose areas.
    8. Watch for growing bubbles. Any bubble formation means repair or replacement is required.
    9. Do not use a flame to check for leaks.

    Regulator Drop Test

    With the torch valves closed and the system pressurized, close the cylinder valve and watch the working-pressure gauge. A pressure drop can indicate a downstream leak in the regulator outlet, hose, arrestor, check valve, or torch valve. Test oxygen and fuel-gas sides separately so the leak path is easier to isolate.

    What To Verify Before Ordering Hose

    • Gas service: oxygen/fuel-gas twin hose or single-line hose.
    • Fuel type: acetylene, propane, propylene, natural gas, or alternate fuel.
    • Hose grade required for the fuel gas being used.
    • Inside diameter and length.
    • Fitting size and thread direction.
    • Compatibility with regulators, torch handle, check valves, and flashback arrestors.

    Common Wrong-Part Mistakes

    • Using hose not rated for the fuel gas.
    • Mixing oxygen and fuel-gas fittings incorrectly.
    • Reusing damaged hose nuts or crushed sealing faces.
    • Skipping check valves or flashback arrestors after hose replacement.
    • Repairing hose with tape instead of replacing the damaged assembly.

    Field Fix vs Proper Fix

    Field fix: Tighten a loose fitting only after depressurizing the system and confirming the threads and sealing surfaces are undamaged. Proper fix: Replace leaking hose assemblies, damaged fittings, failed check valves, leaking flashback arrestors, or contaminated regulators. Do not tape, clamp, or splice damaged oxy-fuel hose unless the repair method is approved by the hose and equipment manufacturer.

    Ignored Failure Consequences

    Ignoring an oxy-fuel hose leak can lead to fire, flashback, regulator damage, unstable flame settings, oxygen-enriched clothing or work areas, fuel-gas accumulation, and serious injury. Fuel-gas leaks are especially hazardous in pits, confined spaces, vehicles, and poorly ventilated shops.

    Safety Notes

    • Keep oil and grease away from oxygen equipment.
    • Never check leaks with an open flame.
    • Ventilate the area before relighting any torch.
    • Do not use damaged, burned, cracked, swollen, or contaminated hose.
    • Keep cylinders closed when equipment is not in use.
    • Use proper PPE for oxy-fuel cutting and heating work.

    Sources Checked

    • Uploaded welding accessory catalogs
    • Uploaded welding PPE and safety catalog references
    • Existing oxy-fuel troubleshooting coverage on the blog

  • Stream with Amazon Music