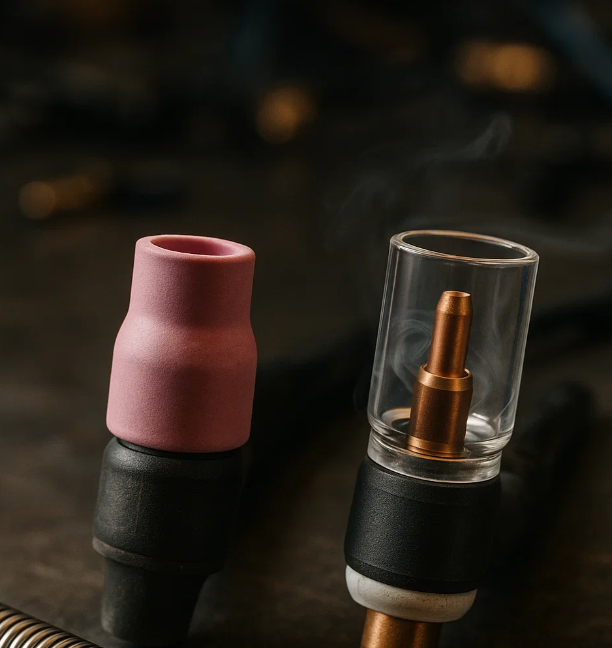
A conventional TIG cup number describes the outlet diameter in sixteenths of an inch: #6 is 3/8 inch and #8 is 1/2 inch. It does not tell you which torch it fits or what gas flow to use. Match the torch family, collet body or gas lens, cup design, and application before ordering.
This guide is designed for professional welders, welding students, and metal fabricators who want to understand how to select the best cup for their specific application, whether working with stainless steel pipe or aluminum sheet.
Types of TIG Cups: Ceramic vs. Glass
There are two primary types of TIG cups used today:
1. Ceramic (Alumina) Cups
- The most common material for TIG cups
- Durable and resistant to heat
- Standard for general fabrication work
- Inexpensive and widely available
2. Glass (Pyrex) Cups
- Transparent—great for visibility of the weld puddle
- Popular with pipe welders and instructors for live arc teaching
- Fragile compared to ceramic
- Often used with gas lens setups
TIG cup size chart: nominal outlet diameters
Cup sizes range by number, which corresponds roughly to 1/16” per number unit in inside diameter. Example: Size #6 = 3/8″.
Here’s a breakdown:
| Cup number | Nominal outlet, inches | Approximate millimeters |
|---|---|---|
| #4 | 1/4 | 6.35 |
| #5 | 5/16 | 7.94 |
| #6 | 3/8 | 9.52 |
| #7 | 7/16 | 11.11 |
| #8 | 1/2 | 12.70 |
| #10 | 5/8 | 15.88 |
| #12 | 3/4 | 19.05 |
| #14 | 7/8 | 22.22 |
| #16 | 1 | 25.40 |
Turn the cup number into an exact part
The millimeter column is an arithmetic conversion of the nominal inch size. Manufacturer dimensions may be rounded; the cup’s actual part number and compatible front-end system still decide fit.
- CK’s AK-4 example lists standard alumina cup 2A8 (13N12), size #8, in its 2 Series kit for CK9/CK20-style torches.
- CK’s Standard Gas Saver example lists D2GS332-P as a CK9/CK20 2 Series kit for 3/32-inch tungsten with a #8 glass cup. The kit has its own matched components; this is not a bare-cup interchangeability claim.
Record the torch model, existing cup part number, collet-body or gas-lens system, and tungsten diameter. Identify the replacement using those details before buying. If the problem is soot or porosity, check the shielding-gas path before purchasing a larger cup. Manufacturer instructions and the applicable welding procedure control the setup.
Key Characteristics to Understand
1. Shielding Gas Coverage
- Coverage depends on the complete setup: cup design, gas lens or collet body, flow, torch position, joint access and drafts. Cup diameter alone does not establish adequate shielding.
- Access and shielding must both work: select the cup from the torch manufacturer’s guidance and the welding procedure rather than assuming smaller or larger is always better.
2. Gas Lens Compatibility
- Match the cup to its specified gas lens, collet body, seals and adapters. CK’s Gas Saver kits show why a complete matched system can be required.
- Use only the tungsten extension and gas settings supported for the complete torch setup and application. A gas lens does not guarantee freedom from turbulence or contamination.
3. Visibility & Puddle Control
- Glass cups give you complete visibility—ideal when puddle control is critical.
- Ceramic cups block your side view, but retain better durability.
4. Heat Resistance & Durability
- Ceramic: check the specific cup and torch ratings for current and duty cycle; material alone is not a universal heat-performance rating.
- Glass: Requires careful handling and is susceptible to cracking.
Process Considerations
GTAW (TIG Welding)
- Cup size is one part of the shielding setup; it is not a substitute for the welding procedure.
- Choose the cup and gas flow from the torch/cup manufacturer’s guidance for the joint, current, and shielding arrangement.
- A larger cup is not automatically better for every aluminum or stainless-steel job.
Welding Equipment Compatibility
- Make sure your torch head (typically WP-17, WP-20, or WP-9) accepts your chosen cup and collet body.
- Glass cups often require aftermarket torch kits or stubby gas lens kits.
Application Use Cases
Common Projects & Metals:
- For a new application, record the torch model, consumable system, cup part number, outlet size, and procedure reference.
- For reactive materials or critical joints, follow the specified shielding and purge arrangement; cup diameter alone does not establish adequate protection.
Industries That Care About Cup Selection:
- Aerospace & Motorsport Fabrication
- Food and Beverage Stainless Systems
- General Repair Shops and Field Welders
- Welding Schools & Training Facilities
Best Practices & Pro Tips
- Verify the whole front end: use the cup maker’s specified gas lens or collet body and compatible components before changing tungsten extension.
- Flow rate matters: use the cup/torch manufacturer’s recommendation and the applicable procedure. There is no universal flow rate based only on cup diameter.
- Don’t overtighten glass cups—they can shatter under torch heat expansion.
- For thin material, check joint access and the specified shielding setup instead of selecting a cup solely by sheet thickness.
- Instructing or filming welds? Use Pyrex to help show arc and puddle behavior clearly.
Safety Note
Always wear proper shade protection, especially when using glass cups, which do not block stray light like ceramic. The arc is more visible, and that includes UV exposure.
Conclusion
Start with fit: torch family, gas lens or collet-body system, and the manufacturer’s cup part number. Then check the application’s shielding requirements. Clear cups can improve sightlines, but neither clear material nor a large outlet guarantees a sound weld.
Take time to match your cup to your base metal, joint design, and access requirements. That simple swap could mean the difference between a clean pass and a scrapped weld.
WeldSupportParts.com may earn a small commission if you purchase recommended welding products through affiliate links provided on this page—at no additional cost to you.
Keep the details for your next job
A #8 cup tells you the nominal outlet size, not the torch family. Record both the cup part number and the torch model when asking for a replacement.
Download the free before-you-order checklist (PDF) — no signup required.
Read next
- Square Wave 205 buyer checks — Separate machine capability from torch and consumable fit.
- Connector identification — Check the machine-side connection before changing a torch.
Need a replacement? Start with parts identification before ordering. A lookup result is not manufacturer confirmation of compatibility.
Manufacturer references
Updated October 9, 2026: nominal-size conversions and CK-specific fit examples reviewed by Weld Support Parts; compatibility remains specific to the installed torch and front-end system. Manufacturer references are identified above where checked; this is not an independent product test, a welding procedure, or verification of every accessory on the page. Report a correction or suggest a guide.
Leave a Reply