
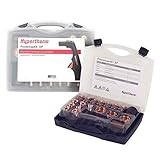
Hypertherm Plasma Swirl Ring 220670 – Replacement for Powermax45 Plasma Cutting System
$30.27
In Stock
View Product
$30.27
In Stock
View Product
If plasma consumables are wearing out too fast, the cause is usually not one part alone. Short life often comes from air quality, incorrect cut settings, poor torch handling, or a worn component elsewhere in the torch stack. Start with the basics and check each item in order.
Contaminated air is one of the most common causes of plasma consumables wearing fast. Moisture, oil, and dirt can damage the electrode and nozzle quickly. Verify the air supply, filtration, and dryer setup used on the machine. If the system depends on shop air, inspect the entire air path for contamination and pressure drop.
If air quality is uncertain, treat it as a likely root cause until verified. Unknown (Verify) for actual air cleanliness at the torch inlet.
Incorrect amperage, cut speed, or duty cycle can overheat consumables. Running too hot will erode the nozzle and electrode. Running too slow can put more heat into the part and torch than intended. Check the machine settings against the material and process being used. If those settings are not documented, mark them as Unknown (Verify).
Holding the torch too close can cause double arcing, nozzle damage, and rapid wear. Holding it too far away can also destabilize the arc and increase wear. Maintain the standoff recommended for the torch and process. If the actual cut height is not measured, it is Unknown (Verify).
Not every consumable set is meant for drag contact. If the torch is being dragged across plate with parts that are not intended for that use, the shield and nozzle may wear early. Confirm whether the process is drag cutting, stand-off cutting, or gouging. Unknown (Verify) if the torch is being used outside its intended cutting method.
Consumables wear faster when the torch is restarted repeatedly. Frequent piercing, short cuts, and testing can burn through nozzles and electrodes faster than normal. Reduce unnecessary starts where possible and use the correct pierce delay and cut sequence.
Do not replace only one part if the wear pattern suggests a system problem. Check the electrode, nozzle, shield, swirl ring, and retaining cap for pits, cracks, distortion, or heat damage. A worn swirl ring can disrupt gas flow and shorten life across the set.
Loose connections, damaged leads, or internal torch wear can cause unstable arc behavior. That instability can look like consumable wear, but the root cause may be elsewhere. Check for heat damage, loose fitment, and damaged sealing surfaces. Unknown (Verify) if the torch body or lead set has been inspected recently.
If parts are not seated correctly, gas flow and arc alignment can be affected. Cross-threaded retaining parts, missing seals, or incorrect part order can shorten life immediately. Recheck installation against the machine service procedure.
If the nozzle is pitted and the electrode is deeply worn, replace the related parts as a set. If the swirl ring is damaged or heat affected, inspect the whole consumable stack before returning the torch to service. A single failed part can be a symptom, not the whole problem.
For torch service, the swirl ring is one of the parts that can affect gas flow and consumable life.
[ArcBox: plasma-swirl-ring-hypertherm-220670]
Use only the correct part for the torch and power source. Compatibility beyond the listed application is Unknown (Verify).
Common causes include dirty air, wrong amperage, incorrect standoff, poor torch handling, frequent starts, and worn or misinstalled parts.
Yes. A damaged swirl ring can disrupt gas flow and contribute to unstable cutting and short consumable life.
Not if the nozzle, shield, or swirl ring also show damage. Replace the full set when wear is uneven or the cause is not confirmed.
Start with air quality, then inspect cut settings, standoff, and the full consumable stack.
Introducing the Hypertherm 220670 Swirl Ring, a vital component designed specifically for the Powermax45 plasma cutting system. This high-quality plasma swirl ring features a tough and durable construction, ensuring it withstands the rigors of plasma cutting with precision and efficiency. The plasma swirl ring plays a crucial role in the cutting process by creating a swirling motion in the plasma arc. This results…
View at Arc Weld StoreIntro
Your MIG gun stops feeding wire mid-weld. You power down, open the feeder, and find the wire welded solid into the contact tip. This is contact tip burnback—and it costs you time, consumables, and weld quality. The good news: it’s preventable with the right tip and maintenance routine.
Key Takeaways
The Problem
Contact tip burnback occurs when the wire gets stuck inside the contact tip and actually welds itself to the copper. This happens because:
The result: the wire literally welds itself to the tip, and your feeder can’t push it through.
Why It Matters
Burnback stops your weld mid-joint. You lose:
On a job site or in a production shop, one burnback can cascade into multiple restarts and rework.
The Fix
Contact tip burnback is a tip problem, not a feeder problem. Here’s what to do:
Prevention: Replace contact tips every 8–10 hours of welding, or sooner if you notice spatter buildup or inconsistent arc.
Why This Product Solves It
The Miller MDX Series MIG Contact Tip (.045″ or 1.2mm) is engineered for consistent wire flow and durability. Miller’s AccuLock design ensures:
Using the correct tip size for your wire diameter is non-negotiable. A .035″ tip on .045″ wire will jam; a .045″ tip on .035″ wire will spit spatter. Miller tips are sized precisely to match your wire.
Product Link:
$25.84 In Stock
Miller MDX Series MIG Contact Tip (.045" or 1.2mm), part no. T-M045 (10 per pack).
What to Check Before You Buy
Real-World Use
A fabrication shop running a Miller MDX-100 on .045″ mild steel was experiencing burnback every 30–40 minutes. The operator was using undersized .035″ tips (wrong size). After switching to Miller .045″ tips and cleaning the nozzle every 4 hours, burnback stopped entirely. Production time increased by 15%.
Common Mistakes
Safety Notes
Contact tips get hot during welding. Always allow the gun to cool before removing the nozzle or tip. Wear welding gloves when handling hot consumables. If you’re replacing tips while the welder is still warm, keep your hands clear of the arc area and power down the welder first.
Always follow the manufacturer’s instructions and your shop’s safety procedures. If you’re unsure about fitment or ratings, verify before you buy or install.
Related Reading
Where to Buy
Available at ArcWeld.store (stock and shipping: Unknown – verify)
$25.84 In Stock
Miller MDX Series MIG Contact Tip (.045" or 1.2mm), part no. T-M045 (10 per pack).
If your plasma cuts are leaving heavy bottom dross, the fastest “real fix” is often replacing worn consumables—especially the nozzle/tip and electrode. Below are practical replacement options and what to look for so you get clean cuts again without wasting time grinding.
Not sure this is your issue? [See the full troubleshooting guide → {PROBLEM POST TITLE & URL}]
WHERE TO BUY (ABOVE THE FOLD — REQUIRED)
Last update on 2026-06-26 / Affiliate links / Images from Amazon Product Advertising API
Key Takeaways:
Comparison Table:
| Model | Key Specs | Best For |
|---|---|---|
| Hypertherm 851510 Essential Handheld Kit | Includes electrodes/nozzles/drag shield (kit) | Stocking common wear items for Powermax45 XP handheld |
| Hypertherm 220941 (45A nozzle) | 45A cutting nozzle (part) | Replacing a worn nozzle causing dross/bevel |
| Hypertherm 220842 (electrode) | Electrode (part) | Restoring arc stability when electrode is pitted |
| Drag shield (model-specific) | Shield for drag cutting (part) | Drag cutting without destroying tips |
Copy table
Short description: A genuine consumables kit that bundles the common wear items so you can reset cut quality quickly.
Key specs (manufacturer verified): Kit for Powermax45 XP essential handheld, 45A cutting; Hypertherm part number 851510. (Contents vary by kit listing—verify before publishing.)
Best for: Users who want a single purchase to refresh consumables and reduce downtime.
ArcWeld link: N/A
Amazon:
Last update on 2026-06-26 / Affiliate links / Images from Amazon Product Advertising API
Short description: The nozzle orifice shape directly affects arc focus and dross. If it’s out-of-round, cut quality will not recover.
Key specs: Unknown (Verify)
Best for: Heavy bottom dross, rough edge, increased bevel after previously clean cuts.
ArcWeld link: N/A
Amazon:
No products found.
MID-POST CTA (REQUIRED):
Still deciding? Compare these options below.
Last update on 2026-06-26 / Affiliate links / Images from Amazon Product Advertising API
Short description: A pitted electrode can destabilize the arc and accelerate nozzle wear.
Key specs: Unknown (Verify)
Best for: Arc instability, rapid consumable wear, inconsistent cut quality.
ArcWeld link: N/A
Amazon:
No products found.
Short description: If you drag cut without the correct shield, you can chew through tips and create inconsistent height—both drive dross.
Key specs: Unknown (Verify)
Best for: Handheld drag cutting on plate where consistent height is hard to maintain.
ArcWeld link: N/A
Amazon:
No products found.
TOP PICK CALLOUT:
Top pick (best overall): Hypertherm 851510 kit — it’s the simplest way to reset multiple wear points at once (nozzle + electrode + shield components), which is exactly what heavy dross usually indicates.
1) Does heavy bottom dross mean I’m cutting too slow?
Often, yes—but worn consumables and incorrect height can create the same symptom.
2) Should I replace just the nozzle or the electrode too?
If cut quality dropped noticeably, replace both (common practice to restore arc shape).
3) Why did my cuts get worse overnight?
Check air moisture/pressure first, then inspect consumables for erosion/pitting.
4) Can I drag cut with any tip?
No—use consumables designed for drag cutting or maintain proper standoff.
Plasma cutting produces hot slag and UV/IR radiation. Wear gloves and ANSI Z87.1 eye protection; use a face shield when chipping dross and keep bystanders protected.
Plasma cuts that leave a thick “slag” ridge on the bottom edge are usually telling you the arc isn’t transferring cleanly. If you’re cutting plate and spending more time grinding than cutting, this is the fast checklist to get clean edges again. Here’s why it happens and how to fix it.
Symptoms (what you’ll see):
Root Cause (what’s actually happening):
Heavy bottom dross is typically caused by a mismatch between travel speed, torch standoff/drag technique, and air quality/pressure. When you move too slowly (or hold the torch too high/too low for the consumables you’re using), the arc lingers and the molten metal doesn’t blow out of the kerf cleanly—so it re-freezes as dross on the bottom edge.
Once you’ve run a set of consumables past their useful life, the nozzle orifice can erode and the electrode can pit. That degrades arc shape and airflow, which makes dross and bevel worse even if your technique is decent.
The Fix (step-by-step):
Real-World Tip:
Experienced plasma users don’t “fight” dross with more amps—they do quick test cuts and tune speed first, then height, then air. If the cut suddenly gets worse after it was fine yesterday, they assume air moisture or consumables before anything else.
Soft CTA (MANDATORY):
If this keeps happening, your plasma consumables (nozzle/tip + electrode + shield) are likely worn or damaged. See the best replacement options → [BUYER PAGE LINK PLACEHOLDER]
Safety Note:
Wear eye/face protection and gloves—plasma cutting throws hot sparks and slag. Use ANSI Z87.1-rated eye protection and keep flammables clear of the work area.
