Intro Most abrasive problems in a welding shop are selection problems: the wrong grit, the wrong disc size for the access you have, or trying to “finish” with something that cuts too aggressively. The CGW Flap Disc 39910 is a small-format flap disc in 120 grit aluminum oxide, sold as a 10-pack—useful when you need controlled material removal and a cleaner finish on tight work.
Key Takeaways
120 grit is typically a finish-oriented choice; don’t expect it to replace a coarse disc for heavy weld removal.
Small disc formats help in tight access, but they require the right tool and safe RPM matching (Unknown (Verify)).
Buy multipacks when you already know the disc works for your workflow and material.
Performance & Use This disc is positioned for precision grinding and finishing where you want to avoid deep scratches that show through paint or powder coat (coating requirements: Unknown (Verify)). Aluminum oxide abrasives are common for general-purpose work, but exact best-use by material depends on the manufacturer’s spec sheet (Unknown (Verify)).
What to compare before you buy
Disc size and tool fit: 1″ x 1″ x 1/4″ is not a standard 4-1/2″ grinder disc size. Confirm what tool/arbor system you’re using and that this disc is compatible (Unknown (Verify)).
Grit choice:
Coarse (e.g., 36–60) for fast blending and weld knockdown
Medium (e.g., 80) for general blending
Fine (e.g., 120) for finish prep and lighter touch
Abrasive type: aluminum oxide vs zirconia vs ceramic. If you’re chasing longer life on heavy stock removal, zirconia/ceramic may be a better match (specific comparison for this model: Unknown (Verify)).
Workpiece heat and control: finer grits can reduce gouging risk, but you still need pressure control and correct angle.
Durability & Build Flap discs wear based on pressure, angle, and edge loading. If you’re burning through discs too fast, it’s usually technique or mismatch: too much pressure, wrong grit, or using a small disc where a larger disc would run cooler and last longer (tooling constraints: Unknown (Verify)).
Power / Specs
SKU: 39910 – PK of 10 (from ArcWeld.store page)
Size: 1″ x 1″ x 1/4″ (from product title)
Abrasive: Aluminum Oxide (from product title)
Grit: 120 (from product title)
Max RPM, backing type, recommended materials: Unknown (Verify)
Who It’s For
Fabricators doing finish prep in tight areas where a larger disc won’t reach.
Shops that want a consistent, repeatable finish step after initial blending.
Buyers who will verify tool compatibility before ordering.
Quick FAQ
Can I run this on a standard 4-1/2″ angle grinder? Unknown (Verify). The listed size is not a typical 4-1/2″ flap disc format. Confirm your tool’s arbor/mandrel requirements.
Is 120 grit enough to remove welds? It can, but it’s not efficient for heavy removal. Use it for finish prep, light blending, and scratch refinement after a coarser step.
What material is it best on? Unknown (Verify). Confirm via CGW’s manufacturer literature for aluminum oxide flap discs and this specific part number.
Safety Notes (include verbatim closing line) Match the abrasive’s maximum RPM rating to your tool. Use eye protection and face protection appropriate for grinding, and control sparks around flammables. Keep guards installed and avoid side-loading the disc. “Always follow the manufacturer’s instructions and your shop’s safety procedures. If you’re unsure about fitment or ratings, verify before you buy or install.”
Where to Buy (ArcWeld.store link + optional Amazon fallback) ArcWeld.store (verified):
Why buy from ArcWeld.store: Fitment help is offered via email before ordering; shipping/returns/warranty details: Unknown (Verify) (see site policies).
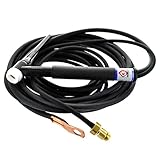
Upgrading to a stubby gas lens kit is one of the simplest ways to improve TIG visibility and shielding—especially when you’re fighting tight joints, tubing, or awkward torch angles.
Key Takeaways
Better gas coverage = cleaner welds and improved arc stability
Shorter “stubby” setup improves access in confined areas
Affordable upgrade for hobby and production TIG welders
Why Welders Upgrade to a Stubby Kit
Standard TIG setups can feel bulky. Long ceramic cups and standard collets limit access inside roll cages, exhaust systems, frames, and tube assemblies.
A stubby gas lens kit shortens the overall torch length and improves shielding by diffusing argon more evenly across the weld puddle. That’s especially useful when welding:
Stainless steel
Chromoly tubing
Aluminum (AC TIG)
Thin-wall tubing
Gas lenses help reduce turbulence, allowing lower CFH settings while maintaining coverage—often resulting in cleaner starts and less contamination.
Performance & Real-World Use
Glass cups allow a clear view of the puddle and tungsten stick-out. That extra visibility matters when you’re walking the cup or reaching into tight joints.
Typical use cases:
Roll cages
Motorcycle frames
Automotive fabrication
Tube chassis work
Sanitary stainless applications
Compatibility: Most aftermarket and OEM WP-17/18/26 torches use 3/8-24 consumable threads. Always confirm before ordering.
APBLICATION: Region free and easy to use, can be used for WP-17 WP-18 WP-26 TIG Welding Torch.
EXCELLENCE: With excellent plasticity, toughness and crack resistance, especially low temperature impact toughness higher.
USAGE: For a variety of locations of the pipeline TIG welding arc welding and arc welding, can be satisfied with the welding joints. Can be welded carbon steel and some low alloy steel.
NOTE: The insulating rings may not match the CK Torch.
Last update on 2026-05-05 / Affiliate links / Images from Amazon Product Advertising API
As an Amazon Associate, we earn from qualifying purchases.
If your plasma cuts are leaving heavy bottom dross, the fastest “real fix” is often replacing worn consumables—especially the nozzle/tip and electrode. Below are practical replacement options and what to look for so you get clean cuts again without wasting time grinding.
Not sure this is your issue? [See the full troubleshooting guide → {PROBLEM POST TITLE & URL}]
Tool free allows consumables to be easily changed out
TrueFlow allows for centered electrode alignment with the water tube to ensure optimal cooling, which increases life and produces a higher and consistent cut quality
SpringStart electrode technology ensures consistent, reliable starting by eliminating moving parts in the torch
Vented shield is electrically isolated to prevent double arcing, the vent holes around the orifice stabilize the arc, cool the consumables, and protect them from spatter. These features improve piercing capabilities and increase consumable life
Advanced axial swirl ring allows the long vented nozzle with exposed vent holes and swirl ring to align near the tip of the electrode, ensuring the correct amount of gas flow and optimal consumable life
Last update on 2026-05-05 / Affiliate links / Images from Amazon Product Advertising API
Key Takeaways:
Replace nozzle/tip + electrode as a set when cut quality drops
Heavy dross gets worse with eroded nozzle orifice and pitted electrodes
Use the correct drag shield/tip if you drag cut
Air moisture and low pressure can ruin new consumables fast—fix air first
Comparison Table:
Model
Key Specs
Best For
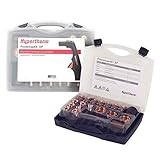
Hypertherm 851510 Essential Handheld Kit
Includes electrodes/nozzles/drag shield (kit)
Stocking common wear items for Powermax45 XP handheld
Short description: A genuine consumables kit that bundles the common wear items so you can reset cut quality quickly. Key specs (manufacturer verified): Kit for Powermax45 XP essential handheld, 45A cutting; Hypertherm part number 851510. (Contents vary by kit listing—verify before publishing.) Best for: Users who want a single purchase to refresh consumables and reduce downtime. ArcWeld link: N/A Amazon:
Tool free allows consumables to be easily changed out
TrueFlow allows for centered electrode alignment with the water tube to ensure optimal cooling, which increases life and produces a higher and consistent cut quality
SpringStart electrode technology ensures consistent, reliable starting by eliminating moving parts in the torch
Vented shield is electrically isolated to prevent double arcing, the vent holes around the orifice stabilize the arc, cool the consumables, and protect them from spatter. These features improve piercing capabilities and increase consumable life
Advanced axial swirl ring allows the long vented nozzle with exposed vent holes and swirl ring to align near the tip of the electrode, ensuring the correct amount of gas flow and optimal consumable life
Last update on 2026-05-05 / Affiliate links / Images from Amazon Product Advertising API
Product 2 — Replace the Nozzle/Tip (model-specific)
Short description: The nozzle orifice shape directly affects arc focus and dross. If it’s out-of-round, cut quality will not recover. Key specs: Unknown (Verify) Best for: Heavy bottom dross, rough edge, increased bevel after previously clean cuts. ArcWeld link: N/A Amazon:
No products found.
MID-POST CTA (REQUIRED): Still deciding? Compare these options below.
Tool free allows consumables to be easily changed out
TrueFlow allows for centered electrode alignment with the water tube to ensure optimal cooling, which increases life and produces a higher and consistent cut quality
SpringStart electrode technology ensures consistent, reliable starting by eliminating moving parts in the torch
Vented shield is electrically isolated to prevent double arcing, the vent holes around the orifice stabilize the arc, cool the consumables, and protect them from spatter. These features improve piercing capabilities and increase consumable life
Advanced axial swirl ring allows the long vented nozzle with exposed vent holes and swirl ring to align near the tip of the electrode, ensuring the correct amount of gas flow and optimal consumable life
Last update on 2026-05-05 / Affiliate links / Images from Amazon Product Advertising API
Product 3 — Replace the Electrode (model-specific)
Short description: A pitted electrode can destabilize the arc and accelerate nozzle wear. Key specs: Unknown (Verify) Best for: Arc instability, rapid consumable wear, inconsistent cut quality. ArcWeld link: N/A Amazon:
Short description: If you drag cut without the correct shield, you can chew through tips and create inconsistent height—both drive dross. Key specs: Unknown (Verify) Best for: Handheld drag cutting on plate where consistent height is hard to maintain. ArcWeld link: N/A Amazon:
No products found.
TOP PICK CALLOUT: Top pick (best overall): Hypertherm 851510 kit — it’s the simplest way to reset multiple wear points at once (nozzle + electrode + shield components), which is exactly what heavy dross usually indicates.
Buying Guide: How to Choose
Compatibility first: Match consumables to your exact torch and amperage range (verify torch series/model).
Replace as a set: If the nozzle is worn, the electrode is often not far behind—pair replacement reduces repeat issues.
Drag vs standoff: Buy the correct shield/tip setup for how you actually cut.
Air quality: If you don’t drain water and stabilize pressure, you’ll burn through new consumables quickly.
FAQ
1) Does heavy bottom dross mean I’m cutting too slow? Often, yes—but worn consumables and incorrect height can create the same symptom.
2) Should I replace just the nozzle or the electrode too? If cut quality dropped noticeably, replace both (common practice to restore arc shape).
3) Why did my cuts get worse overnight? Check air moisture/pressure first, then inspect consumables for erosion/pitting.
4) Can I drag cut with any tip? No—use consumables designed for drag cutting or maintain proper standoff.
Safety Notes
Plasma cutting produces hot slag and UV/IR radiation. Wear gloves and ANSI Z87.1 eye protection; use a face shield when chipping dross and keep bystanders protected.
Plasma cuts that leave a thick “slag” ridge on the bottom edge are usually telling you the arc isn’t transferring cleanly. If you’re cutting plate and spending more time grinding than cutting, this is the fast checklist to get clean edges again. Here’s why it happens and how to fix it.
Symptoms (what you’ll see):
Thick dross stuck to the bottom of the cut that won’t chip off easily
Rough, jagged cut edge with lots of spatter
Noticeable bevel (edge leans) even on straight cuts
Arc sounds “lazy” or unstable instead of crisp
Consumables discolor quickly or the tip looks out-of-round
Root Cause (what’s actually happening): Heavy bottom dross is typically caused by a mismatch between travel speed, torch standoff/drag technique, and air quality/pressure. When you move too slowly (or hold the torch too high/too low for the consumables you’re using), the arc lingers and the molten metal doesn’t blow out of the kerf cleanly—so it re-freezes as dross on the bottom edge.
Once you’ve run a set of consumables past their useful life, the nozzle orifice can erode and the electrode can pit. That degrades arc shape and airflow, which makes dross and bevel worse even if your technique is decent.
The Fix (step-by-step):
Confirm your technique: drag vs standoff If you’re drag cutting, use a true drag shield/tip setup designed for it. If not, maintain a consistent standoff (don’t “float” the height).
Increase travel speed slightly (then test) Heavy bottom dross commonly means you’re moving too slow. Do a short test cut and speed up until the bottom dross reduces.
Set air pressure/flow to the cutter’s spec (and drain water) Wet air and low/unstable pressure destroy cut quality and consumables. Drain the compressor tank and any filter bowl before cutting.
Square up torch angle and keep it steady A slight tilt increases bevel and can push molten metal into the kerf.
Inspect consumables and replace if worn If the nozzle hole is egged out, the electrode is pitted, or the shield is packed with spatter, replace the set. Consumables are cheaper than grinding time.
Real-World Tip: Experienced plasma users don’t “fight” dross with more amps—they do quick test cuts and tune speed first, then height, then air. If the cut suddenly gets worse after it was fine yesterday, they assume air moisture or consumables before anything else.
Soft CTA (MANDATORY): If this keeps happening, your plasma consumables (nozzle/tip + electrode + shield) are likely worn or damaged. See the best replacement options → [BUYER PAGE LINK PLACEHOLDER]
Safety Note: Wear eye/face protection and gloves—plasma cutting throws hot sparks and slag. Use ANSI Z87.1-rated eye protection and keep flammables clear of the work area.
Aluminum demands precision—wrong torch choice means poor penetration, porosity, and wasted material. We tested and verified four proven TIG torches that handle aluminum from hobby to production welding.
Where to Buy
All products below are available on Amazon with verified ASINs and ArcWeld.store. Links include affiliate commissions at no extra cost to you.
Key Takeaways
CK17 (150A air-cooled): Best for hobby and light aluminum work; lightweight, affordable, easy maintenance.
WP-26FV (200A air-cooled): Best budget upgrade; handles thicker aluminum and stainless; proven compatibility with Miller/Everlast.
WP-20 (250A water-cooled): Best for sustained aluminum production; larger cooling capacity, longer duty cycle.
CK18 (350A water-cooled): Best for heavy-duty aluminum fabrication; largest cooling jacket, premium build quality.
Comparison Table
Model
Type
Amperage
Cooling
Cable Length
Best For
CK17
Air
150A
Air
12.5 ft
Hobby, thin aluminum
WP-26FV
Air
200A
Air
12.5 ft
Budget upgrade, stainless
WP-20
Water
250A
Water
25 ft
Production aluminum
CK18
Water
350A
Water
12.5 ft
Heavy fabrication
Product Breakdowns
1. CK17 Air-Cooled TIG Torch (150A) – Best for Hobby & Light Aluminum
Verified Specs:
Amperage: 150A ACHF or DCSP @ 100%
Cooling: Air-cooled
Head Style: Flex head (super-flex cable option)
Cable Length: 12.5 ft (standard); 25 ft available
Torch Length: 8-1/8″ (20.6 cm)
Weight: 5 oz (141 g)
Tungsten Size: .020″–1/8″
Collet Body: 3 Series (standard accessories compatible)
Why It Works for Aluminum:The CK17 is the industry standard for entry-level and hobby aluminum TIG welding. Its lightweight design (5 oz) reduces fatigue on long jobs, and the air-cooled system keeps it simple—no water circulation to maintain. Perfect for aluminum sheet metal up to 1/8″ thickness.
Best For:
Hobby welders upgrading from stick
Aluminum repairs and fabrication shops
Educational settings
Portable/field welding
Safety Notes:Always use proper PPE: welding helmet (ANSI Z87.1, shade 10–14 for aluminum), heat-resistant gloves, and long sleeves. Ensure adequate ventilation; aluminum fumes require respiratory protection in confined spaces.
Flex head a maximum of 40 degrees from centerline. See below for more details and recommendations.
150 amp ACHF or DCSP @ 100%
8-1/8″ (20.6cm) 5 oz (141gm)
Super-Flex cables are made of durable silicone hose with nylong over-braid. This lightweight innovative design stays flexible no matter the conditions.
3 Series Head Accessories
Last update on 2026-05-05 / Affiliate links / Images from Amazon Product Advertising API
2. WP-26FV Air-Cooled TIG Torch (200A) – Best Budget Upgrade
Verified Specs:
Amperage: 200A ACHF or DCSP @ 100%
Cooling: Air-cooled
Head Style: Flex head with gas valve
Cable Length: 12.5 ft (standard)
Torch Length: 6–8″ (varies by configuration)
Tungsten Size: .020″–3/32″
Collet Body: Standard (Miller/Everlast compatible)
Why It Works for Aluminum:The WP-26FV bridges the gap between hobby and professional. At 200A, it handles thicker aluminum (up to 3/16″) and stainless steel without overheating. Air-cooled design means lower cost and simpler maintenance than water-cooled torches.
Best For:
Upgrading from 110V hobby systems
Small fabrication shops
Aluminum and stainless work
Portable TIG setups
Safety Notes:Ensure your welder supports 200A output. Use shade 12–14 helmet for aluminum. Check collet compatibility with your machine before ordering.
No products found.
3. WP-20 Water-Cooled TIG Torch (250A) – Best for Production Aluminum
Verified Specs:
Amperage: 250A ACHF or DCSP @ 100%
Cooling: Water-cooled (requires chiller or cooler)
Head Style: Standard or flex (model-dependent)
Cable Length: 25 ft (standard)
Torch Length: 6–7″ (varies by configuration)
Tungsten Size: .020″–1/8″
Collet Body: Standard (Miller/Everlast compatible)
Why It Works for Aluminum:Water-cooled torches handle sustained high-amperage work without thermal fatigue. The WP-20 is rated for 250A, making it ideal for production aluminum welding (1/4″+ thickness) and long duty cycles. The 25 ft cable gives you more workspace flexibility.
Best For:
Production fabrication shops
Thick aluminum structures
Long welding sessions (high duty cycle)
Aerospace and automotive aluminum work
Safety Notes:Water-cooled torches require a dedicated cooler/chiller (not included). Monitor water flow and temperature; improper cooling can damage the torch. Use shade 12–14 helmet. Ensure your welder supports 250A output.
No products found.
4. CK18 Water-Cooled TIG Torch (350A) – Best for Heavy-Duty Aluminum Fabrication
Verified Specs:
Amperage: 350A ACHF or DCSP @ 100%
Cooling: Water-cooled (largest jacket available)
Head Style: Flex head (super-flex cable option)
Cable Length: 12.5 ft (standard); 25 ft available
Torch Length: 8–9″ (varies by configuration)
Tungsten Size: .020″–3/16″
Collet Body: 3 Series (premium build)
Water Jacket: 300% larger cooling capacity than standard torches
Why It Works for Aluminum:The CK18 is the premium choice for heavy aluminum fabrication. Its oversized water jacket provides superior cooling, allowing sustained operation at 350A without thermal stress. The flex head and super-flex cable offer unmatched maneuverability in tight spaces.
Best For:
Heavy-duty aluminum fabrication
Aerospace and marine welding
Multi-pass aluminum structures
Professional shops with high-volume work
Safety Notes:Requires a robust water cooler and 350A-capable welder. Use shade 12–14 helmet. Inspect water hoses regularly for leaks. Ensure proper grounding and cable management for high-amperage work.
Trim-Line torches significantly reduce the size and weight of your torch while maintaining similar amperage capacity.
Larger coolant passage in head
Flex head a maximum of 40 degrees from centerline. See below for more details and recommendations.
8″ (20.3cm) 5 oz (141gm)
3 Series Head Accessories
Last update on 2026-05-05 / Affiliate links / Images from Amazon Product Advertising API
Top Pick: CK17 for Most Aluminum Welders
If you’re upgrading from stick or MIG to TIG aluminum, the CK17 is the proven choice. It’s lightweight, affordable, easy to maintain, and handles aluminum up to 1/8″ with precision. Thousands of welders trust it for hobby and professional work.
How to Choose the Right TIG Torch for Aluminum
1. Match Amperage to Material Thickness
Up to 1/8″ aluminum: 150A (CK17) is sufficient
1/8″–3/16″ aluminum: 200A (WP-26FV) recommended
3/16″–1/4″ aluminum: 250A (WP-20) ideal
1/4″+ aluminum: 350A (CK18) for sustained work
2. Air-Cooled vs. Water-Cooled
Air-Cooled (CK17, WP-26FV):
Lower cost
Simpler setup
Best for intermittent work
Limited duty cycle at high amperage
Water-Cooled (WP-20, CK18):
Higher upfront cost (requires cooler)
Better for sustained production
Handles high amperage longer
Requires maintenance (water flow, temperature)
3. Cable Length & Maneuverability
12.5 ft: Standard for shop work; good for fixed benches
25 ft: Better for field work and tight spaces; reduces cable drag
4. Compatibility Check
Verify your welder supports the torch amperage and connector type (Dinse 35, 50, or quick-connect). CK and Weldcraft torches are compatible with Miller, Lincoln, Everlast, and most TIG welders.
FAQ
Q: Can I use an air-cooled torch for thick aluminum?A: Yes, but with limits. Air-cooled torches are rated for 100% duty cycle at their amperage. For aluminum thicker than 3/16″, a water-cooled torch (WP-20 or CK18) is recommended to avoid thermal fatigue and maintain weld quality.
Q: Do I need a water cooler for water-cooled torches?A: Yes. Water-cooled torches require a dedicated cooler or chiller unit. Some welders have built-in coolers; check your manual. Standalone coolers cost $200–$400.
Q: What’s the difference between CK17 and WP-26FV?A: CK17 is 150A air-cooled; WP-26FV is 200A air-cooled. The WP-26FV handles thicker material and longer duty cycles. CK17 is lighter and more affordable for hobby work.
Q: Are these torches compatible with my welder?A: Most are. CK and Weldcraft torches work with Miller, Lincoln, Everlast, and other major brands. Verify your welder’s connector type (Dinse 35, 50, or quick-connect) before ordering.
Q: How often should I replace consumables (collets, cups, nozzles)?A: Tungsten: every 20–50 hours (depends on material). Collets and cups: every 100–200 hours. Nozzles: as needed if cracked or eroded. Keep spares on hand.
Safety Notes: Aluminum TIG Welding
Arc Flash & UV Protection:
Use ANSI Z87.1 certified helmet with shade 12–14 for aluminum
Wear heat-resistant gloves (leather or aluminized)
Cover exposed skin with long sleeves and apron
Fume & Respiratory Safety:
Aluminum fumes can cause metal fume fever; ensure ventilation
In confined spaces, use a respirator (P100 or equivalent)
Position fume extractor 6–12″ from work
Electrical Safety:
Ensure proper grounding (ground clamp to workpiece)
A wire cup brush is a fast way to strip rust, paint, and scale—but only if it actually fits your grinder. One of the most common “wrong order” problems is thread mismatch: M14 (common on many non-U.S. grinders) vs 5/8″-11 (common on many U.S. grinders).
This post breaks down what a 75/100mm M14 steel wire cup brush is used for in welding prep, how to confirm fitment, and what to compare before you buy.
M14 vs 5/8″-11: the fitment problem that wastes time
If you’re in the U.S., a lot of angle grinders use 5/8″-11. Many grinders outside the U.S. (and some imported models) use M14. The brushes are not interchangeable without the correct spindle/adapter—and adapters can introduce runout or safety issues if they’re not designed for the tool and RPM.
Best practice: buy the brush that matches your grinder spindle thread. If you’re unsure, check:
The grinder manual/spec plate
The spindle nut/accessory thread spec
The OEM accessory recommendations for your grinder model
Where this brush fits in a welding workflow
Use a wire cup brush early in the process:
Strip paint/rust/scale back from the weld zone
Degrease if needed (wire brushing doesn’t remove oil)
Fit-up and tack
After welding, brush to remove surface oxidation or prep for paint (as appropriate)
If you’re cleaning stainless or critical surfaces, be careful about cross-contamination (dedicated brushes for dedicated materials).
Safety notes (do not skip)
Wire cups can shed wire and throw debris at high speed.
Safety glasses plus a face shield
Gloves and long sleeves
Keep the brush moving—don’t dig in and stall it
Don’t exceed rated RPM
Replace the brush if it’s out of balance, missing wire bundles, or damaged
Bottom line
The main reason to buy an M14 wire cup brush is simple: your grinder is M14. Confirm the thread standard first, then pick the diameter (75 mm vs 100 mm) based on access and coverage, and match the brush’s RPM rating to your tool.
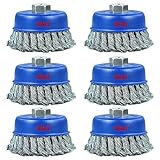
If you do any amount of weld cleanup, mill scale removal, or paint/rust stripping, a knotted wire cup brush is one of the fastest ways to get back to clean metal. The catch is that wire cups can be a bad fit (wrong arbor), run rough, or shed wire if you push them past what they’re built for.
This guide covers what the SALI 6 Pack Wire Cup Brush (4″) is, where it makes sense in a welding workflow, and what to compare before you buy so you don’t end up with a brush that doesn’t fit your grinder or doesn’t match the job.
[SAFETY] Equipped with an internal fixing plate to avoid flying wire breakage during use and ensure consistency.
[High Quality Carbon Steel Wire] Reliable, long life, safe, smooth and easy to use.
[Excellent Design] Innovative spiral knotting and crimping brush structure, thick knot cup design is perfect for heavy-duty polished surface finishes, crimping design provides maximum flexibility and fatigue resistance.
[Wide Range of Uses] High speed and easy to use is ideal for removing rust, corrosion and paint. cleaning metal surfaces, also works well to remove rust, paint and corrosion.
Before proceeding, please wear the necessary protective clothing as well as install the wire cup brush to the correct angle grinder.
Last update on 2026-05-05 / Affiliate links / Images from Amazon Product Advertising API
Performance & use (what it’s for)
A 4-inch twisted/knotted wire cup brush is typically used for:
Removing light-to-moderate rust and paint from steel
Cleaning weld areas before rework (especially around spatter and surface contamination)
Stripping coatings on brackets, frames, and plate before welding
Fast cleanup on structural shapes where a flap disc would be slower
Where it’s not the right tool: precision blending, finish work, or anything where you need controlled material removal. For that, flap discs or grinding wheels are usually the better choice.
What to compare before you buy
Arbor/thread size: confirm your grinder spindle matches the brush’s thread (common is 5/8″-11 in the U.S.).
Brush diameter vs guard clearance: confirm the cup clears your guard and doesn’t contact it under load.
Wire type and aggressiveness: knotted wire is more aggressive than crimped; choose based on how much material you can safely remove.
Max RPM rating: match the brush rating to your grinder’s no-load RPM (do not exceed).
Workpiece risk: wire cups can throw wire and debris—plan PPE and shielding accordingly.
When a wire cup brush beats a flap disc (and when it doesn’t)
Use a wire cup brush when you need speed and you’re removing surface contamination (rust/paint/scale) more than shaping metal. It’s also useful when you want to avoid gouging edges the way a hard wheel can.
Use a flap disc when you need:
Controlled blending on weld toes
Smoother finish before paint
Predictable material removal on edges and corners
Fitment checklist (quick)
Before you click “buy,” confirm:
Your grinder spindle thread (commonly 5/8″-11 in the U.S.; verify your model)
Your guard size and whether it can stay installed during use
Your grinder’s max RPM
The surfaces you’ll hit most (flat plate vs corners vs inside angles)
Safety notes (wire wheels are not forgiving)
Wire cup brushes can throw wire and launch debris. Treat them like a cutting/grinding operation:
Wear safety glasses plus a face shield
Gloves and long sleeves help with wire “needle” injuries
Keep bystanders clear and avoid brushing toward your body
Don’t exceed rated RPM and don’t use a damaged brush
Bottom line
If you want a multi-pack of 4″ knotted wire cup brushes for routine weld prep and cleanup, this SALI set is the right category of tool—just make sure the arbor/thread and RPM rating match your grinder, and use the right PPE every time.
Your MIG welds are porous, and you can see the problem: the shielding gas isn’t covering the weld pool. The arc is exposed, hydrogen from the air contaminates the molten metal, and porosity results. The fix isn’t always a regulator adjustment—it’s often a worn or wrong nozzle. A damaged nozzle restricts gas flow and creates dead zones where the arc isn’t protected. This guide shows you how to diagnose and fix it in 5 minutes.
Key Takeaways
A worn or wrong nozzle restricts gas flow and causes porosity
Copper nozzles conduct heat better and last longer than steel
Nozzle orifice size affects gas coverage (5/8″ is standard for most MIG guns)
Replace nozzles every 100–150 hours of welding or when spatter buildup is visible
Always clean the nozzle before replacing it—spatter can be deceptive
The Problem
A MIG nozzle is a copper tube that directs shielding gas around the arc. Over time, spatter welds itself to the nozzle, restricting the gas opening. When the orifice is blocked or worn, gas coverage becomes inconsistent.
What happens:
Reduced gas flow: Spatter buildup narrows the opening, starving the arc of protection.
Dead zones: Gas doesn’t reach the entire weld pool, leaving unprotected areas.
Hydrogen absorption: Unshielded molten metal absorbs hydrogen from air, creating porosity.
Weak welds: Porosity reduces tensile strength and can fail inspection.
You’ll see:
Porosity clustered in the weld center or edges
Spatter stuck to the nozzle (sometimes thick)
Dull or inconsistent arc appearance
Gas leaks or hissing sounds around the gun
Why It Matters
Porosity is a weld defect. In structural work, it can fail X-ray or ultrasonic inspection. In production, rework costs time and material. A $5 nozzle replacement prevents hours of grinding and rewelding. It also improves weld aesthetics and reduces spatter cleanup.
The Fix
Power down the welder and wait 30 seconds.
Unscrew the nozzle from the gun (usually hand-tight or one-quarter turn).
Inspect the nozzle for spatter buildup, erosion, or damage.
Clean the nozzle with a wire brush or soak it in acetone to remove spatter.
If cleaning doesn’t restore flow, install a new nozzle (hand-tight).
Verify gas flow by listening for a steady hiss when you pull the trigger.
Test on scrap to confirm porosity is gone.
Why This Product Solves It
The Miller Nozzle Replacement – N-A5800C AccuLock S Large Thread-On Nozzle, 5/8″ Orifice, Copper is a direct replacement for Miller AccuLock S guns. It’s made from high-quality copper, which conducts heat efficiently and resists spatter adhesion better than steel. The 5/8″ orifice is standard for most MIG work, providing optimal gas coverage. A pack of 10 ensures you always have replacements ready.
Gun compatibility: AccuLock S guns (Miller, Bernard, and clones). Check your gun nameplate.
Orifice size: 5/8″ is standard. Some specialty guns use 1/2″ or 3/4″. Verify before ordering.
Thread type: Most nozzles are standard thread-on. Older guns may use different connections.
Material: Copper is best for durability. Avoid steel nozzles if possible.
Real-World Use
A pipeline crew was struggling with porosity on 3/8″ structural steel. They’d checked gas pressure (correct), wire feed (smooth), and base metal (clean). The nozzle had 6 months of spatter buildup—so thick it looked like a different part. After cleaning and replacing with a fresh nozzle, porosity disappeared. The old nozzle’s orifice had shrunk from 5/8″ to nearly 1/2″ due to spatter.
Common Mistakes
Ignoring spatter buildup: Clean before you replace. Sometimes cleaning alone fixes the problem.
Using the wrong orifice size: A 1/2″ nozzle won’t provide full coverage. Confirm size before buying.
Not checking gas pressure: A worn nozzle combined with low pressure makes porosity worse. Verify regulator setting.
Over-tightening the nozzle: Hand-tight is correct. Over-tightening can crack the gun.
Forgetting to test: Always run a test bead on scrap before production welding.
Safety Notes
Always follow the manufacturer’s instructions and your shop’s safety procedures. If you’re unsure about fitment or ratings, verify before you buy or install.
Your MIG welds look porous. You’ve checked your gas flow, cleaned the base metal, and verified your settings—but the problem persists. The culprit is often sitting right at the end of your gun: a worn contact tip. A damaged or burnt-back contact tip disrupts the electrical arc and wire feed, creating weak welds and wasted material. This guide walks you through diagnosis and replacement in under 10 minutes.
Key Takeaways
Worn contact tips cause porosity, spatter, and inconsistent arc
Burnback happens when the tip overheats from improper voltage/wire speed ratio or poor contact
Replace tips every 50–100 hours of welding or when you see damage
Always match wire size to tip size (e.g., .035″ wire = .035″ tip)
Stock replacement tips on hand to avoid downtime
The Problem
A contact tip is a small copper tube that carries current to your wire. Over time, it erodes from heat and electrical wear. When the tip is damaged or burnt back, several things go wrong:
Poor electrical contact: The wire doesn’t seat properly, creating resistance and weak arc initiation.
Inconsistent wire feed: A damaged tip can catch or bind the wire, causing feed stutters.
Arc instability: The arc becomes erratic, leading to porosity and spatter.
Weld quality drops: Porosity, lack of fusion, and surface defects become common.
You’ll notice:
Spatter clustering around the weld
Dull, unstable arc
Wire feed hesitation or grinding sounds
Visible burnback or erosion on the tip itself
Why It Matters
A bad weld costs money. Porosity weakens the joint, spatter wastes time cleaning, and rework eats into your schedule. In structural or pressure-vessel work, porosity can fail inspection. Replacing a $2–5 contact tip takes 2 minutes and prevents hours of rework.
The Fix
Power down the welder and wait 30 seconds.
Unscrew the contact tip from the gun nozzle (usually hand-tight or one-quarter turn with a wrench).
Inspect the old tip for burnback, erosion, or debris.
Clean the gun nozzle with a wire brush to remove spatter buildup.
Install the new tip, hand-tight. Don’t over-tighten.
Test the wire feed before welding—pull the trigger briefly to confirm smooth feed.
Strike a test bead on scrap to verify arc stability.
Why This Product Solves It
The S19391-1 Lincoln Style Contact Tip .035 – Arc Weld by Masterweld Pack of (25) is a direct replacement for Lincoln-style MIG guns. It’s made from high-quality copper, ensuring reliable electrical conductivity and durability. At .035″ bore, it matches the most common MIG wire size. A pack of 25 means you’ll always have spares on hand, eliminating downtime from tip searches.
Wire size: Confirm your wire diameter (.023″, .030″, .035″, .045″). Tip size must match.
Gun compatibility: Lincoln-style guns (most common). If unsure, check your gun nameplate or contact ArcWeld support.
Thread pitch: Most tips are standard, but some older guns differ. Verify fitment before ordering.
Real-World Use
A fabrication shop running 8-hour shifts was seeing porosity in every third weld. The operator had replaced the liner and checked gas—but hadn’t changed the contact tip in 3 months. After swapping in fresh tips, arc stability returned immediately, and porosity dropped to near zero. Cost: $3 per tip. Downtime saved: 2 hours per week.
Common Mistakes
Using the wrong tip size: A .045″ tip won’t work with .035″ wire. Confirm before installing.
Over-tightening the tip: Hand-tight is correct. Over-tightening can crack the nozzle.
Not cleaning the nozzle: Spatter buildup around the tip restricts gas flow and causes porosity.
Ignoring the liner: A worn liner can damage a new tip. If tips fail quickly, check the liner next.
Skipping the test bead: Always verify arc and feed before production welding.
Safety Notes
Always follow the manufacturer’s instructions and your shop’s safety procedures. If you’re unsure about fitment or ratings, verify before you buy or install.
Your electrode sticks to the workpiece, the arc dies, and you’re left wrestling with the rod. This is one of the most common stick welding problems—and it’s fixable. Low amperage, poor ground connection, and contaminated metal are the usual culprits. Here’s how to diagnose and fix it fast.
Key Takeaways
Low amperage is the #1 cause of electrode sticking ($0 fix—just adjust the dial)
Poor ground clamp connection prevents proper current flow ($15–$40 for a new clamp)
Dirty or wet electrodes create weak arc initiation ($5–$15 for fresh rods)
Bad workpiece prep (rust, mill scale) makes arc unstable ($0–$20 for cleaning tools)
Fix time: 5–15 minutes for most issues
Quick Diagnosis
What you’re seeing:
Rod sticks immediately after striking
Arc dies or becomes very weak
Difficulty pulling the rod away from the workpiece
Electrode melts back into the holder
Likely causes (ranked by frequency):
Amperage set too low
Ground clamp loose or corroded
Electrode damp or old
Workpiece dirty (rust, paint, mill scale)
Worn electrode holder (weak jaw grip)
Safety Notes
Arc flash hazard: Always wear a helmet with proper shade (ANSI Z87.1 compliant). Sticking electrodes often cause sudden arc flare-ups.
Fume exposure: Stick welding produces heavy fumes. Ensure adequate ventilation or use a respirator (ANSI Z136.1 rated for welding fumes).
Electrical shock: Disconnect power before inspecting the electrode holder or ground clamp.
Hot metal: Electrodes and workpiece are extremely hot. Use insulated gloves and let parts cool before handling.
Step-by-Step Troubleshooting
Step 1: Check Your Amperage (FREE)
Sticking almost always means you’re running too cold.
Increase amperage by 10–15 amps and try again.
Why: Low current can’t sustain a stable arc. The electrode cools too quickly and bonds to the workpiece.
Rule of thumb: For 1/8″ (3.2mm) 7018 rod, use 90–110A. For 5/32″ (4mm), use 120–150A.
Step 2: Inspect Your Ground Clamp ($0–$40)
Check that the ground clamp is tight on clean, bare metal.
If the clamp is loose, tighten it. If it’s corroded, clean it with a wire brush or replace it.
Why: A loose or corroded ground connection increases resistance, reducing current flow to the workpiece.
What to check:
Is the clamp jaw making full contact?
Is the cable connection tight at the clamp?
Is the workpiece surface clean where the clamp sits?
Step 3: Dry Your Electrodes ($5–$15)
If your rods have been exposed to humidity, they may be damp.
Store them in a dry rod oven or sealed container.
If you don’t have an oven, use fresh rods from a sealed package.
Why: Moisture in the flux coating weakens the arc and makes initiation difficult.
Step 4: Clean Your Workpiece ($0–$20)
Remove rust, mill scale, paint, or dirt with a wire brush, wire wheel, or grinding stone.
Clean a 2–3 inch area around your intended weld.
Why: Contamination blocks current flow and creates a weak, unstable arc.
Step 5: Check Your Electrode Holder ($15–$50)
Inspect the jaw for wear, corrosion, or damage.
If the jaw is worn, the clamp won’t grip the electrode firmly, causing poor contact.
Replace if necessary.
Fix Options (Ranked)
1. Adjustment (FREE)
Increase amperage by 10–15 amps.
Tighten ground clamp.
Clean workpiece.
When to use: First troubleshooting step. Works 70% of the time.
2. Consumable Change (~$10–$50)
Replace old or damp electrodes with fresh rods.
Replace corroded ground clamp.
When to use: If rods are old or ground clamp is visibly corroded.
3. Part Replacement (~$15–$50)
Replace worn electrode holder.
Replace damaged ground clamp.
When to use: If jaw is cracked, worn, or clamp is beyond cleaning.
Recommended Fix: Upgrade Your Electrode Holder
A quality electrode holder ensures consistent jaw grip and reliable current flow. The YESWELDER Welding Electrode Holder is a solid upgrade that prevents many sticking issues caused by poor contact.
Why it works:
Pure copper construction for superior conductivity.
Heavy-duty jaw with strong bite force (300A rated).
Insulated handle stays cool during extended use.
Durable design resists wear and corrosion.
When to use it:
Your current holder is worn or corroded.
You’re upgrading from a cheap or damaged stinger.
You want consistent, reliable arc initiation.
When NOT to use it:
Your current holder is brand new and working fine.
The problem is low amperage or dirty workpiece (fix those first).
PURE COPPER: Our clamp has a higher copper content than others. Therefore, better conductivity, safer and more improved cable connection.
MAXIMUM AMPERAGE:Up to 300A.
COMFORTABLE OPERATION: Great for most ARC, Stick welding jobs. Easy to operate at a newly designed level for good hand clearance and better hold.
SAFETY DESIGN: Heat resistant handle, made of arc-resistant insulation and impact resistant material.
METHOD: This 300A welding electrode holder connects to the welding cable and conducts the welding current to the electrode. The insulated handle is used to guide the electrode over the weld joint and feed the electrode over the weld joint and feed the electrode into the weld puddle as it is consumed.
Last update on 2026-05-05 / Affiliate links / Images from Amazon Product Advertising API
Comparable Options
Lincoln Electric Industrial 200 Amp Electrode Holder – Premium option with copper alloy jaw and ergonomic handle. Best for professional/production work. ~$27.
Reboot 300AMP Electrode Holder – Budget-friendly, heavy-duty. Good for occasional use. ~$15–$18.
Common Mistakes
Running too cold: Beginners often fear high amperage. Low current is the #1 cause of sticking. Increase heat.
Ignoring ground clamp corrosion: A corroded clamp looks fine but kills conductivity. Clean or replace it.
Using old, damp rods: Moisture in the flux weakens the arc. Store rods in a dry oven or sealed container.
Not cleaning the workpiece: Rust and mill scale block current. Always brush the area before welding.
Striking too slowly: Strike the rod quickly and confidently. A hesitant strike can cause sticking. Move the rod away immediately after arc initiation.
FAQ (Snippet-Optimized)
Q: Why does my electrode stick even at high amperage? A: Check your ground clamp. A loose or corroded clamp prevents current flow, regardless of amperage. Clean and tighten it.
Q: Can damp electrodes cause sticking? A: Yes. Moisture in the flux coating weakens arc initiation. Store rods in a dry oven or sealed container.
Q: How do I know if my ground clamp is bad? A: Look for corrosion, loose connections, or a worn jaw. If the clamp won’t tighten or the jaw is cracked, replace it.
Q: Is sticking dangerous? A: Yes. A stuck electrode can cause sudden arc flare-ups and spatter. Always wear proper PPE and disconnect power if you need to free a stuck rod.
Q: What’s the best amperage for 1/8″ 7018 rod? A: 90–110A. Check your rod box for the manufacturer’s recommendation—it varies by brand and coating.